
Best Way to Clean Tile Floors: Pro Guide 2026
Discover the best way to clean tile floors. Get pro tips for ceramic, porcelain & stone. Achieve a lasting shine with our step-by-step guide.
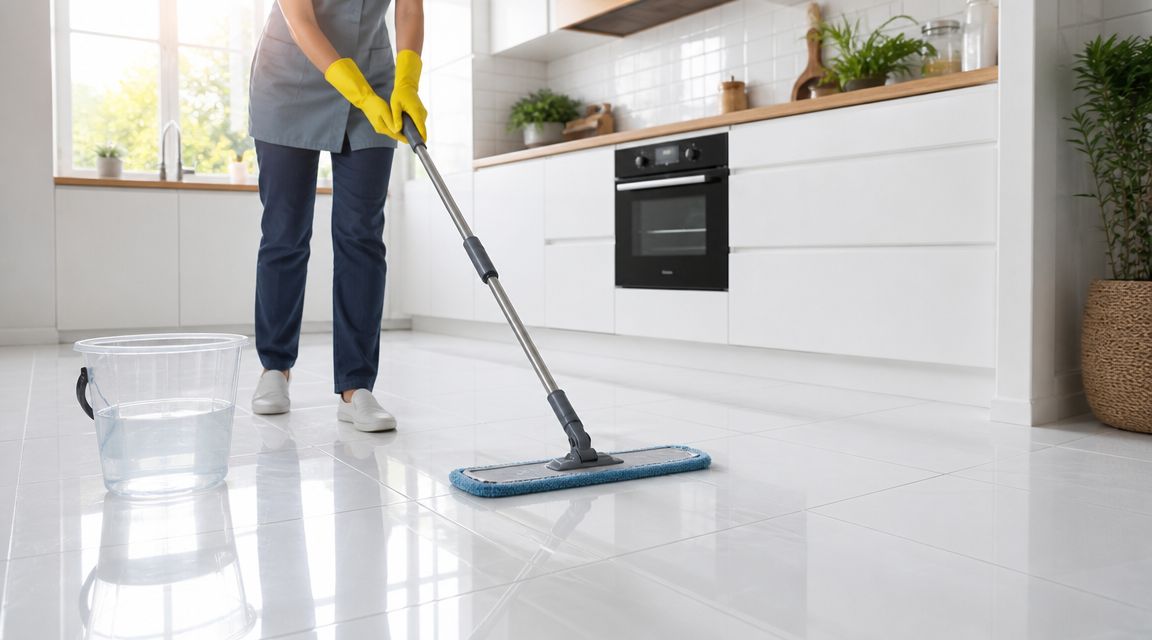
You've probably had this happen. You mop the tile floor, let it dry, and somehow it still looks cloudy. The grout is darker than it should be, footprints show up fast, and the whole floor feels less clean than the effort deserved.
That's usually not a product problem. It's a method problem.
In homes across Wayland, Newton, Needham, Wellesley, and Weston, the biggest issue isn't that people aren't cleaning tile floors. It's that they're cleaning ceramic, porcelain, and natural stone as if they all behave the same way. They don't. A glazed porcelain kitchen floor can handle a routine that would be risky on marble. A sponge mop that seems harmless can make grout look worse. A steam mop can be useful in some situations, but it isn't the universal answer the internet makes it out to be.
The best way to clean tile floors is simple once you match the process to the material, remove grit before you mop, control how much water you use, and stop pushing dirty solution back into the floor.
Table of Contents
- How to tell when regular cleaning isn't enough
- How to deep clean tile without making grout worse
- Why grout keeps looking dirty
- The trade-off homeowners miss with deep cleaning
- What goes wrong most often
- Steam mops need more judgment than people think
- The mistake behind the mistake
- Should I sweep or mop first
- How often should tile floors be cleaned
- What's the best mop for tile floors
- Can I use vinegar on tile floors
- Why does my tile floor still look dull after mopping
- Is steam cleaning safe for tile
- How do I keep grout from getting dark so fast
Getting Beyond the Mop and Bucket
A lot of tile floors look dirty even after they've been cleaned because the soil was never fully removed. It got moved around.
That's common in Boston-area homes where people track in sand, salt, grit, and fine dust through entryways and kitchens. A homeowner in Weston might mop every weekend and still feel frustrated because the floor dries with streaks. A family in Wellesley might focus on the tile surface while the grout keeps holding onto the grime. The floor isn't failing. The cleaning routine is.
The biggest shift is this: there isn't one best way to clean tile floors for every floor.
Ceramic, porcelain, and natural stone need different chemistry and different levels of caution. Glazed tile is usually more forgiving. Unsealed or porous materials aren't. Grout adds another layer because it absorbs more than the tile around it.
Practical rule: Clean the floor based on what it's made of, not based on whatever cleaner or gadget is trending.
Homes in the Boston suburbs also deal with practical wear patterns. Mudroom tile gets hammered. Bathroom tile collects residue differently than a kitchen floor. Entry tile near a garage door needs more dry soil removal than is commonly realized. The right method has to fit real life, not a showroom.
The approach that works consistently is straightforward:
- Identify the tile material before picking a cleaner
- Remove grit first so you don't grind it into the finish
- Use the least aggressive cleaner that will do the job
- Control moisture so grout and edges don't stay wet
- Dry the floor instead of letting residue settle back down
That's the difference between a floor that looks cleaned and one that looks sharp when the light hits it.
First Know Your Tile Matching Cleaners to Materials
A tile floor in Newton can look sturdy enough for any cleaner on the shelf and still get damaged by the wrong one. We see that a lot on service calls. The problem usually is not dirt alone. It is a mismatch between the tile material, the cleaner, and how much water the floor is being asked to handle.
Sunny Day Pro Services installs tile and cleans it, so we get to see both sides of the problem. The same floor that looks great right after installation can lose its finish, haze over, or develop dingy grout because the maintenance method never matched the material. That is why blanket advice like “just use a steam mop” causes trouble. Steam can be fine on some surfaces and a bad choice on others, especially around grout lines, stone, older sealers, and tile with movement or moisture issues underneath.
Why tile type changes the cleaning method
Ceramic tile is usually straightforward. Most residential ceramic is glazed, so the tile face does not absorb much. In practice, that means the tile itself often cleans up well with mild chemistry. The grout is usually what holds the stain and makes the whole floor look dirty.
Porcelain tile needs a closer look. Glazed porcelain is dense and fairly forgiving, but unglazed or textured porcelain is different. It traps fine soil in the surface texture, especially in Boston-area mudrooms, basement entries, and back hallways where sand and winter grit get ground in. On those floors, stronger technique matters more than stronger soap.
Natural stone needs the most caution. Marble, granite, slate, and travertine should not be treated like ceramic with a different label. Stone can react poorly to acidic cleaners, heavy residue, aggressive scrubbing, and too much moisture left sitting on the surface or in the grout. If you are working on marble, read our guide on how to clean marble tile without dulling the finish before testing a random floor cleaner.
One bad cleaning rarely ruins a floor. Repeated cleaning with the wrong product is what dulls polished stone, leaves porcelain hazy, weakens sealer performance, and turns grout darker over time.
Tile cleaning cheat sheet
| Tile Type | Recommended Cleaner | What to Avoid | Pro Tip |
|---|---|---|---|
| Ceramic tile | Mild detergent or properly diluted tile cleaner | Harsh acids, abrasive powders, dirty mop water | Glazed ceramic usually responds better to clean rinse water and proper drying than to stronger chemicals. |
| Glazed porcelain | Mild detergent or properly diluted cleaner, followed by a rinse and dry buff | Leaving cleaner to dry on the surface, overconcentrated solutions | Glossy porcelain shows film fast. If the floor looks worse after mopping, residue is usually the reason. |
| Unglazed or textured porcelain | Tile-safe cleaner with agitation from a microfiber pad or soft scrub tool | Waxy products, sponge mops, heavy soap residue | Textured porcelain needs shorter passes, more frequent rinsing, and better soil pickup from the low spots. |
| Marble | pH-neutral stone cleaner with controlled moisture | Vinegar, lemon, acidic bathroom cleaners, abrasive pads | Polished marble loses clarity faster than many homeowners expect. The shine does not protect it from chemical etching. |
| Granite | pH-neutral stone-safe cleaner | Acidic cleaners and soaking the floor | The stone is often tougher than the grout and sealer around it. Clean for the weakest material on the floor, not the hardest one. |
| Slate and other natural stone | Stone-safe pH-neutral cleaner | Acids, residue-heavy products, over-wetting uneven surfaces | Textured stone can hold cleaner in pits and clefts. If it is not rinsed and dried well, the floor starts looking flat and dusty even when it is clean. |
A simple way to judge the floor is to ask two questions. Is the surface glazed or porous? Is the texture smooth or does it trap soil?
Glazed, non-porous tile usually needs controlled soap use and strong residue removal. Stone, porous tile, and textured finishes need more caution with chemistry and more attention to moisture. That trade-off matters. Push too hard for cleaning power and you can shorten the life of the finish. Go too gentle on a textured porcelain mudroom floor and you leave the soil behind.
The Everyday and Weekly Cleaning Routine That Actually Works
By Friday night, the kitchen tile in a busy Boston suburb home usually tells the whole story. Fine grit by the back door, cooking film near the stove, and mop marks from a quick pass that spread soil instead of removing it. The fix is not more cleaner or a hotter tool. It is a repeatable routine that matches the floor and keeps dirty water off the tile.
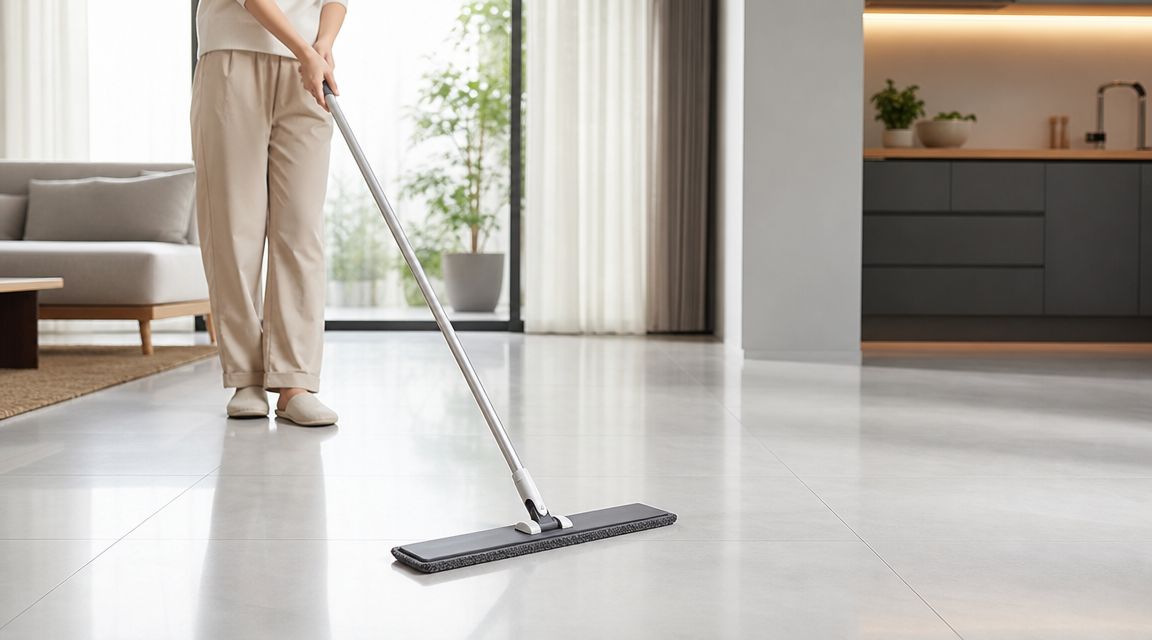
The routine we use most often
We start dry every time. On client homes, that step does more for the final look than the mop does.
Here's the method:
Vacuum or dust mop first
Use a hard-floor vacuum or microfiber dust mop to pull up grit, pet hair, and the fine dust that settles into grout lines. In entryways and kitchens, skipping this step turns loose soil into a muddy film.Use a light mix of the right cleaner
The goal is to suspend soil, not coat the floor. Ceramic and porcelain usually do well with a mild tile cleaner. Stone needs a stone-safe pH-neutral product. If the floor feels sticky after it dries, the mix is too strong or too much product stayed behind.Mop in small sections
Work an area you can control before the solution dries on the surface. On textured porcelain, that usually means smaller sections because the surface holds more soil. On smooth glazed tile, you can move a little faster.Keep rinse water separate
A two-bucket setup is still one of the simplest ways to get a cleaner result. One bucket for solution, one for rinsing the mop. If the rinse water turns gray early, change it early.Dry the floor as you go
Use a clean microfiber towel or dry flat mop pad. This is the step that cuts haze on dark tile, polished porcelain, and glossy finishes.
The floor should look clearer as you move across the room. If it starts looking duller, the mop head is loaded with soil or the cleaner is leaving residue.
Steam mops get recommended for almost every tile floor online. We do not treat them as a universal answer. They can be useful on some ceramic and porcelain floors, but they are a poor default for natural stone, older grout, loose tiles, and floors with failing sealer. Heat and moisture still need control.
A realistic cleaning schedule for busy homes
One schedule does not fit every tile floor. A mudroom in Newton, a family kitchen in Needham, and a guest bath in Weston wear very differently, even if the tile looks similar.
A workable routine looks like this:
- High-traffic areas: dry clean several times a week and damp mop as needed
- Average-use rooms: dry clean weekly and mop when soil or film starts showing
- Spill-prone areas: spot clean right away so residue does not settle into grout or textured tile
That is the trade-off homeowners miss. Mop too often with too much solution and the floor loses clarity. Wait too long in a busy area and grit settles into texture and grout joints, which makes the next cleaning harder.
If you want to cut cleaning time without rushing the floor care steps that matter, this guide on how to clean house fast fits well with a realistic tile routine.
For homeowners who do not want to stay on top of the cycle of dry soil removal, section mopping, and towel drying, Sunny Day Pro Services offers recurring home cleaning that includes routine floor care as part of normal maintenance.
Deep Cleaning Tile and Restoring Grout
A tile floor usually tells on itself after a while. In a Brookline kitchen or a Lexington mudroom, the tile may still look decent from across the room, but the grout turns dark, the surface loses its color, and traffic lanes start standing out. At that point, regular maintenance is no longer enough. The floor needs a controlled reset.
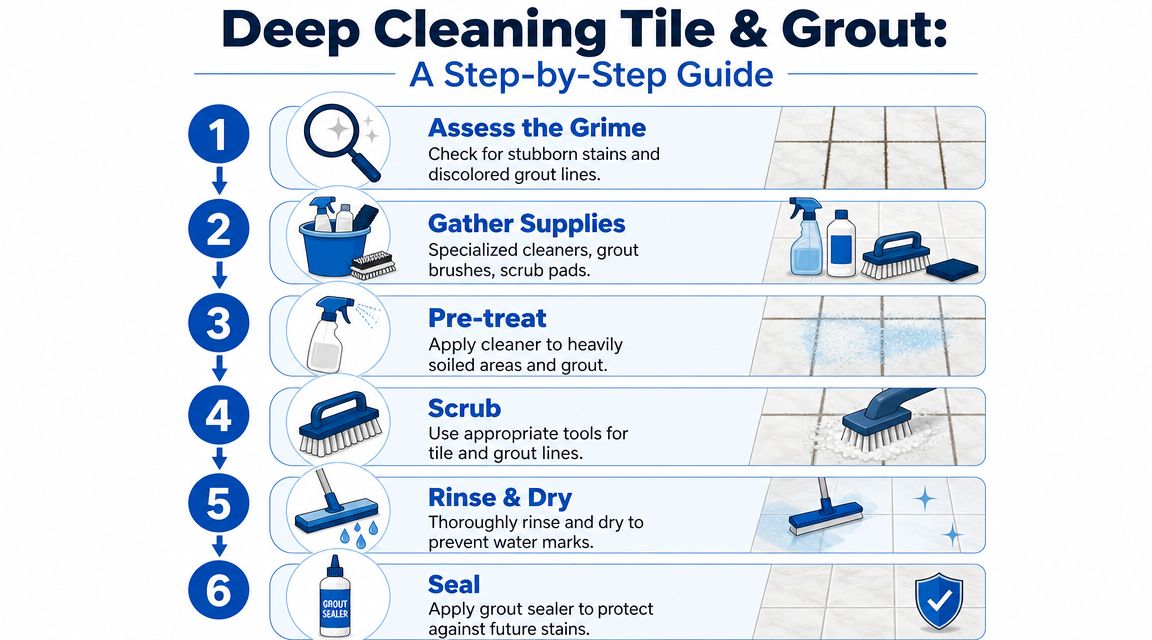
How to tell when regular cleaning isn't enough
Deep cleaning makes sense when the floor has buildup, not just loose dirt. The signs are usually easy to spot once you know what to look for:
- A hazy film on the tile after the floor dries
- Grout lines that stay dark even after careful mopping
- A sticky feel from cleaner residue, cooking oils, or tracked-in grime
- Noticeable traffic paths where busy areas look different from protected spots
- Soil packed into edges, corners, or texture that a mop keeps missing
In the homes we clean, this level of buildup usually shows up after months of routine use, faster in entryways, kitchens, and floors with textured tile or light grout. The right timing depends on wear, the tile surface, and how the floor has been cleaned up to this point.
How to deep clean tile without making grout worse
The method matters as much as the cleaner. Ceramic and porcelain can usually handle more agitation than natural stone. Grout often cannot. That is why the best deep-cleaning approach is controlled, section by section, with full rinsing at the end.
Use this process:
Vacuum the floor thoroughly
Hit edges, corners, and grout lines first. Any dry grit left behind turns into muddy residue once cleaner hits it.Choose a cleaner that matches the tile
Use a pH-neutral product for stone. For ceramic or porcelain, use a tile-safe cleaner suited to grease, soap film, or general soil. Avoid grabbing one harsh product for every floor. That shortcut causes damage.Work in small sections
Apply enough solution to wet the area evenly. Do not flood the floor. Excess water can soak grout joints and slow drying.Let the cleaner sit briefly
Dwell time loosens buildup better than hard scrubbing. Keep an eye on it and do not let it dry on the tile.Agitate with the right tool
Use a microfiber pad, soft deck brush, or grout brush based on the surface. On stone, go gentler. On textured porcelain, a brush often cleans better than a mop head.Rinse with clean water
This is the step many homeowners skip. If the loosened soil and cleaner stay on the floor, the haze stays too.Dry the section
Towel dry or buff with a clean microfiber pad. That helps prevent streaks and shows you whether the floor is clean or just wet.
I see the same mistake all the time. People scrub hard, feel like the job is done, and leave the slurry behind. Then the floor dries dull again.
Why grout keeps looking dirty
Grout is the weak point visually and functionally. It is more porous than tile, it grabs fine soil, and it holds onto residue from dirty mop water, cooking grease, bath products, and cleaning solution that was never fully rinsed out.
A sponge mop often makes this worse because it pushes dirty water across the surface and into the joints instead of lifting it away. For grout, direct work gets better results:
- Apply cleaner to the grout lines, not just the tile face
- Use a dedicated grout brush or narrow cleaning brush
- Scrub with steady pressure instead of aggressive tools that can chew up the joint
- Rinse more than once if needed
- Let the floor dry completely before judging the result
If grout still looks blotchy after proper cleaning, the problem may not be dirt alone. Old staining, worn grout, missing sealer, or previous damage can all leave grout looking uneven. In those cases, more scrubbing does not fix the issue and can make it worse.
The trade-off homeowners miss with deep cleaning
More force is not better. Better matching is better.
Porcelain often responds well to a stronger mechanical clean because the surface is dense. Natural stone needs a much safer approach, especially marble, travertine, and limestone. We handle those floors very differently at Sunny Day Pro Services because we also see what happens during repair and replacement. Tiles that were installed well can still be damaged by the wrong chemistry, too much water, or repeated steam and aggressive brushing.
If a floor still looks worn after a proper deep clean and rinse, stop there and reassess. The floor may need sealing, grout repair, stain treatment, or professional restoration rather than another round of scrubbing.
Common Tile Cleaning Mistakes and How to Avoid Them
A floor can look clean right after mopping and still be headed in the wrong direction. We see this in Boston-area homes all the time. The tile loses its finish, grout darkens around traffic paths, and homeowners end up cleaning more often because the method is working against the floor.
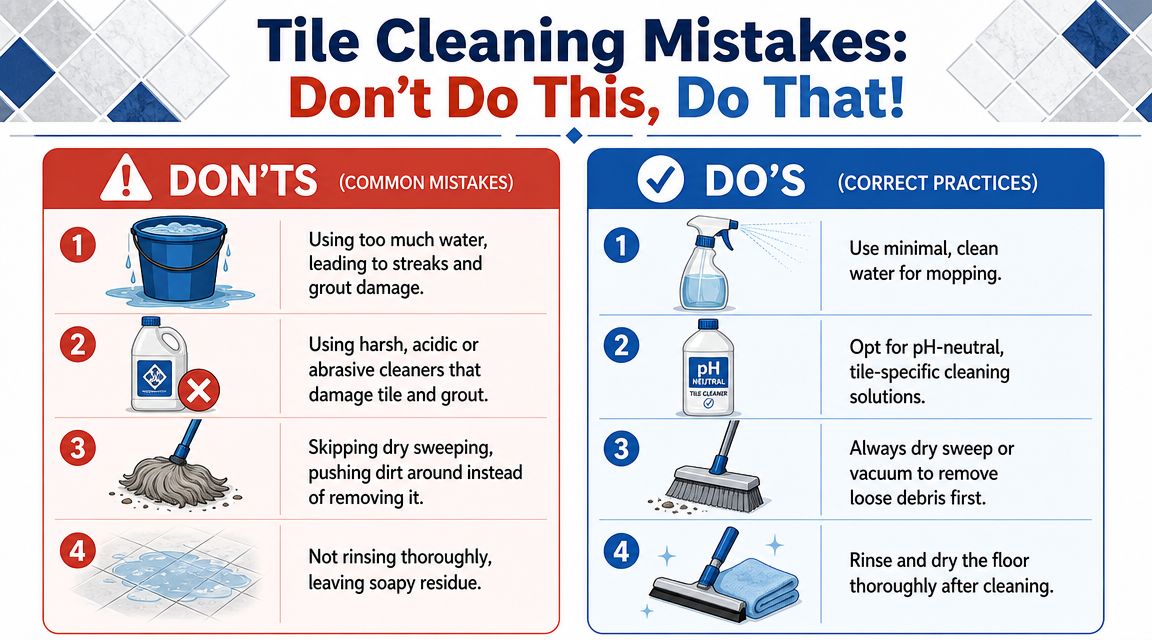
What goes wrong most often
Some mistakes are obvious. Others look harmless for months, then show up as haze, dullness, stubborn grout staining, or sealer failure.
Using vinegar on stone
This is the mistake that does the most expensive damage. Marble, travertine, limestone, and other natural stone need a pH-neutral cleaner made for stone. Acidic products can dull the finish, etch the surface, and shorten the life of the sealer. On ceramic or porcelain, vinegar may be tolerated in some situations. On stone, it is a bad bet.
Over-wetting the floor
A soaked mop leaves dirty water in grout lines, corners, and low spots in textured tile. That slows drying and often leaves the floor looking streaky after all the work you just did.
Skipping the vacuum or dry dusting step
Grit is what scratches finishes and turns mopping water muddy fast. On client homes, we remove dry soil first because wet cleaning loose debris just spreads it around.
Using the same bucket of water for the whole floor
Once the rinse water is cloudy, it stops rinsing. It starts redepositing soil. This is one reason a floor can feel sticky or look filmy even after repeated mopping.
Using the wrong brush or pad
Stiff tools have their place, but not on every surface. Aggressive scrub brushes can rough up grout joints and leave fine scratching on polished tile or stone. Softer tools take longer, but they are often the safer choice.
Letting spills sit too long
Oil, coffee, juice, and bath residue sink into grout faster than many homeowners expect, especially if the grout is older or the sealer has worn off.
One quick cleanup saves a lot of scrubbing later.
Steam mops need more judgment than people think
Steam mops get recommended as a universal fix for tile floors. That advice is too broad.
On some sealed porcelain or ceramic floors, steam can be fine in moderation. On natural stone, older grout, failing sealer, or mixed-material floors, it can create problems that do not show up right away. We are careful with steam at Sunny Day Pro Services because we also handle tile installation and repair work. We get to see the aftereffects. Loose grout, moisture pushed into weak joints, and stone finishes that lose clarity over time.
The safer standard is simple. Match the cleaning method to the tile and the condition of the floor.
A practical way to judge steam use:
- Sometimes acceptable on well-sealed ceramic or porcelain
- Riskier on natural stone and any floor with questionable sealer
- Poor choice for unsealed grout, cracked grout, or mixed tile-and-stone layouts
- Never a substitute for vacuuming first and rinsing properly
Steam also gets overused because it feels productive. Heat does not remove gritty soil by itself, and it does not fix detergent residue already left in the floor.
The mistake behind the mistake
In most homes, the actual problem is not laziness. It is using one cleaning method for every tile floor in the house.
That approach causes trouble fast. A product that works well on dense porcelain can be wrong for slate. A tool that helps on textured ceramic can be too aggressive for polished stone. The best results come from treating tile by material, surface finish, grout condition, and how the floor is used.
If the floor keeps looking dull or dirty no matter what you try, the issue may be buildup, worn sealer, or grout problems rather than simple surface soil. That is usually the point where homeowners start looking into professional deep cleaning services for tile and grout instead of doing another round with the same mop and cleaner.
When to DIY vs When to Call a Professional
Most homeowners can handle regular tile maintenance just fine. Dry soil removal, careful mopping, and small spot treatments are all reasonable DIY work if the floor is in decent condition.
Jobs you can usually handle yourself
DIY makes sense when the issue is routine buildup, a recent spill, or normal traffic soil.
You can usually stay on top of it if:
- The tile still responds to normal cleaning
- The grout is slightly dingy but not heavily stained
- There's no visible damage such as chipping, etching, or crumbling grout
- The floor is a manageable size and you can clean it in sections without rushing
When it makes sense to bring in help
Call a professional when the floor needs restoration, not just cleaning.
That includes:
- Grout that stays dark after targeted cleaning
- A haze or film that keeps coming back
- Natural stone with dull spots or surface damage
- Post-construction dust and residue
- Large tile areas where DIY cleaning turns into an all-day project
- Cracking or missing grout, which may be a repair issue rather than a cleaning issue
For homeowners comparing service options, this guide to deep cleaning services near me can help clarify what's included and when deeper floor work is worth it.
In busy households, calling a pro isn't giving up. It's often the smarter move when the goal is to protect the floor, save time, and avoid using the wrong chemistry on an expensive surface.
Frequently Asked Questions About Cleaning Tile Floors
Should I sweep or mop first
Sweep or vacuum first. Dry grit is abrasive, and wetting it before removal can scratch tile and leave muddy residue behind.
How often should tile floors be cleaned
A practical maintenance rhythm is to sweep or vacuum at least weekly, mop regularly based on traffic, and give grout occasional attention. Kitchens, bathrooms, and entryways usually need more frequent care than low-use spaces.
What's the best mop for tile floors
A flat microfiber mop is usually the safest and most controllable choice for routine cleaning. It uses less water, rinses more cleanly, and doesn't push as much dirty water into grout as a sponge mop.
Can I use vinegar on tile floors
It depends on the tile. Acidic cleaners are discouraged on natural stone, so vinegar is not a safe default across all tile floors. If you aren't completely sure what material you have, don't guess.
Why does my tile floor still look dull after mopping
Usually because of one of three things: dirty water, too much cleaner, or residue left behind on the floor. In some homes, the grout is also carrying most of the visible discoloration.
Is steam cleaning safe for tile
Sometimes, but not always. Steam isn't the best choice for every tile floor, especially where sealers, grout condition, or natural stone are concerns.
How do I keep grout from getting dark so fast
Remove dry soil consistently, clean spills quickly, and don't over-wet the floor. Most grout problems get worse when dirt and moisture are allowed to sit.
If your tile floors still look dull after routine cleaning, or your grout lines never seem to come back, Sunny Day Pro Services can help you figure out whether the problem is residue, embedded soil, worn grout, or a material-specific cleaning issue. We serve homeowners across the Boston suburbs with practical cleaning help and tile expertise that fits real homes, not generic advice.

