
Broken Floor Tile Replacement: How to Do It Right
Plan your broken floor tile replacement with step-by-step DIY guidance, tool lists, safety tips, and advice on when to call a Massachusetts pro.
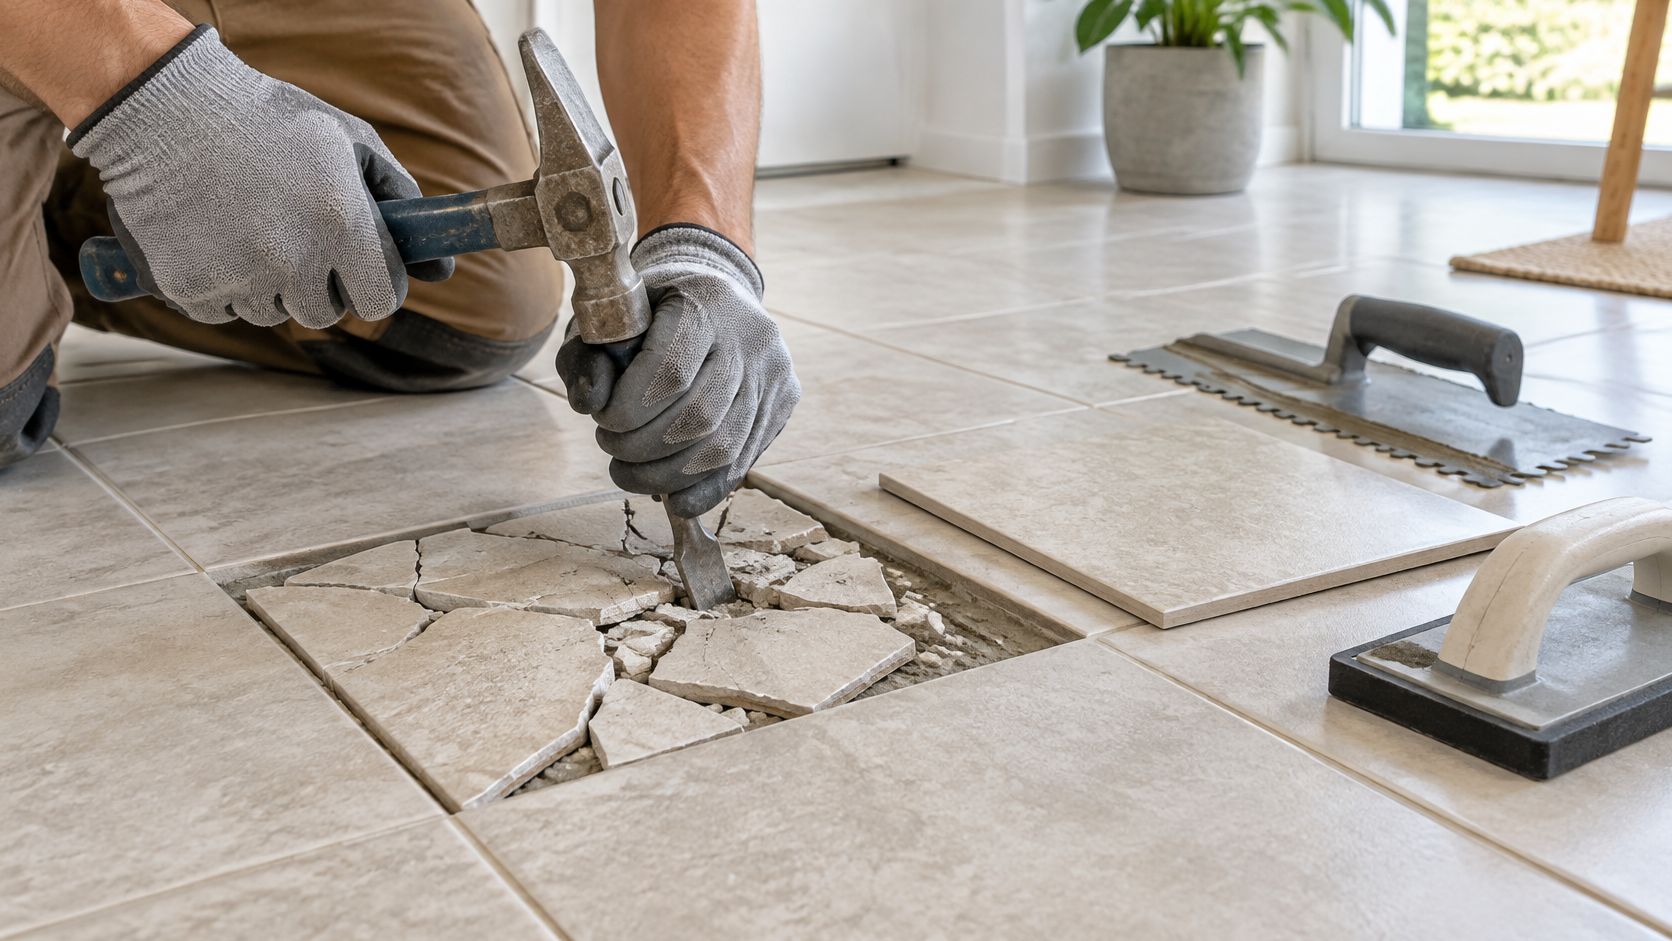
You drop a cast-iron skillet by the sink, hear a pop, and find a star in the floor tile. Or a line shows up in the entry that was not there before the last freeze. Broken floor tile replacement can be a Saturday job, and sometimes it is. The piece beside it may already be loose, the grout near the tub may be damp, or the tile you need may have left the showroom years ago. Pulling the wrong piece first is how a one-tile fix becomes a torn-up kitchen.
Table of Contents
Diagnose the Crack Before You Pull Anything
A cracked tile on an ordinary morning is not automatically a one-tile job. The pattern tells you whether the break is local or a message from the floor under it.
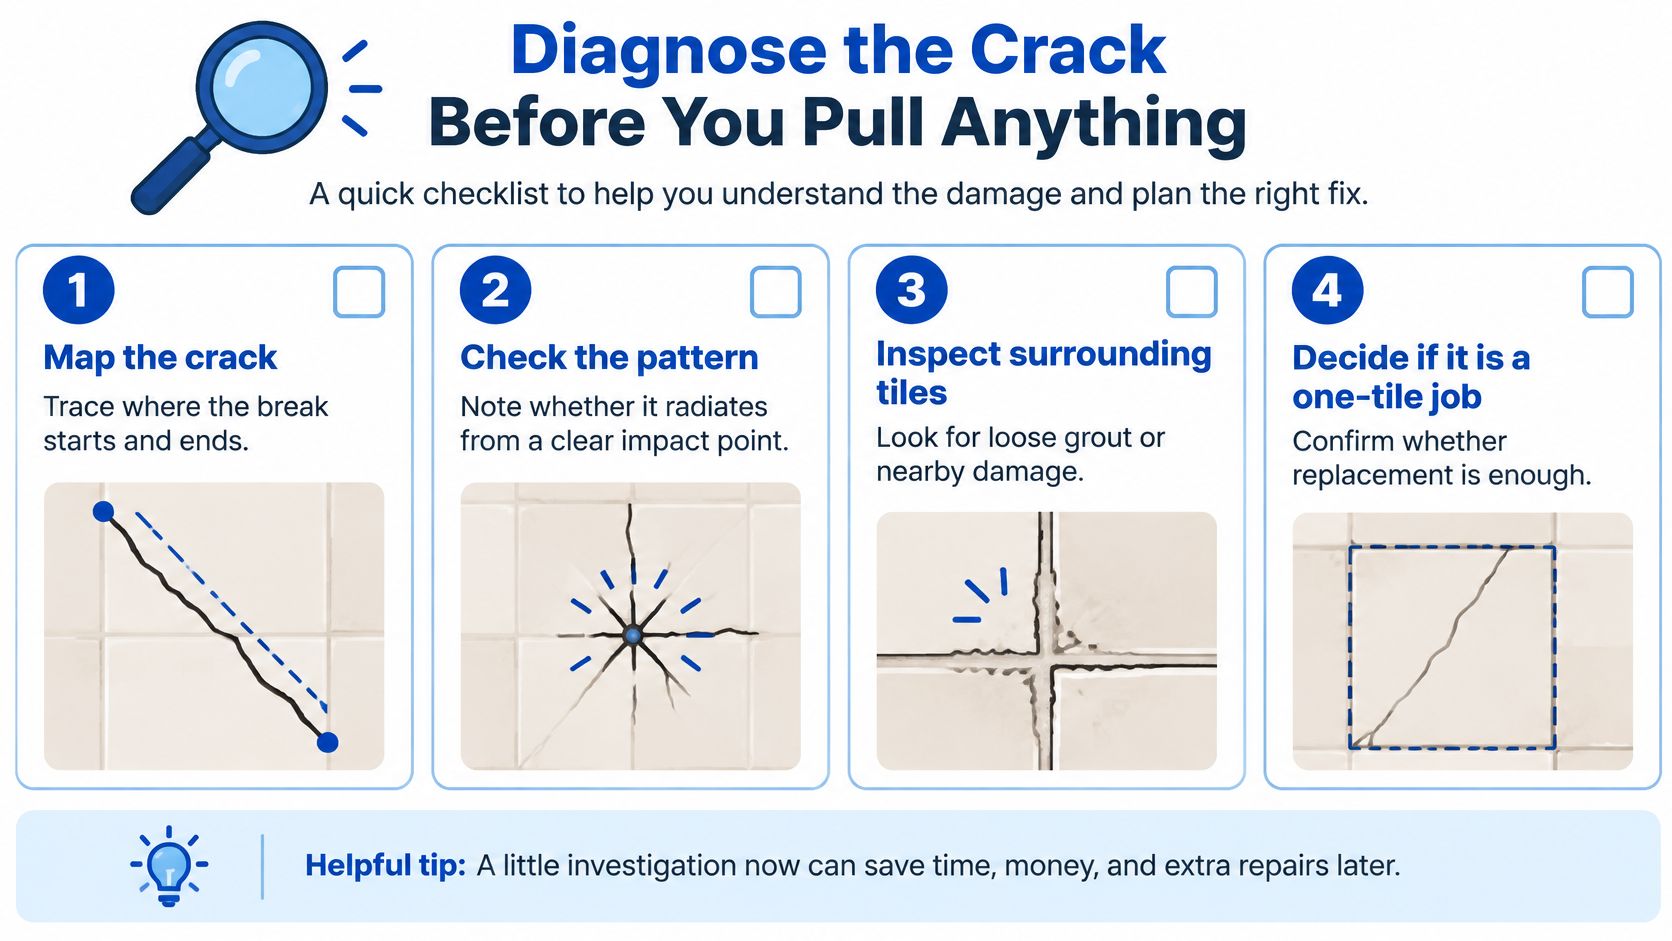
Work with a pencil and a phone photo before any tool comes out.
- Map the crack. Trace where it starts and ends. A fracture that radiates from a clear impact, the mark a dropped pan leaves, can support a single-tile swap.
- Check the pattern. A line that steps across several tiles, or that tracks a slab joint or a control joint, is not impact damage.
- Inspect surrounding tiles. Press neighbors with your hand and tap them with a screwdriver handle. Solid tile rings. A hollow sound, rocking, or loose grout means the bond has already failed past the broken face.
- Watch for water and change. Staining, a soft spot, darkened grout, or a musty smell by a bathroom or dishwasher points to moisture. Photograph the area and check again over two or three weeks to see if it spreads.
What the pattern is telling you
Replacing only the visible tile when waterproofing or substrate movement has failed can lead to repeat failure within a year or two, which is why the crack pattern matters more than the tile itself, according to tile repair versus replacement guidance.
Practical rule: If the crack ignores the grout and holds a straight line, stop. A new tile will not hold a base that is still moving.
Older floors in Massachusetts
Older additions, seasonal moisture swings, and mixed wood and concrete subfloors around Wayland, Newton, and Wellesley make a "simple" swap easy to misread. A tile that bounces near the fridge, or one sitting over a cracked control joint, needs a substrate look before demolition. Keep going only when the break is isolated, the neighbors are tight, and the area is dry.
Gather the Right Tools and Safety Gear
Once the crack looks like a single hit, set the kit up before the first cut. Hunting for a bit halfway through is how neighboring edges get chipped.
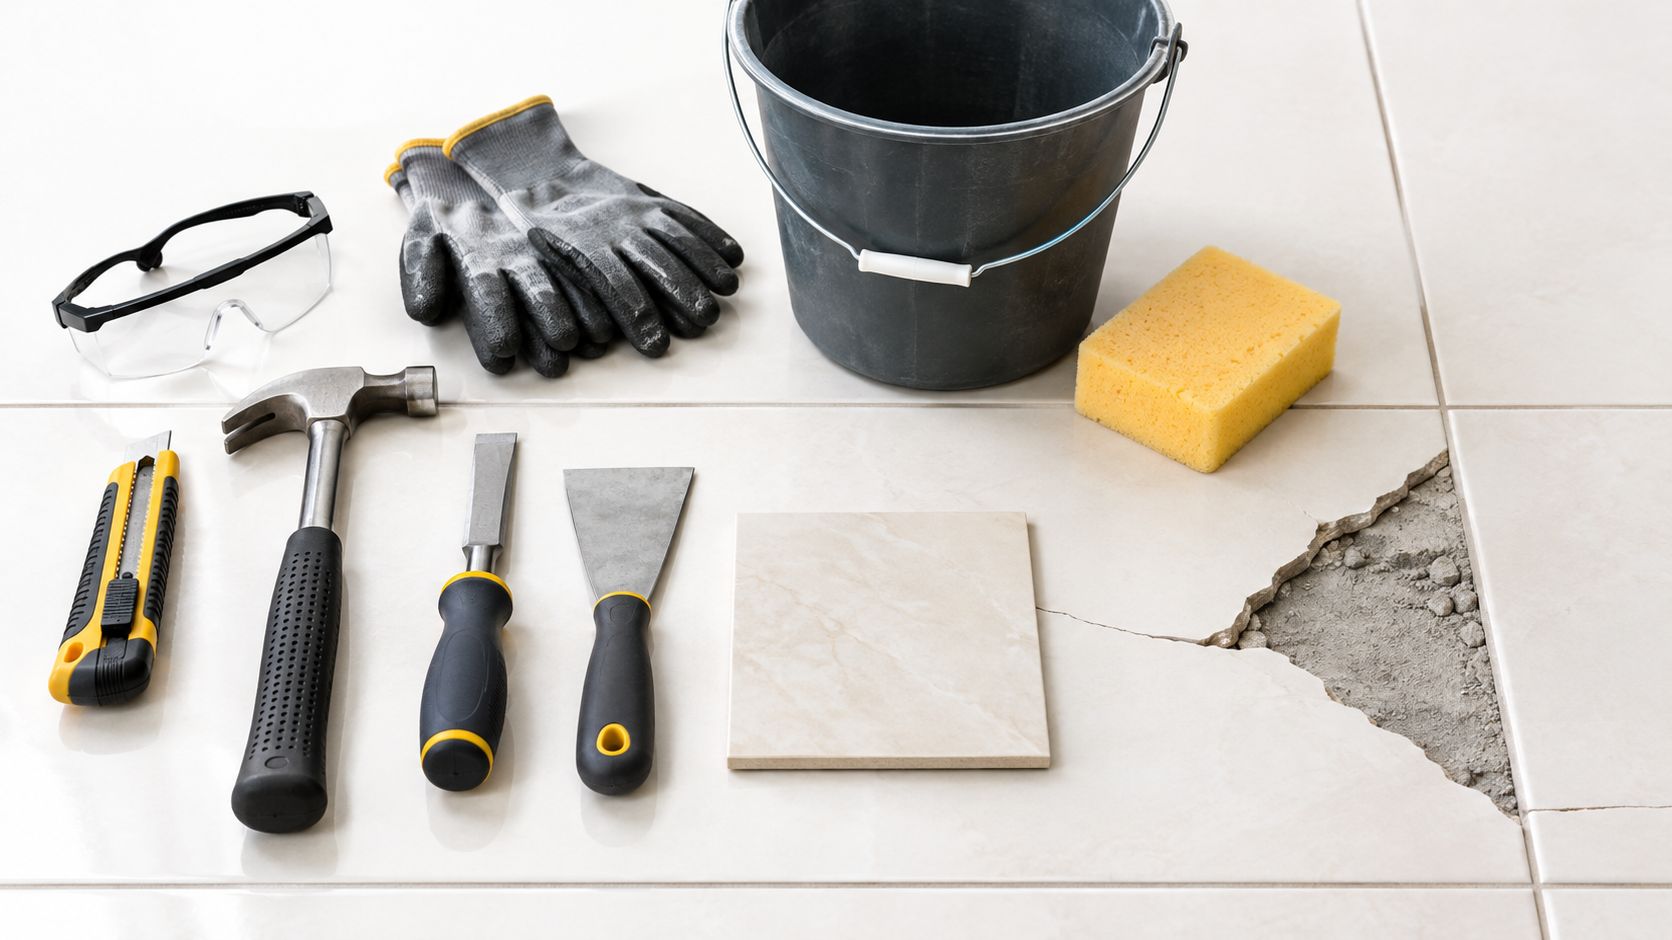
Build the kit in the order you will use it
A tile installation tools list is useful, but a one-tile repair only needs a short bench.
- Grout saw or oscillating tool. This frees the damaged piece from its neighbors before any impact starts.
- Drill and masonry bit. Relief holes in the center give the break somewhere to go.
- Cold chisel, hammer, and a flat pry bar. These lift fragments inward. They are not for levering against sound edges.
- Notched trowel, margin trowel, bucket, and sponge. You will need them only after the opening is clean.
- HEPA-filtered vacuum. Dry sweeping throws dust back into a kitchen or hall.
Safety glasses and gloves stay on the whole time. Painter's tape on glossy porcelain edges saves a chip you cannot hide.
Dust and older flooring
Cutting, drilling, or crushing ceramic and porcelain can release respirable crystalline silica. OSHA's construction standard generally sets a permissible exposure limit of 50 micrograms per cubic meter of air over an eight-hour workday, and it prefers wet cutting and ventilation before respirators, per OSHA's silica background. For one tile, wet the cut when you can, close off nearby rooms, and wipe or vacuum with a HEPA filter.
Keep the work wet and the doorway shut. A small repair in a closed bathroom fills the air faster than an open shop.
Older resilient floors are a different hazard. If vinyl tile or black adhesive looks old enough to raise a question, do not sand, grind, or smash it. Massachusetts disposal guidance summarized for Lowell notes that broken or crumbled asbestos tile must be handled as asbestos-containing waste, not ordinary construction debris. Stop and get a professional asbestos evaluation before you disturb suspect material.
Remove the Broken Tile Without Damaging Neighbors
Grout locks the floor into one stiff sheet. Pry while that grout is still intact and the force goes straight into the next tile.
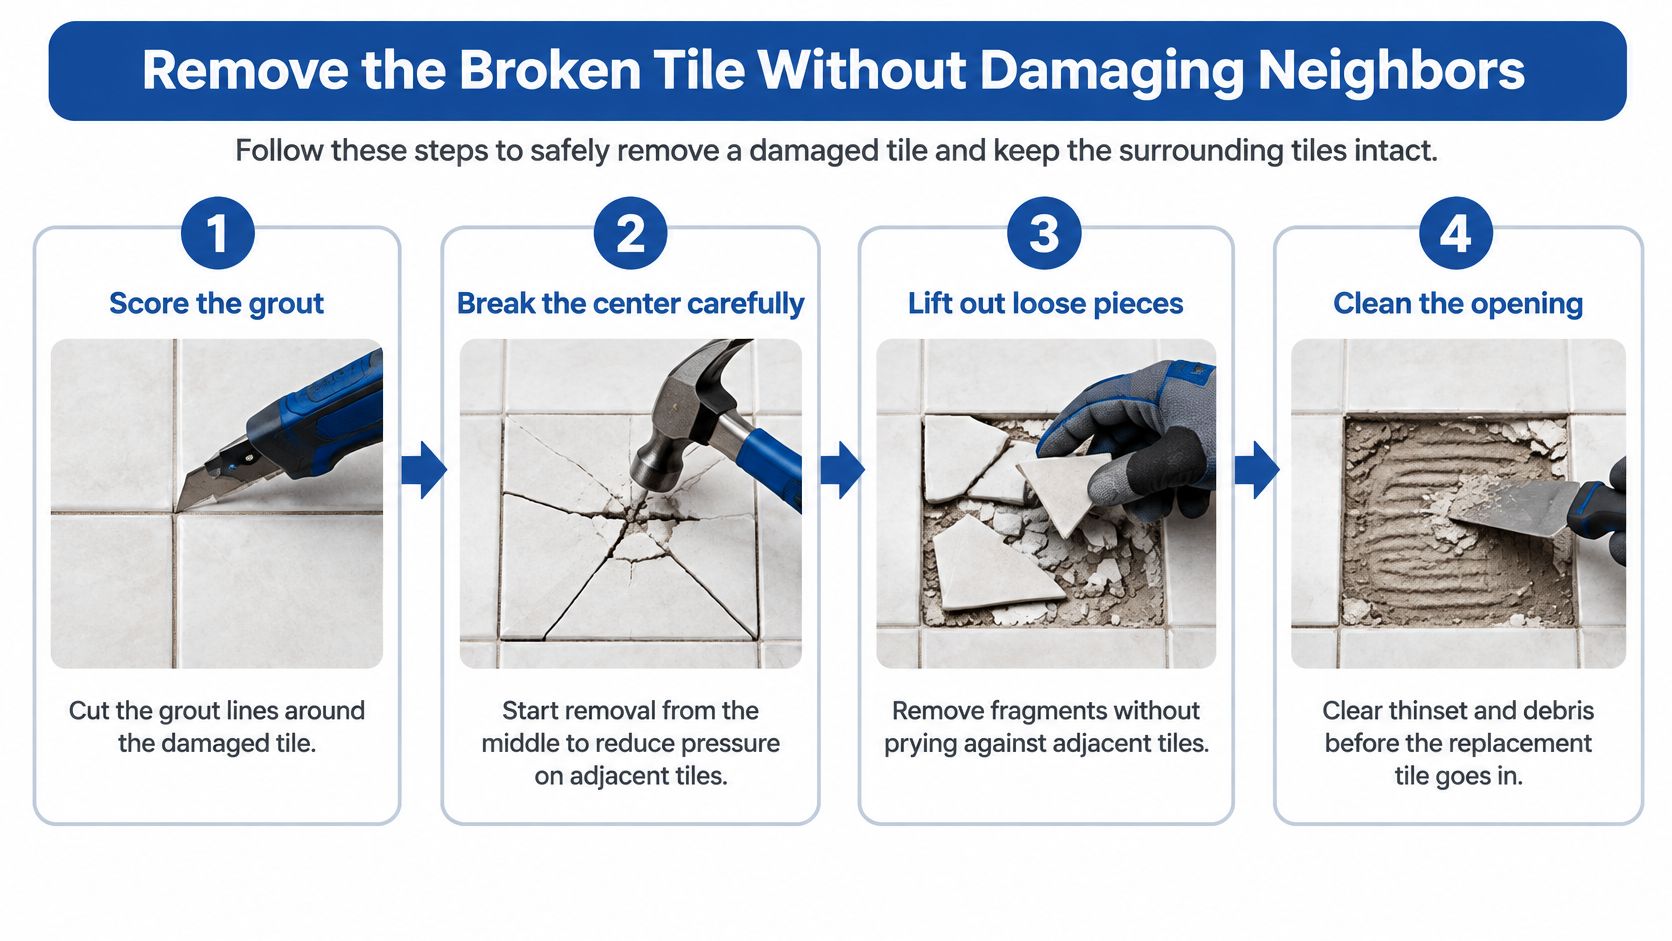
A durable replacement starts with controlled removal rather than prying against adjacent tiles. Surface-preparation specifications call for cutting or raking out the grout, drilling toward the center, then breaking and lifting pieces inward.
Free the tile before you break it
- Score the grout. Cut all four sides down to the setting bed with a grout saw or an oscillating tool. You want a visible gap, not a scratched neighbor.
- Drill the center. Several holes toward the middle, kept wet, give the tile a place to collapse. Stay off the edges.
- Break inward. Seat a narrow chisel in a center hole and tap so pieces fall into the opening. If the chisel loads a neighboring edge, stop. You are prying, not lifting.
- Lift fragments. Pick them out. Do not lever under a sound tile to "help" a stuck corner.
Stop and reset: A tick in the grout next door means the impact has left the broken piece. Tape that edge and work from the hole again.
Clear the bed and bag the debris
Scrape residual thin-set until the opening is firm and flat. Ridges left behind will hold the new tile proud of a kitchen or entry floor. Vacuum dust so the next mortar has a clean face to grab.
In Massachusetts, these fragments are construction and demolition debris, not kitchen trash. Concord's construction and demolition guidance identifies brick, concrete, and related masonry among materials banned from landfill disposal under state waste-ban rules. Keep pieces in a covered bin, skip the curbside cart until the town confirms, and ask the municipality, a permitted hauler, or an authorized facility where ceramic should go. You want a clean, dry opening, not a bag sitting in the hallway.
Prep, Set, and Grout the Replacement Tile
The new tile only sits as flat as the bed under it. This is the part that decides whether the repair lasts past the next winter.
A flat, dry opening
Sweep out dust, wax, oil, and loose patch. Fill dips or chipped substrate with a patch meant for that base, then let it firm up. Dry-fit the replacement with spacers that match the existing joints. Check orientation, joint width, and whether the face lands in plane with the floor. If it sits high, take more old mortar out. Do not plan to "press it down" later. If a movement joint crosses the opening, leave it open. Mortar or grout across that joint glues two slabs that are supposed to move apart.
Set for coverage, then wait to grout
Use the mortar the maker specifies for that tile and that room, and the trowel size on the bag.
- Key mortar into the substrate with the flat side of the trowel.
- Comb fresh mortar in one direction. Do not set into mortar that has skinned over.
- Press the tile in and move it across the ridges so voids collapse.
- Lift it once or twice while the mortar is wet and look at the back.
ANSI-based tile guidance calls for at least 80% mortar contact on typical interior dry floors and at least 95% in wet or exterior work, with support concentrated under corners and edges. Stone needs that 95% as well. An empty corner is where a chair leg cracks the new piece. The same published specification calls for at least 48 hours before grouting. Clean joints while the mortar is workable so about two-thirds of the joint depth stays open for grout.
Cement-based installation guidance says the tile should be securely bonded and cured at least 24 hours before grout, spacers out, excess mortar gone. After mixing, grout commonly needs about a 10-minute slake, then a remix. Do not add extra water to "loosen" it. That ratio change weakens and discolors joints. Pack joints full, keep movement joints empty, and wipe with a sponge that is damp, not wet. Some products also want a light mist for as long as 72 hours. Follow the bag in front of you when the two cure windows differ.
Lippage, hollow spots, and haze
- Lippage. The new tile sits above its neighbors. Pull it while the mortar is soft and lower the bed. A high edge in a doorway will catch toes and chair legs.
- A hollow sound. Coverage failed, usually at a corner. Lift and reset before the mortar skins. Do not grout over a drum.
- Haze. A dry microfiber cloth after the joints have set beats a soaking sponge, which pulls grout back out of a bathroom joint.
Matching a Discontinued Tile in Your Floor
A sound repair can still look wrong at noon in an open kitchen. Matching is a sourcing and design problem, not a hunt for the closest swatch.
Tile product lines may change every two to four years, and even tiles sold as the same product can differ in shade, calibration, thickness, finish, and dye lot, as extra-tile planning guidance notes. Hold any candidate in the actual room, under daylight and under the kitchen lights, before you commit.
Four ways to handle a missing match
| Approach | Best when | Main tradeoff | Visual result |
|---|---|---|---|
| Salvage a hidden tile | A closet, toe-kick, or spot behind the toilet still has the original | You create a second, less visible repair | The public floor stays uniform |
| Specialty sourcing | You have a maker name, size, and a clean fragment | Shade, thickness, or finish may still miss | Close, but often readable in raking light |
| Deliberate accent or border | An exact match is gone and the spot is in plain view | The floor gains a new design move | Contrast that looks chosen |
| Replace a larger zone | Several tiles already differ, or the area is a small bath or entry | More labor and more material | Variation reads as one field, not a patch |
Choose by visibility, what you can buy, budget, and whether you want uniformity or a designed contrast. A single off tile in a Needham hallway reads as a defect. The same tile set as a small inset by the stove can look intentional.
After the repair, keep spares, write down the manufacturer and lot, and photograph the layout. The next break, or the next buyer walking the house, will not have to guess.
Realistic Costs and Timelines for DIY and Pro Repairs
Skip any flat price you see online. A one-tile job moves with five things you can count yourself: whether a match exists, how much mortar, grout, and patch you open, whether you buy or borrow tools, how debris gets hauled, and how many store trips the discontinued piece costs you.
What actually changes the bill
Ceramic floor tile is built as a long-life material, not a surface you swap on a schedule. A 2025 Environmental Product Declaration from the Tile Council of North America assumes a 75-year estimated service life for the building and gives ceramic tile the same 75-year reference service life, in the ceramic tile EPD. That is why a local repair beats tearing out a sound floor. The same assessment puts average installation at 4.07 kilograms of mortar and 0.212 kilograms of grout per square meter, with 4.5% of installation material lost as waste. Your opening is far smaller than a square meter, but you still buy a bag, mix more than you set, and haul the old bed away.
A spare from the original box keeps the material line small. A discontinued field tile in a visible kitchen can cost more in samples and a second trip than in mortar.
Time on a Saturday versus a failed substrate
Removal and cleanup are the same afternoon if the grout cuts cleanly. Patching adds drying time you do not control. Setting is short. Grouting waits on the product sheet, often a day or two, and foot traffic waits again after that. An isolated crack in a dry hall can be a weekend with the room roped off overnight.
A hollow run, a soft spot, or a crack that follows a joint is no longer that weekend. Opening waterproofing or stiffening a bouncy subfloor changes both the hours and the risk. That is the point where a professional visit costs less than a second repair.
When to Call Sunny Day Pro Services for Tile Repair
DIY fits a dry, isolated break with a real spare and solid neighbors. It stops being the smart path when the floor is telling you something else.
- Movement. Cracks in a line, rocking tile, or a patch that failed once already.
- Moisture. Stains, soft spots, or a bathroom or kitchen where water may be under the tile.
- A visible mismatch. A discontinued tile in an open plan, or a zone large enough that a patch will show in daylight.
- Suspect older material. Vinyl or black mastic you should not grind.
Sunny Day Pro Services is a Massachusetts team that installs porcelain, ceramic, marble, and granite, including custom backsplashes and full-room remodels. The crew is background-checked and trained, and the work carries a satisfaction guarantee. If something is not right, they make it right. Service covers Wayland, Newton, Needham, Wellesley, Weston, and nearby towns. You can review tile services, request a fast quote, pick the work and a schedule, and get plain timelines before anyone opens the floor.
Common questions before you book
Can one broken floor tile be replaced alone? Yes, when the crack is isolated, nearby tiles are solid, and the base is dry.
What if the original tile is gone? Treat the repair as a design choice. Salvage a hidden piece, source carefully, or make the change look deliberate.
When should you skip DIY? When the pattern says movement or water, when older flooring may contain asbestos, or when the spot is too visible for a near miss.
A careful one-tile repair is worth doing yourself. A floor that is moving, wet, or impossible to match is worth handing to someone who does this every week.
Sunny Day Pro Services installs porcelain, ceramic, marble, and granite floors and handles the repairs that start as one broken tile and turn into a matching or substrate problem. If your kitchen, bath, or entry needs a clean fix instead of another weekend of guesswork, request a quote and a schedule through Sunny Day Pro Services. You will get clear timing and a crew that treats the surrounding floor as carefully as the piece coming out.

