
Restore Your Pan: How to Clean a Burnt Stainless Steel Pan in 2026
Discover how to clean burnt stainless steel pan and restore its shine. Our 2026 guide covers simple, effective methods using baking soda, vinegar, and more.

We’ve all been there. You get distracted for a moment, and next thing you know, a blackened, burnt-on mess has taken over your favorite stainless steel pan. My first piece of advice? Don’t panic, and definitely don’t toss it. Most of the time, there’s a simple fix with things you already have in your kitchen.
As a professional with years of experience helping homeowners in places like Wellesley and Newton keep their kitchens sparkling, I’ve seen my fair share of seemingly ruined pans. I’m here to share the exact methods we use to restore them to their former glory, saving you time, money, and frustration.
Table of Contents
- Can I use steel wool on my burnt pan?
- What if my pan has a rainbow-colored stain?
- Is a pan ever too burnt to save?
Your Guide to Reviving a Burnt Stainless Steel Pan
That stubborn, carbonized layer isn't a death sentence for your cookware. Think of it as a problem with a surprisingly easy solution. Stainless steel is incredibly durable—it's why chefs and home cooks love it—and it can bounce back from a lot of abuse. With the right technique, you can learn how to clean a burnt stainless steel pan and restore its original shine without resorting to harsh chemicals or abrasive scouring pads that leave permanent scratches.
The secret isn't brute force. It's about using a little kitchen chemistry to get the pan to release the grime for you.
This approach is all about working smarter, not harder. It also happens to be a much healthier way to handle household chores, which is something we talk about a lot. If you're interested in similar ideas, we have some great spring cleaning hacks for a healthier home you might find useful.
So, how does it work? It comes down to a few key principles:
- Gentle Abrasion: Forget steel wool. Ingredients like baking soda give you just enough grit to scrub away residue without gouging the pan's surface.
- Acidic Action: White vinegar is your best friend here. Its acetic acid is brilliant at dissolving those tough, burnt-on bits and mineral deposits.
- Heat and Patience: Simply adding some heat and letting the pan soak does wonders. This combination helps loosen the chemical bonds between the burnt food and the metal itself.

For Light Scorch Marks, Start with a Gentle Soak
We’ve all been there. You turn your back for just a moment, and now there’s a stubborn, discolored film at the bottom of your favorite stainless steel pan. When you're dealing with light scorch marks—that filmy residue from a quick sear or a bit of sauce that cooked on too long—your first instinct might be to grab something abrasive. Don't.
Starting with an aggressive scrubber on a minor burn is overkill and can easily scratch your pan’s finish. The best place to begin is always with the simplest, most gentle method: a good old-fashioned soak with hot water and dish soap.
The Soaking Method
First thing's first: let the pan cool down on the stove for several minutes. Never, ever put a screaming-hot pan into a sink of water. This can cause thermal shock, a rapid change in temperature that can warp the metal, leaving you with a wobbly, ruined pan.
Once it's cool enough to handle, just add a good squirt of dish soap and fill it with the hottest water from your tap. Make sure all the burnt spots are completely underwater.
Expert Tip: Here’s where a little patience pays off. Let the hot, soapy water do the hard work for you. It’s actively loosening all that gunk so you won't have to put in nearly as much elbow grease later.
Cookware pros agree this is the right first step. Give it a solid 30–60 minutes to soak. After that, you should be able to wipe away most of the residue with a regular sponge or a soft nylon brush. For more insights into the best ways to restore your pans, the experts at Greenpan.us offer a great breakdown.
Using Baking Soda for Stubborn, Stuck-On Grime
So, that simple soak didn’t quite cut it, huh? We’ve all been there. When you’re dealing with burnt-on food that just won’t budge, it's time to bring out the secret weapon from your pantry: baking soda.
Baking soda is a mild abrasive, powerful enough to lift grime but gentle enough that it won't scratch up your stainless steel. It's a much smarter choice than harsh scouring pads. For most moderately burnt pans, one of these two baking soda methods will get the job done.
Creating a Baking Soda Paste
For a concentrated burn spot—like that one corner where your sauce decided to carbonize—a simple paste is the perfect tool for a targeted attack.
Grab a small bowl and mix a few tablespoons of baking soda with a tiny bit of water. You're aiming for a thick paste, something with the consistency of toothpaste. Smear this paste directly over the burnt areas, making sure every bit of the stain is covered.
Now, just let it sit. For lighter messes, 15-20 minutes is often enough. For more serious burns, you can leave it for a few hours. This gives the baking soda time to work its magic and break down the grime. When you're ready, grab a non-abrasive sponge and scrub in small circles before rinsing it clean.
The Boiling Method for Tougher Jobs
If the paste didn't fully lift the stain, or if the entire bottom of your pan is coated in a layer of black, it’s time to turn up the heat. This simmering technique is incredibly effective at loosening widespread, stubborn residue.
It's a straightforward process:
- Pour about an inch of water into the pan, just enough to submerge the burnt-on food.
- Stir in 2-3 tablespoons of baking soda.
- Place the pan on your stove and bring the water to a gentle boil.
- Let it simmer for 5-10 minutes. You'll actually start to see flakes of burnt gunk lifting off and floating in the water.
- Turn off the burner and let the pan cool completely. Once it’s safe to handle, use a wooden spoon or a silicone spatula to gently scrape away the loosened bits.
A Quick Word of Caution: I've seen too many good pans ruined by impatience. Please, never use a metal fork or knife to scrape the bottom. You will absolutely scratch your stainless steel. Stick with wood or silicone tools to keep your pan looking its best.
This boiling trick is a true lifesaver for pans that look like a lost cause. After you've scraped away the residue, just give the pan a final wash with regular soap and water, and it should be good as new. It’s my go-to for cleaning a burnt stainless steel pan without having to resort to harsh chemicals.
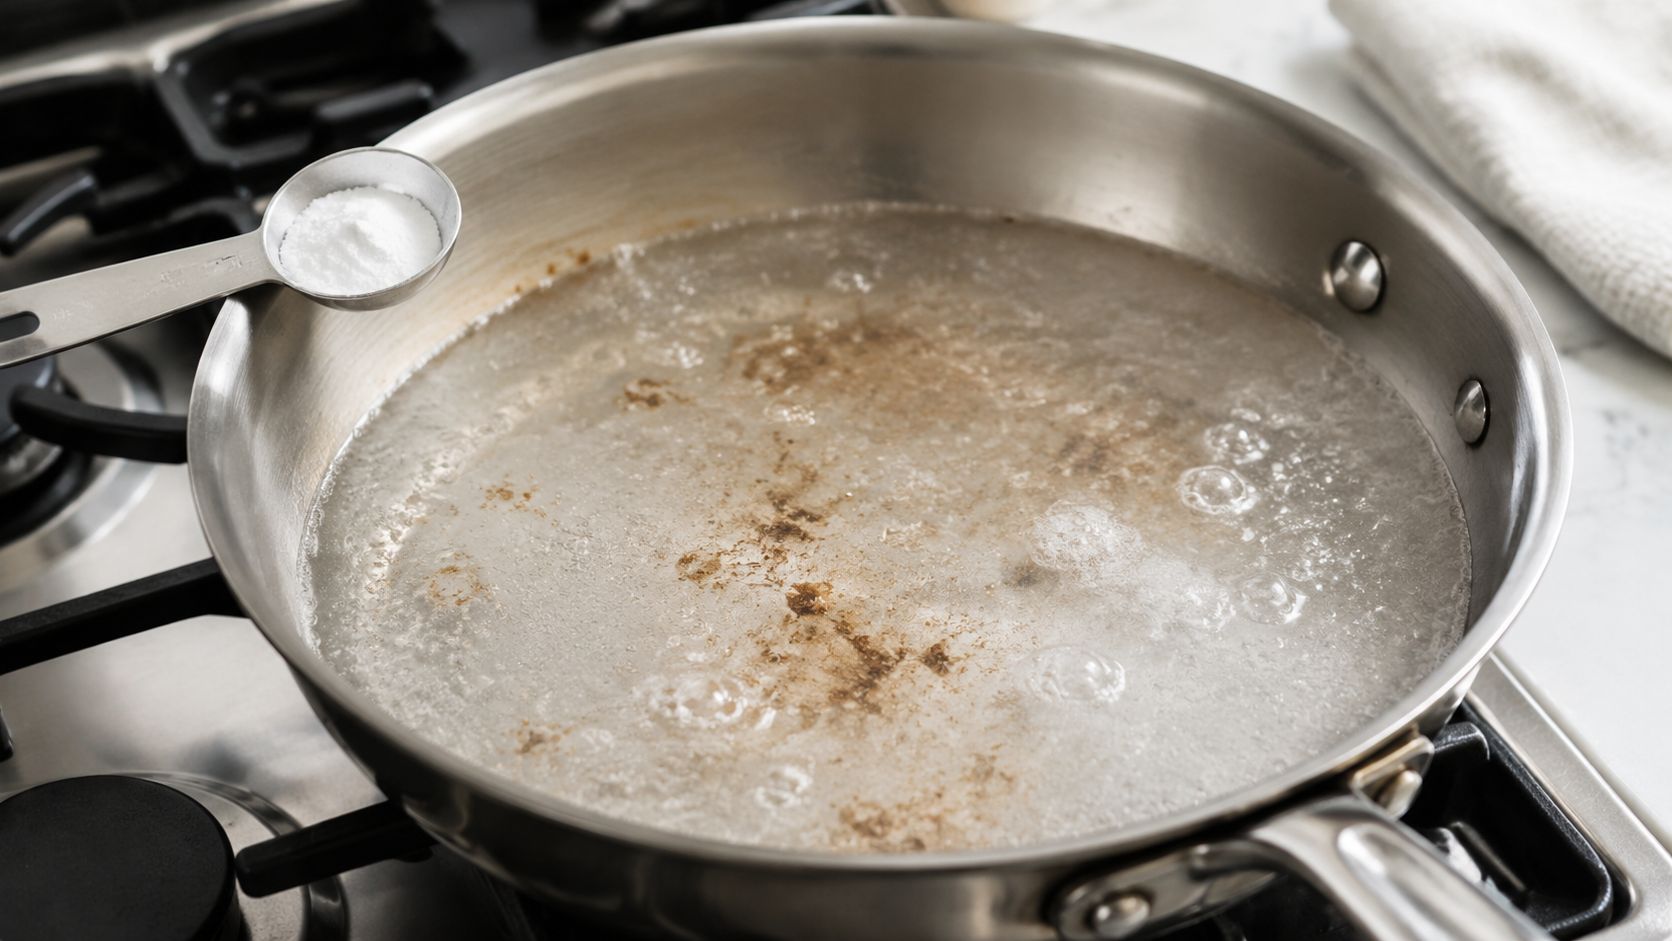
The Vinegar Boil to Erase Tough Stains and Discoloration
When you’re facing the toughest cleaning jobs—think stubborn black carbon buildup or that frustrating, rainbow-colored heat tint that won’t scrub away—it's time to reach for the vinegar. White vinegar contains natural acetic acid, a true workhorse when it comes to dissolving mineral deposits and breaking down burnt-on food that soap and water can’t touch.
Instead of trying to win with brute force scrubbing, this method uses a bit of kitchen science to do the heavy lifting for you.
The Basic Vinegar Boil Process
The process is straightforward. All you need is your burnt pan, some plain white vinegar, and water.
Start by pouring equal parts white vinegar and water into the pan. You don't need to fill it to the brim; just add enough liquid to completely cover the scorched or discolored areas, usually about an inch deep.
Place the pan on your stove and bring the solution to a rolling boil. Once it’s boiling, reduce the heat and let it simmer for 3–5 minutes. You’ll see the grime start to loosen as the acidic steam works its magic. After simmering, turn off the heat and let the pan cool down completely before you even think about touching it.
Once it's cool, the burnt residue should be soft enough to wipe away easily with a non-abrasive sponge.
Expert Tip: I can't stress this enough: patience is everything here. Never pour cold water into a screaming-hot pan or try to scrub it while the solution is still hot. You risk warping the metal permanently, not to mention getting a nasty steam burn.
Combining Vinegar and Baking Soda for Extra Power
What happens if the vinegar boil alone doesn't quite finish the job? For those truly disastrous, blackened-on messes, you can bring in a second ingredient: baking soda. This creates a powerful fizzing reaction that helps physically lift and dislodge the most stubborn carbon.
Here’s how to do it safely. After you’ve finished simmering the vinegar and water, turn off the heat and move the pan to a cool burner. This is a critical safety step, so don't skip it.
Very slowly, sprinkle in 1–2 tablespoons of baking soda. The mixture will immediately begin to fizz and foam up—that's the reaction breaking down the grime.
Let the fizzing die down and allow the pan to cool to room temperature. Once it's safe to handle, use a nylon brush or scrubber to tackle the remaining spots. This one-two punch of acid and a fizzing base is often the final trick needed to restore a pan you thought was a lost cause. Just be sure to open a window or turn on your vent fan when boiling vinegar, as the smell can be quite strong.
Comparing Pan Cleaning Methods for the Best Results
So, you've burnt your favorite stainless steel pan. It happens to all of us. The real question is, how do you fix it? The right approach really depends on the severity of the mess. A light, golden-brown scorch from some forgotten onions is a completely different challenge than a thick, black crust of burnt sugar.
For those tougher, more stubborn messes, one of my go-to methods is the vinegar boil. It's a fantastic technique that uses the acidity of vinegar to loosen up all that baked-on grime without hours of scrubbing.
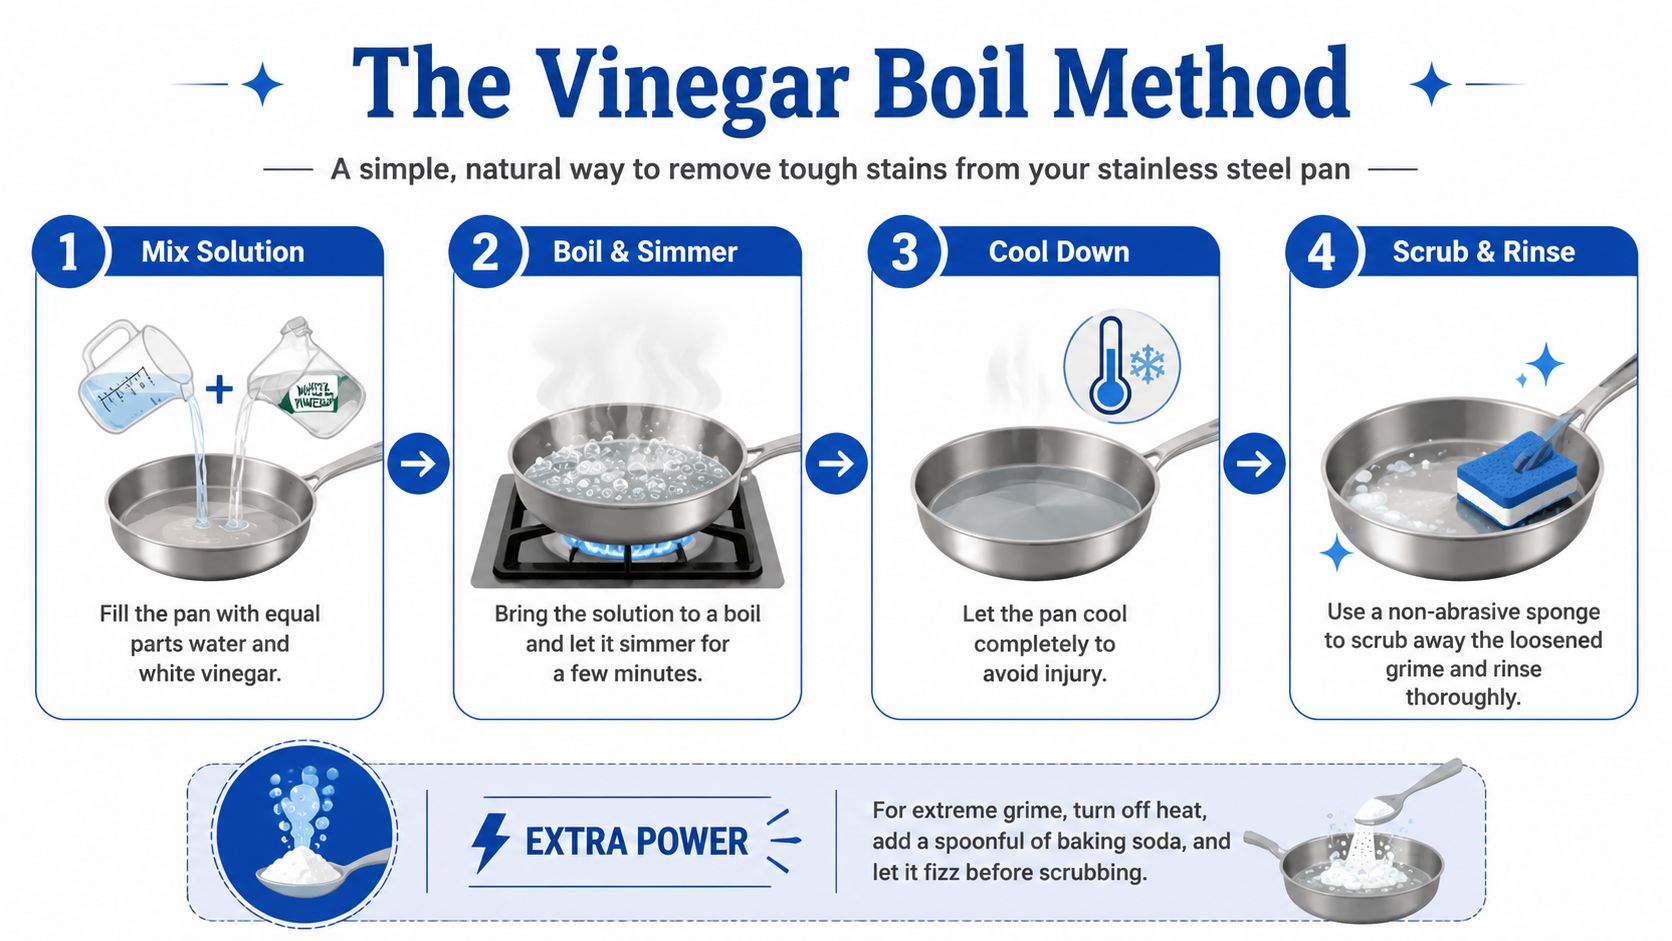
This handy visual breaks down the process and even includes a great tip for adding a little extra cleaning power when you really need it.
Which Cleaning Method Should You Use?
To figure out where to start, you first need to assess the damage. I've put together this quick table to help you match the mess to the method, saving you time and protecting your cookware.
As you can see, it's best to work your way up. Always start with the least aggressive option first. You can't undo damage from harsh abrasives, but you can always try a stronger method if the first one doesn't cut it.
Expert Tip: The golden rule I always follow in my own kitchen is to start small. You can always move to a stronger method, but you can't undo scratches from being too aggressive at the start.
Mastering these techniques is a huge step toward keeping your kitchen in top shape. For more pro tips on maintaining a truly spotless cooking space, be sure to check out our guide on the secret to a sparkling kitchen.
Preventing Burns and Maintaining Your Cookware
They say an ounce of prevention is worth a pound of cure, and that’s especially true for keeping your stainless steel pans looking brand new. The real secret to avoiding those tough, burnt-on messes isn't about scrubbing—it's about how you cook. It all comes down to heat management.
Before a single drop of oil or piece of food touches the surface, you need to preheat your pan properly. Place it on the stove over medium heat and just wait. After a minute or two, flick a drop of water into the pan. If it sizzles and evaporates, it’s not ready. If it beads up and glides around like a tiny hovercraft, you’ve hit the sweet spot.

That’s your cue to add the cooking oil. Let it get hot enough to shimmer, then add your ingredients. This technique, known as the Leidenfrost effect, creates a temporary non-stick surface by generating a thin layer of steam that lifts the food off the metal.
Keeping Your Pans in Top Shape
What you do after cooking is just as crucial. A few simple habits will go a long way in preserving the life and look of your cookware.
- Dry Immediately After Washing: Don't let your pans air dry. Toweling them off right away is the number one way to prevent those frustrating water spots and mineral deposits that can dull the finish.
- Store with Care: Try not to stack pans directly inside one another, as this can cause scratches. If you're short on space and have to stack them, just place a paper towel or a soft dishcloth between each one as a buffer.
- Give It a Quick Oil Wipe: While you don't "season" stainless steel like cast iron, wiping a very thin layer of cooking oil on the interior surface with a paper towel can help maintain a slicker, more resilient finish over time.
We get it—keeping up with kitchen maintenance can feel like a never-ending task. If you feel like your kitchen needs a complete reset, a professional deep cleaning from a trusted team in Wellesley or Newton can restore your space and give you a fresh start. For day-to-day cleaning, you might also be interested in learning about the best eco-friendly cleaning products that get the job done.
FAQs: How to Clean a Burnt Stainless Steel Pan
Even after you've mastered the best cleaning methods, a few specific questions always seem to pop up. Let's tackle some of the most common concerns we hear when it comes to saving a scorched stainless steel pan.
Can I use steel wool on my burnt pan?
That’s a hard no. You should never use steel wool, metal scouring pads, or any other harsh, abrasive cleaners on your stainless steel cookware. They will permanently ruin the finish with deep scratches.
Always stick with non-abrasive tools. A soft sponge, a dedicated nylon brush, or even the edge of a wooden spoon for scraping will get the job done without causing damage.
What if my pan has a rainbow-colored stain?
Ah, the dreaded rainbow stain! This is just a harmless discoloration called heat tint, and it happens when the pan gets a little too hot. It looks strange, but it's an easy fix.
The vinegar boil method we covered earlier works perfectly for this. For very faint stains, you can often get away with just wiping the pan down with a cloth soaked in white vinegar—no boiling required.
Is a pan ever too burnt to save?
Honestly, it’s highly unlikely. I've seen pans that looked like they belonged in a scrapyard, but with some patience and the right techniques, they were brought back to life. Unless the pan is physically warped or has a hole in it, almost any amount of burnt-on carbon is removable.
One thing to remember, which manufacturers and cleaning pros all agree on: never plunge a blazing hot pan into cold water. That rapid temperature shock is the number one cause of warping, which really can ruin a pan. For more great advice, you can find excellent tips from experts like those at ArmandHammer.com.
While you can salvage nearly any pan with a bit of elbow grease, sometimes life is just too busy to spend an hour scrubbing. When you’d rather focus on other things and leave the deep cleaning to the experts, Sunny Day Pro Services is here to help.
We bring that sparkling, fresh-start feeling to homes throughout the greater Boston area, including Wellesley and Weston. Get your fast, free estimate today!

