
How to Waterproof a Shower Before Tiling the Right Way
Learn how to waterproof a shower before tiling with proven methods, tools, and tests that prevent leaks and protect your bathroom remodel for years.
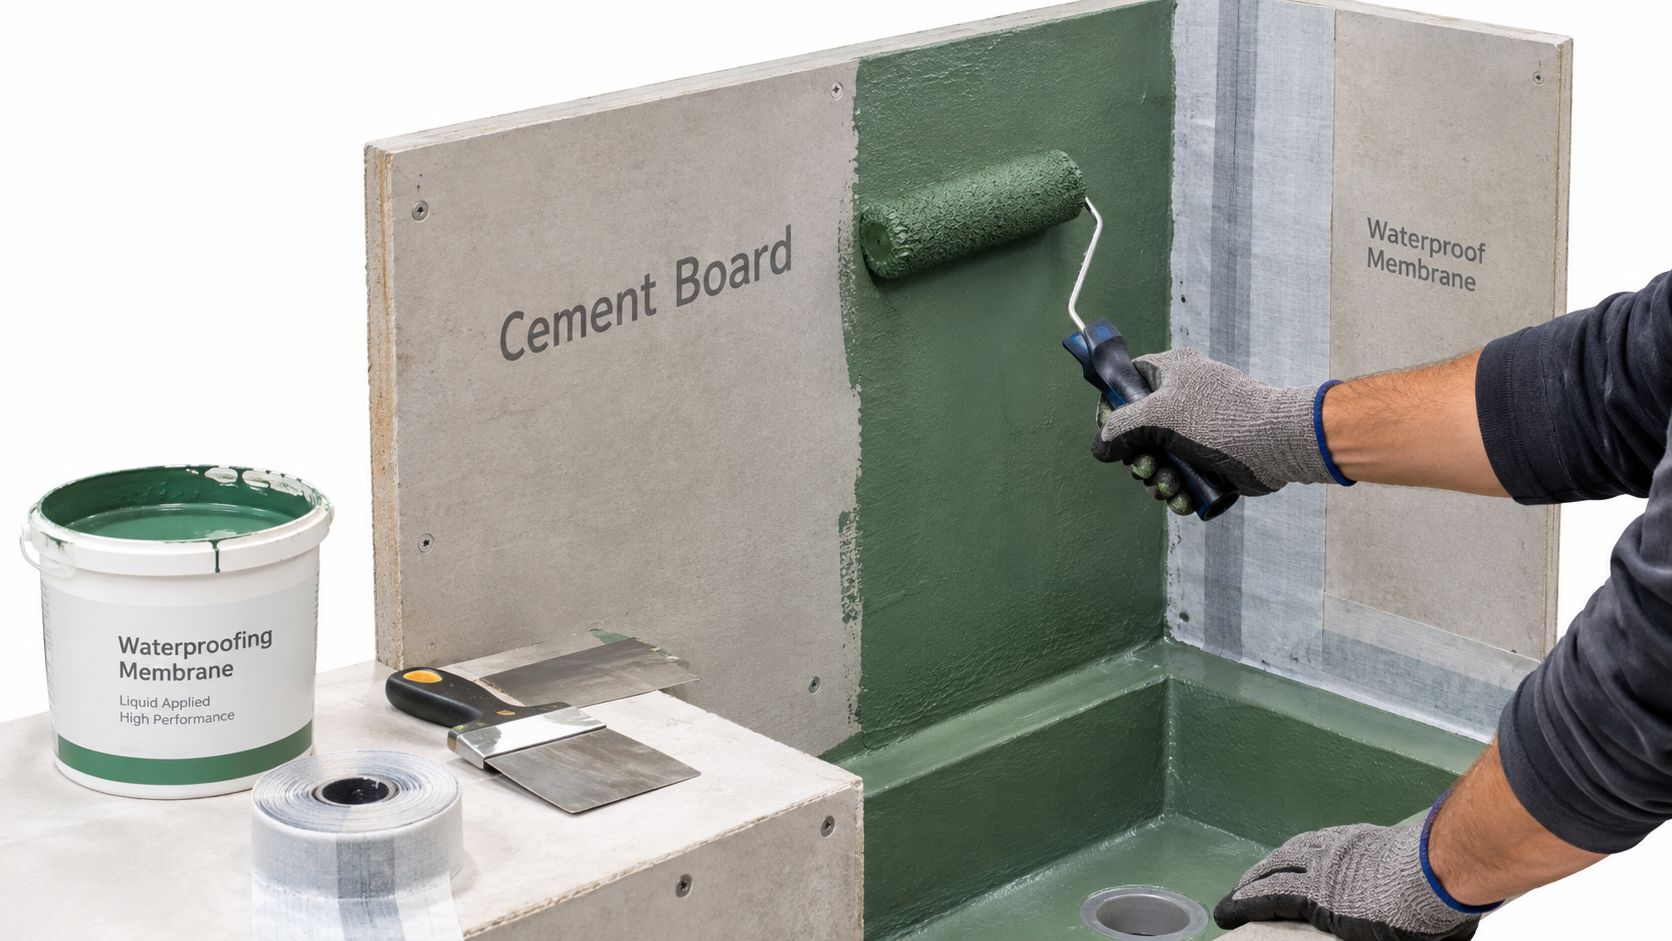
You've picked the tile, ordered the fixtures, and perhaps even dry-laid the pattern on the bathroom floor. Then someone asks the question that determines whether the remodel lasts: how do you waterproof a shower before tiling? The answer isn't choosing a product from a shelf and rolling it onto the wall. A reliable shower is a continuous, bonded membrane system that's prepared, detailed, cured, and tested before tile hides the work.
I've seen showers look perfect at installation and still allow moisture into the framing within eighteen months. The visible finish usually wasn't the actual problem. The failure started behind it, at an unsealed corner, a pipe penetration, a curb, or a drain connection that nobody verified before the tile went on.
Table of Contents
Why a Shower Needs Waterproofing Before Tile Goes On
A tiled shower can look sealed while water is already moving behind the finish. Tile and grout resist water, but they aren't the waterproofing layer. Even epoxy grout doesn't replace a properly continuous membrane behind the tile.
Daily shower use exposes the assembly to liquid water, vapor pressure, temperature changes, and movement. If the substrate absorbs that moisture, framing can swell or decay, fasteners can corrode, adhesives can lose their bond, and mold can develop in concealed spaces. Repairs then require removing finishes that looked completely acceptable.
Modern shower construction treats the enclosure as a true wet area, not merely a wall with a water-resistant surface. In North America, bonded waterproof membranes installed under tile are benchmarked by ANSI A118.10, which addresses waterproof and durable membrane performance for the life of the assembly. Schluter's technical guidance on tiled shower waterproofing explains why the membrane belongs beneath the tile and why the entire assembly needs deliberate coverage.
The membrane carries the moisture load
A bonded membrane creates the continuous barrier that tile and grout can't provide. It protects the substrate, helps separate the tile layer from minor movement, and gives the installer something that can be inspected before the finish covers it.
The industry's concern isn't theoretical. A technical document discussing failed showers reports that forensic consultant David Gobis, after two decades investigating shower failures, estimated that roughly half of showers in the United States are leaking. The waterproofing-mistakes document presents that estimate as a warning about hidden moisture, not as a reason to panic.
Practical rule: The product matters, but continuity matters more. A premium membrane interrupted at a niche or corner is still a failed system.
That's why a bathroom remodel should be planned around the whole wet-area assembly. A tub-to-shower conversion guide can help homeowners think through the framing, plumbing, base, walls, and finish as one project rather than treating waterproofing as a last-minute coating.
Comparing Sheet Membrane, Liquid Membrane, and Cement Board Prep
There are three common paths, and each can work when installed as a complete system. The practical choice depends on the shower's geometry, the installer's control over details, and how much time the project allows for curing and inspection.
| Method | Skill Level | Cure Time | Best Geometry | Best For |
|---|---|---|---|---|
| Sheet membrane | Intermediate to advanced | Usually ready after bonded seams and system requirements are satisfied | Flat walls, conventional pans, clean corners | Consistent thickness and fast coverage |
| Liquid membrane | Intermediate | Requires full cure according to the product's conditions | Niches, irregular shapes, numerous penetrations | Custom layouts and seamless coating over prepared substrates |
| Cement board prep with liquid coating | Intermediate | Multiple coats and full cure are required | Standard framed shower walls | Renovations where cement board is already part of the plan |
Sheet membranes
Sheet systems, including PVC and CPE-style products, arrive at a controlled thickness. That removes one major variable: the installer isn't trying to judge whether a rolled coating is thick enough across the entire wall.
They work efficiently on broad, flat geometry. The trade-off is detailing. Corners, seams, valves, benches, niches, and changes of plane need compatible bands or pre-formed pieces, and the sheets must be bonded without voids or poorly sealed laps. For sheet-style systems, this trade guide to waterproofing best practices specifies a minimum 2-inch overlap at seams, corners, and joints, with the membrane extending from the drain to above the shower heads.
Liquid membranes
Liquid-applied products conform well to irregular shapes. They're useful around custom niches, curved transitions, and complicated penetrations where cutting and folding sheet material creates bulk.
They also leave more room for application error. You need the right primer where required, the correct wet-film thickness, complete reinforcement at vulnerable details, and enough drying time between coats. A coat that looks opaque may still be too thin, especially over a textured or absorbent substrate.
Cement board with a coating
Cement board is a stable tile substrate, but it isn't waterproof by itself. Pairing it with a liquid membrane is a familiar middle path for remodelers and DIY installers. It can be practical when the framing and board layout are already straightforward, but it demands careful seam treatment and disciplined coating thickness.
Don't choose by material price alone. A faster sheet installation may cost more in materials but reduce coating labor. A liquid system may fit a complicated shower better but require more waiting and inspection. Whichever route you choose, use the manufacturer's compatible accessories rather than mixing unrelated bands, sealants, primers, or drains.
Preparing the Substrate the Way Inspectors Wish Every Crew Did
Waterproofing can't correct a crooked, flexible, contaminated, or poorly supported substrate. Before a panel goes up, check the framing from several directions. Studs should be straight, plumb, dry, and rigid enough to support the backer system without movement.
Install blocking where the shower design needs it. Niches, benches, curbs, grab bars, glass hardware, and plumbing fixtures all need solid support. Confirm the valve depth and pipe locations before waterproofing so you won't cut through the membrane later.
Build a surface that can hold the system
For cement board or foam panels, use the fasteners specified for that board and install them at the manufacturer's required spacing. The head should sit flush without crushing the panel or standing proud where it can interfere with the membrane.
Treat seams as part of the waterproofing, not as cosmetic panel joints. Use the system's mesh, band, or liquid treatment at every required joint. Reinforce inside corners with pre-formed corners or membrane strips, and fill gaps wider than one-eighth inch before applying the waterproofing so the membrane doesn't bridge an unstable void.
Prime porous surfaces when the membrane manufacturer calls for it. Remove dust, drywall compound, loose fibers, oil, and any material that could prevent bonding. The substrate should be clean, dry, sound, and continuous before the first membrane coat or sheet is installed.
For a useful reference on panel layout and fastening, review this tile backer board installation guide. The exact fastener pattern and seam method should always follow the board manufacturer's instructions.
The readiness check
Before opening a membrane bucket or mixing mortar, confirm:
- Framing: The walls are square, plumb, rigid, and properly blocked.
- Panels: Boards are secure, seams are tight, and no fastener is proud.
- Openings: Niches, valves, shower arms, and benches are framed and supported.
- Surface: Dust, loose material, and contaminants are gone.
- Drainage: The shower floor and drain assembly are ready to integrate with the membrane.
If the base isn't correctly sloped toward the drain, stop there. Waterproofing a flat floor only creates a waterproof place for water to stand.
Applying the Waterproofing System Step by Step
A shower can look ready for tile while its weakest corner remains unsealed. Treat waterproofing as a system you can verify before covering it: continuity from the drain through the floor, walls, corners, penetrations, curb, and threshold matters more than the product name.
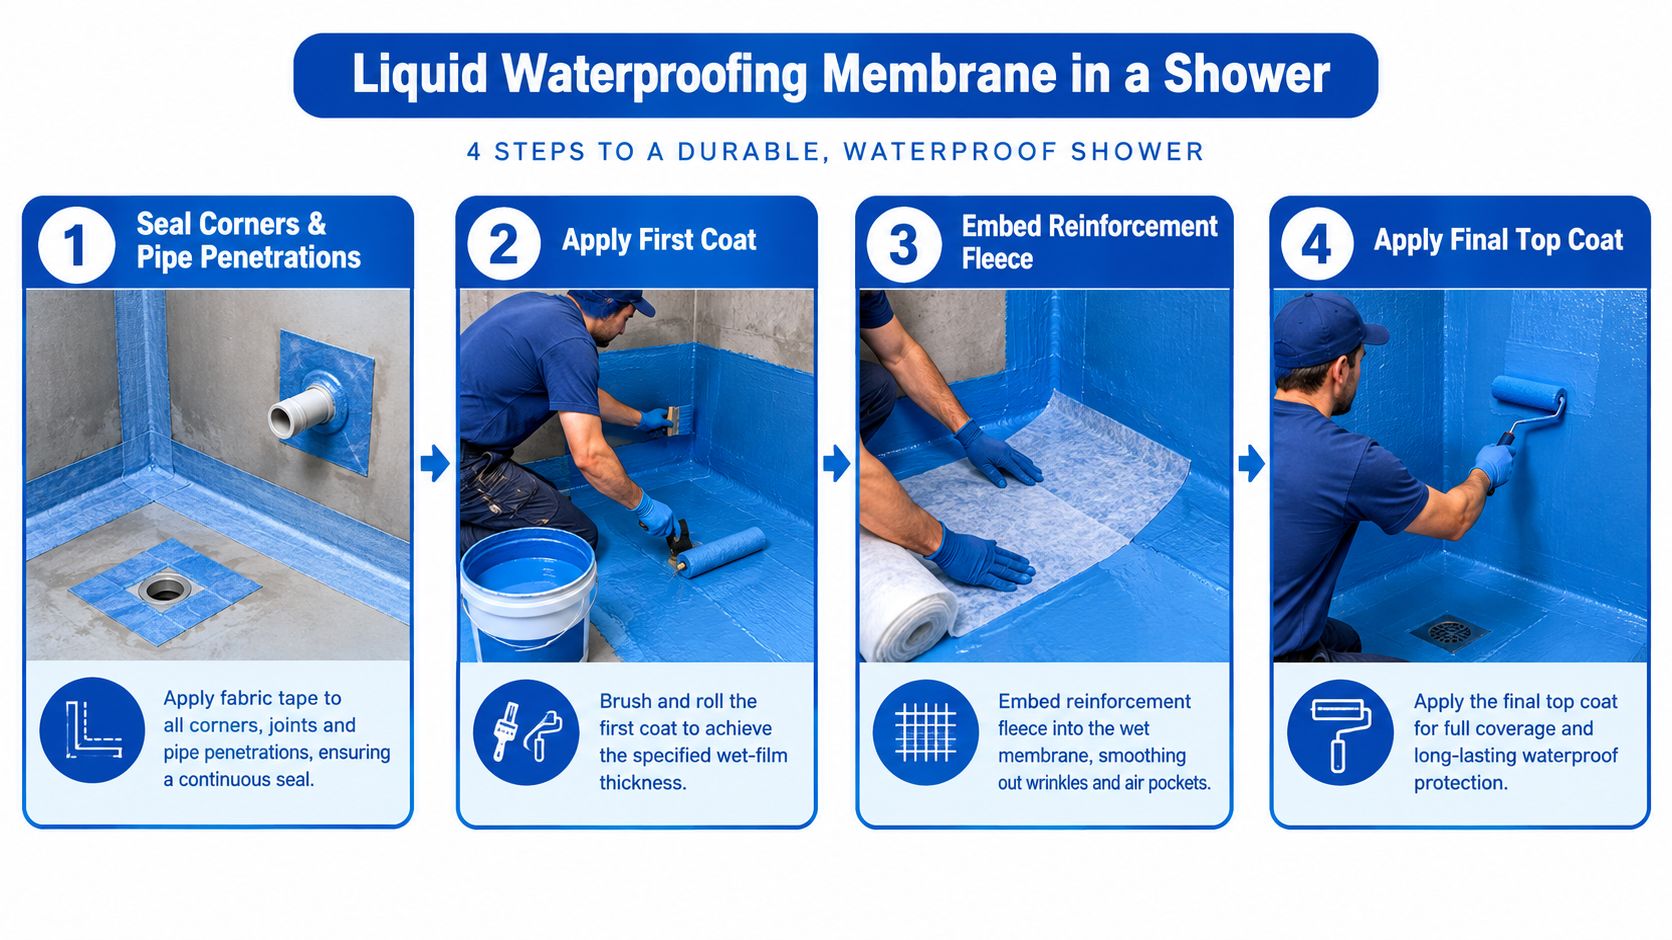
Liquid membrane sequence
Start with the details, then cover the open wall.
- Seal corners and penetrations. Apply the approved primer where the manufacturer requires it. Install compatible reinforcing fabric, fleece, or pre-formed pieces at inside and outside corners, pipe penetrations, niches, changes of plane, and the drain connection.
- Apply the first coat. Brush liquid membrane into corners and tight areas, then roll the field. Control coverage with a wet-film gauge or the manufacturer's specified method. A consistent color does not prove consistent thickness.
- Embed reinforcement. Press fleece or fabric into wet membrane at corners, seams, joints, and around the drain. Smooth wrinkles and air pockets before the coating begins to set.
- Apply the second coat. Wait until the first coat reaches the stated recoat condition, then apply the next coat in the opposite direction. This helps cover missed areas and directional gaps.
The wall waterproofing should extend over the complete wet area, including all shower walls up to the full shower-head height, per manufacturer specifications. Cure time is part of the installation, not an optional pause. Do not tile until the membrane has reached the product's required cure condition for the site.
Sheet membrane sequence
Cut the sheets accurately and plan the order before spreading mortar. Where the system permits, work from the bottom upward. Arrange laps and transitions so water cannot travel behind an upper sheet edge toward the framing.
Bond each sheet into the approved mortar with a flat trowel, roller, or smoothing tool. Work out air pockets and lift a section while the mortar is fresh to confirm contact. Seams require the system's specified overlap or sealing band. For sheet-style systems, TCNA FAQ T-113 specifies minimum 2-inch overlaps at seams, corners, and joints, with the membrane extending from the drain to above the shower heads.
Use compatible pre-formed corners or membrane pieces at every change of plane. Seal the floor-to-wall transition, curb, dam, threshold, niche, valve, and shower arm without leaving a pinhole at any penetration. The membrane must connect continuously to the drain assembly, including the areas that protect the drainage path.
What finished waterproofing looks like
Before tile, inspect the work as a connected assembly:
- Uniform coverage: No thin areas, bare substrate, fish mouths, wrinkles, or holidays.
- Continuous details: Corners, seams, niches, joints, and penetrations use compatible system components.
- Protected fasteners: Required screw heads and punctures are treated without damaging the membrane.
- Integrated drainage: The membrane is bonded to the drain and does not obstruct its weep path.
- Cure and cleanliness: The surface has cured under the product requirements and is free of mortar crumbs, dust, and debris.
Tile is the finish layer. It should cover confirmed waterproofing, not conceal uncertainty. Photograph the completed details and record the product, batch information, application conditions, and cure status before tile covers the work.
Common Waterproofing Mistakes That Show Up After Tile Is Set
The most expensive errors are often the ones that look acceptable on installation day. A wall can be flat, the grout lines can be clean, and the shower can pass a visual inspection while a small discontinuity is already directing moisture into the assembly.
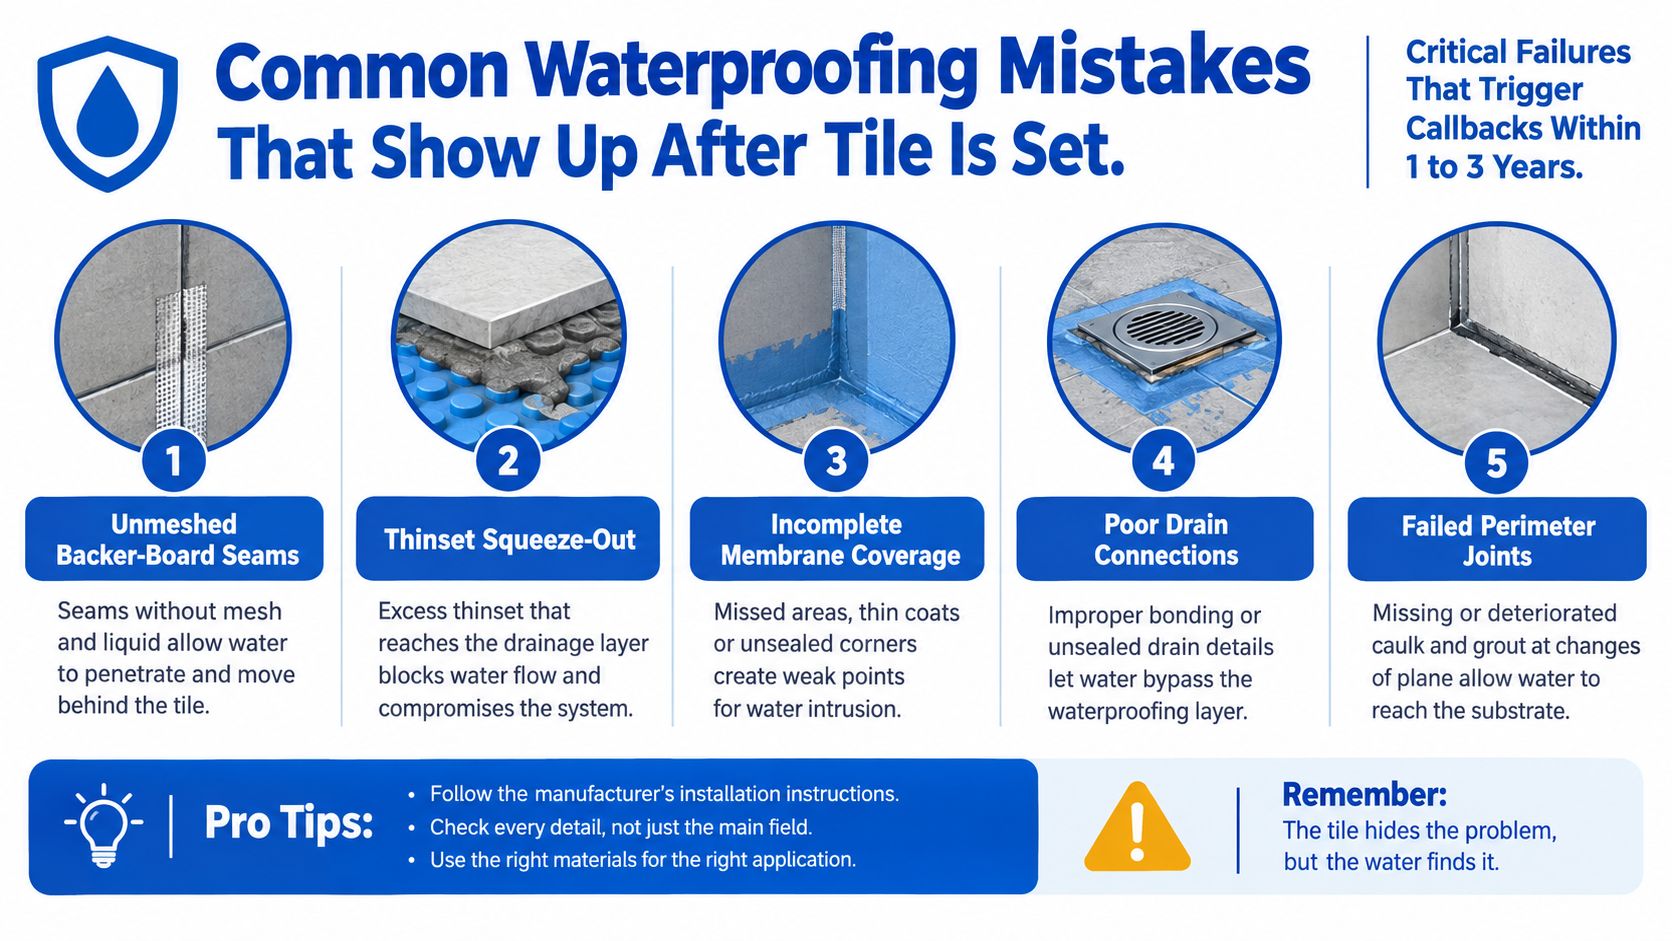
Failure points that cause callbacks
- Unmeshed backer-board seams: A seam without mesh and liquid treatment can move and open a moisture path. The fix is compatible reinforcement before the field membrane.
- Thinset squeeze-out: Excess mortar left under a sheet seam can keep the membrane from bonding. Remove the obstruction while the mortar is workable and confirm contact.
- Overdriven screws: A screw driven below flush can crush a panel or leave a damaged spot that behaves like a pinhole. Seat fasteners without damaging the substrate, then seal every head required by the system.
- Caulk used instead of membrane: Caulk at an inside corner may look neat, but it doesn't create the continuous bonded waterproofing detail behind the tile. Reinforce the corner with the membrane system first.
- Blocked drain weep holes: Mortar can clog the drainage path around a bonded drain. Keep the weep holes clear so moisture can reach the drain instead of collecting in the assembly.
Other failures are more obvious. Tile installed over green board without a waterproofing system leaves the wall dependent on a material that wasn't designed to carry constant shower moisture. Skipping the second liquid coat because the first “looks thick enough” creates unverified coverage and can leave weak spots at transitions.
The visible symptom may be loose tile at the curb, a stained ceiling below a corner, or efflorescence at the shower base. Those signs don't tell you exactly where the breach began. They do tell you that the assembly needs investigation, not another bead of surface caulk.
Flood Testing, Cure Times, and Pre-Tile Inspection
A waterproofing job isn't ready for tile because it looks finished. It's ready when it has satisfied the system's cure requirements and passed a water test appropriate to the shower pan and membrane assembly.
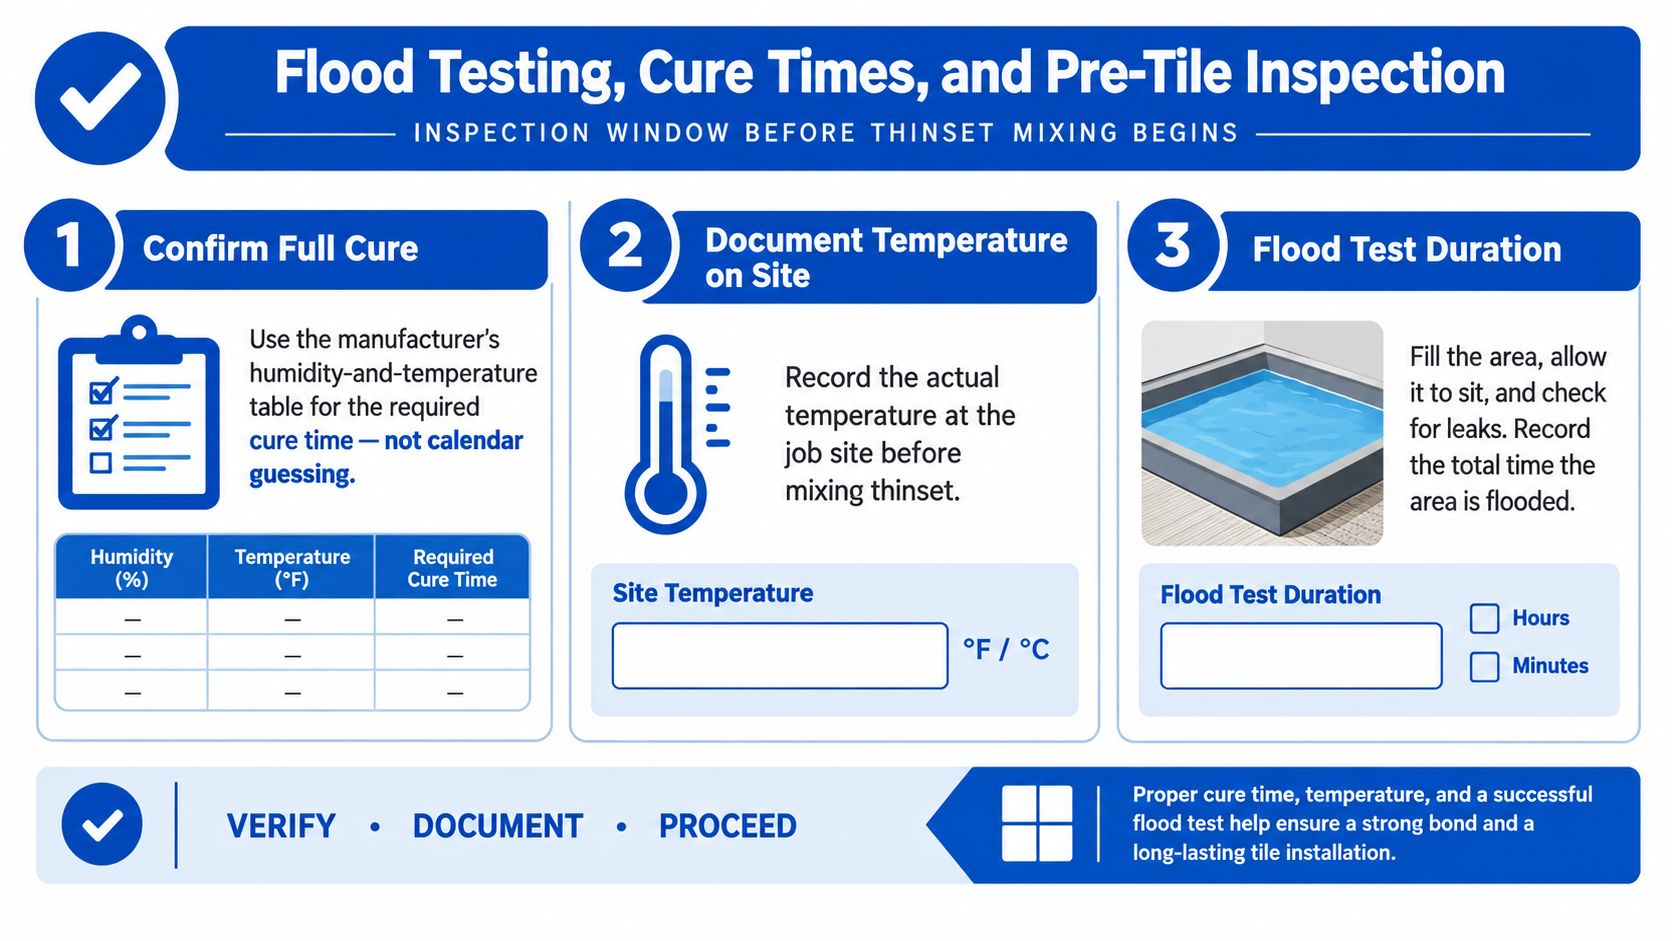
Cure time comes before the calendar
Read the product's technical data sheet and use its temperature and humidity requirements. A coating that cures quickly in warm, dry conditions may need much longer in a cool, damp bathroom. Record the site temperature and don't cover the membrane while it remains soft, tacky, or vulnerable to disturbance.
For a liquid system, verify that the second coat has cured through its full thickness. For a sheet system, confirm that the mortar and seam treatment have developed the bond required by the manufacturer. TAL's installation guidance also emphasizes full cure before tiling, with guidance that often calls for at least 3 days, depending on the system.
Flood test the pan before covering it
Install the test plug or dam the drain as the assembly requires, then fill the pan to the specified test level. Mark the water line and inspect the room below, adjacent walls, curb, drain, corners, and penetrations during the hold period.
Current manufacturer guidance varies by assembly. LATICRETE's flood-testing technical data specifies a test window of 24 to 72 hours from the time water reaches maximum test depth. A code reference summarizing IRC 2024 guidance describes holding 2 inches of water for 24 hours before covering the walls, while the shower pan liner must extend at least 3 inches above the threshold. Confirm the requirements that apply to your location, pan type, and approved system.
Record the result
Keep a simple inspection record:
- Cure: Product, batch if available, site temperature, humidity conditions, and cure confirmation.
- Coverage: Membrane reaches the required shower-head height and covers the floor, curb, threshold, corners, and penetrations.
- Drain: Flange is bonded and weep holes remain open.
- Test: Start level, end level, test duration, and observations.
- Surface: Dry to the touch, clean, firm, and ready for thinset.
Non-negotiable: Tile doesn't go on a waterproofing system that hasn't passed both water and time.
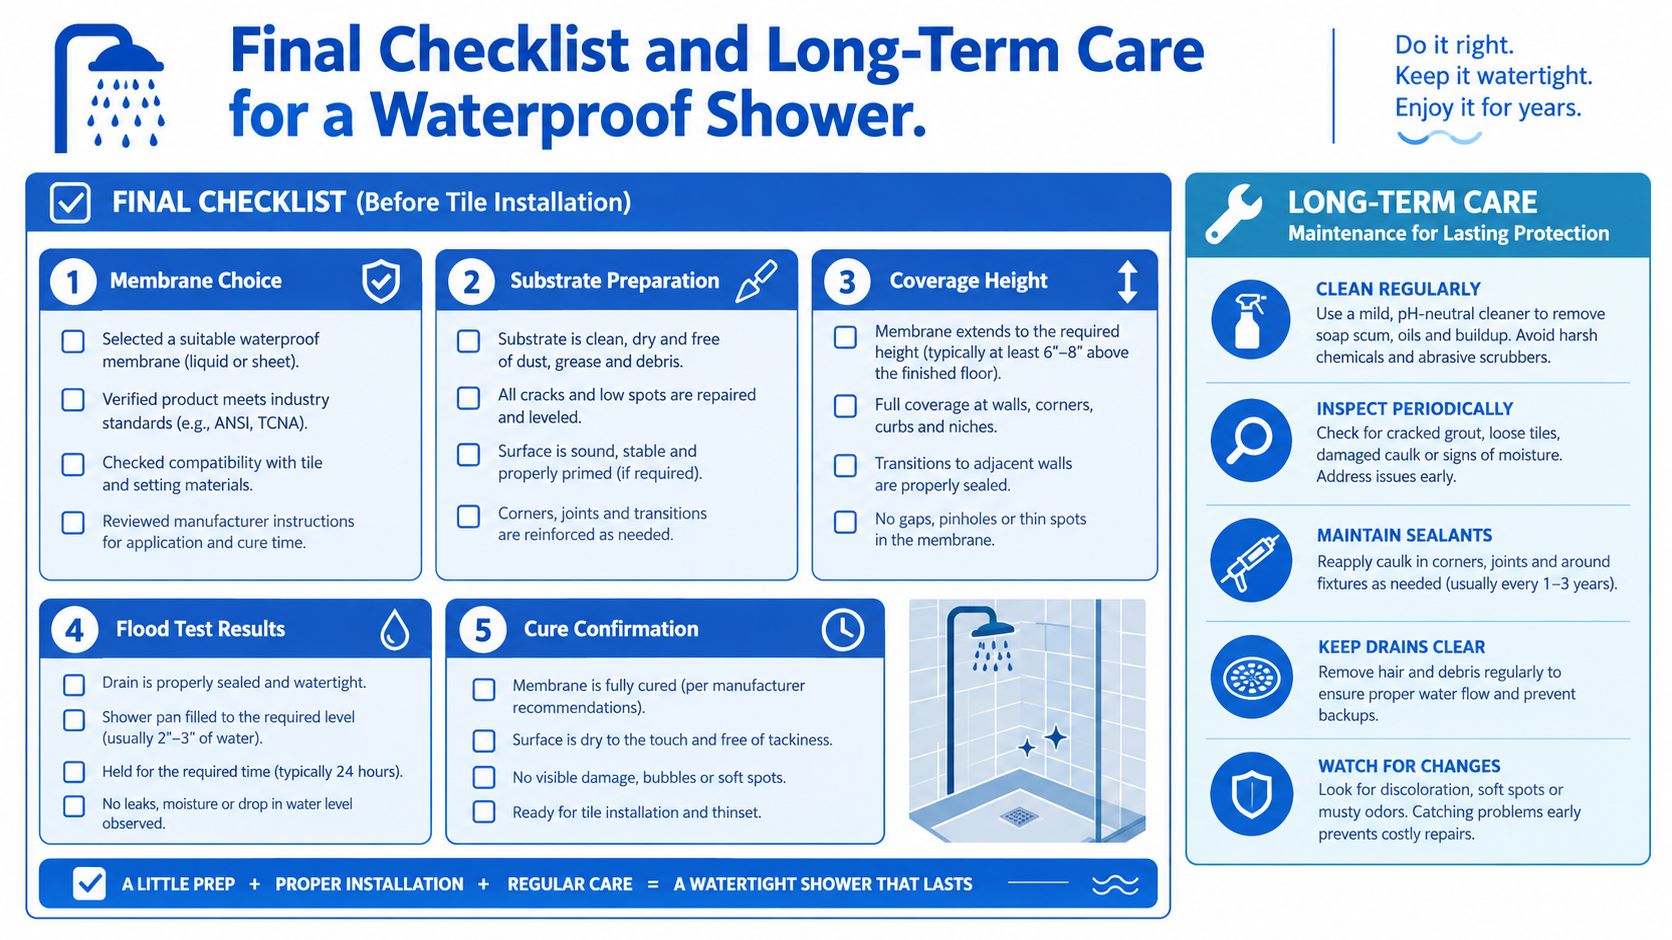
Final Checklist and Long-Term Care for a Waterproof Shower
A sound shower can be reduced to a short decision record before tile arrives. Print this list or keep it with the project photos:
- Membrane selected: Sheet or liquid system matches the shower geometry and includes compatible accessories.
- Substrate prepared: Framing is rigid, panels are secure, surfaces are clean and dry, and gaps are treated.
- Coverage completed: Walls, floor, curb, threshold, corners, niches, penetrations, and drain connection are continuous.
- Flood test passed: The test level held for the required period with no visible leakage or unexplained drop.
- Cure confirmed: The manufacturer's conditions were met before thinset was mixed.
After installation, maintenance still matters. Keep the drain's weep path clear, and watch for efflorescence, soft grout, loose tiles, or a musty odor. Re-caulk inside corners when the sealant loses elasticity, and follow the grout manufacturer's guidance for resealing grout and penetrations, commonly on a 1 to 3 year cycle as described in this guide to grout cleaning and sealing.
The membrane handles the actual waterproofing work. Tile and grout protect and finish the visible surface, but they shouldn't be asked to compensate for a discontinuous system underneath.
Sunny Day Pro Services provides professional bathroom tile installation with waterproofing planned as part of the shower assembly, including substrate preparation, membrane detailing, and tile-ready finishing. If you're remodeling in Wayland, Newton, Needham, Wellesley, Weston, or a nearby Massachusetts community, visit Sunny Day Pro Services to discuss the project and request a quote.

