
Tile Backer Board Installation: A Pro's Guide for 2026
Get a flawless tile job with our pro guide to tile backer board installation. Learn subfloor prep, fastening, waterproofing, and when to call an expert in MA.
You're probably looking at a bathroom, mudroom, or kitchen right now and thinking about the part everyone sees. The tile color. The grout line. The pattern. Maybe a clean porcelain floor in Needham, or a shower surround in Newton that finally doesn't look dated.
The part that decides whether that tile still looks good years from now sits underneath it.
In Massachusetts homes, movement is real. Seasonal humidity shifts, older framing, patched subfloors, and bathroom remodels layered over past work all put stress on tile. When the base isn't right, the tile tells on you fast. Cracked grout, loose corners, hollow spots, water where it shouldn't be. Good tile backer board installation prevents a lot of that, but only when it's done with the same care as the finished surface.
Table of Contents
- Cement board where strength matters most
- Fiber cement for cleaner cuts and tighter remodel work
- Foam board for waterproof-focused wall systems
- Start with layout not fasteners
- Cutting methods that match the board type
- Why the mortar bed matters
- Fastening pattern that holds up
- Treat the seams as structural, not cosmetic
- Waterproofing is a system
- Pro details that prevent expensive callbacks
Why Your Tile Job Depends on What's Underneath
Tile is rigid. Houses aren't.
That's the whole reason backer board matters. A tile surface can look perfectly installed on day one and still fail if the layer below it flexes, swells, or allows moisture to linger. In older Massachusetts homes, that risk gets higher because remodelers often uncover mixed substrates, patched plywood, uneven floor transitions, and framing that has seen decades of settling.
Backer board gives tile a more stable, more predictable base. It helps separate the finished surface from the movement and moisture issues that ruin installations. That's why experienced setters don't treat it like an optional add-on. They treat it like part of the tile system.
A lot of homeowners assume tile can go right over a wood surface if the floor feels solid underfoot. Sometimes it feels solid and still isn't stable enough for tile. Wood expands and contracts. Tile and grout don't forgive that movement.
Practical rule: If the substrate has bounce, seams, moisture exposure, or unknown layers, the job isn't ready for tile just because it looks flat.
That thinking isn't just residential best practice. In commercial construction, tile backer board usage stands at 32% globally, which highlights how heavily large-scale projects rely on it where moisture resistance and structural integrity matter most, according to Fortune Business Insights on the tile backer board market. Commercial builders don't spend money on extra steps for fun. They use systems that hold up.
The hidden failures start below the tile
When a tile floor cracks, people often blame the tile itself. Usually, the issue started lower down.
Common root problems include:
- Subfloor movement: Minor deflection telegraphs upward and stresses grout joints first.
- Poor support at seams: If board joints aren't planned and treated correctly, the tile assembly develops weak lines.
- Moisture exposure: In bathrooms, laundry areas, and entryways, water finds every shortcut.
- Improper fastening: A board that isn't seated and secured correctly can shift just enough to create trouble later.
What works and what doesn't
What works is a complete system. Flat substrate, right board for the application, proper mortar bed, correct fastening, reinforced seams, and waterproofing where the space demands it.
What doesn't work is treating tile backer board installation like a cosmetic prep step. It isn't. It's the structural and moisture-management layer that gives the finish above it a chance to last.
That's the difference between a tile job that still feels tight years later and one that starts talking back the first winter after installation.
Choosing the Right Backer Board for Your Project
There isn't one best backer board for every job. There's the right board for the floor, wall, moisture exposure, weight, and workflow you're dealing with.
A mudroom floor in Wayland and a shower wall in Wellesley don't ask for the same thing. One needs impact resistance and steady support under foot traffic. The other needs clean waterproof detailing and easier handling on vertical surfaces. Choosing correctly at this stage prevents a lot of frustration later.
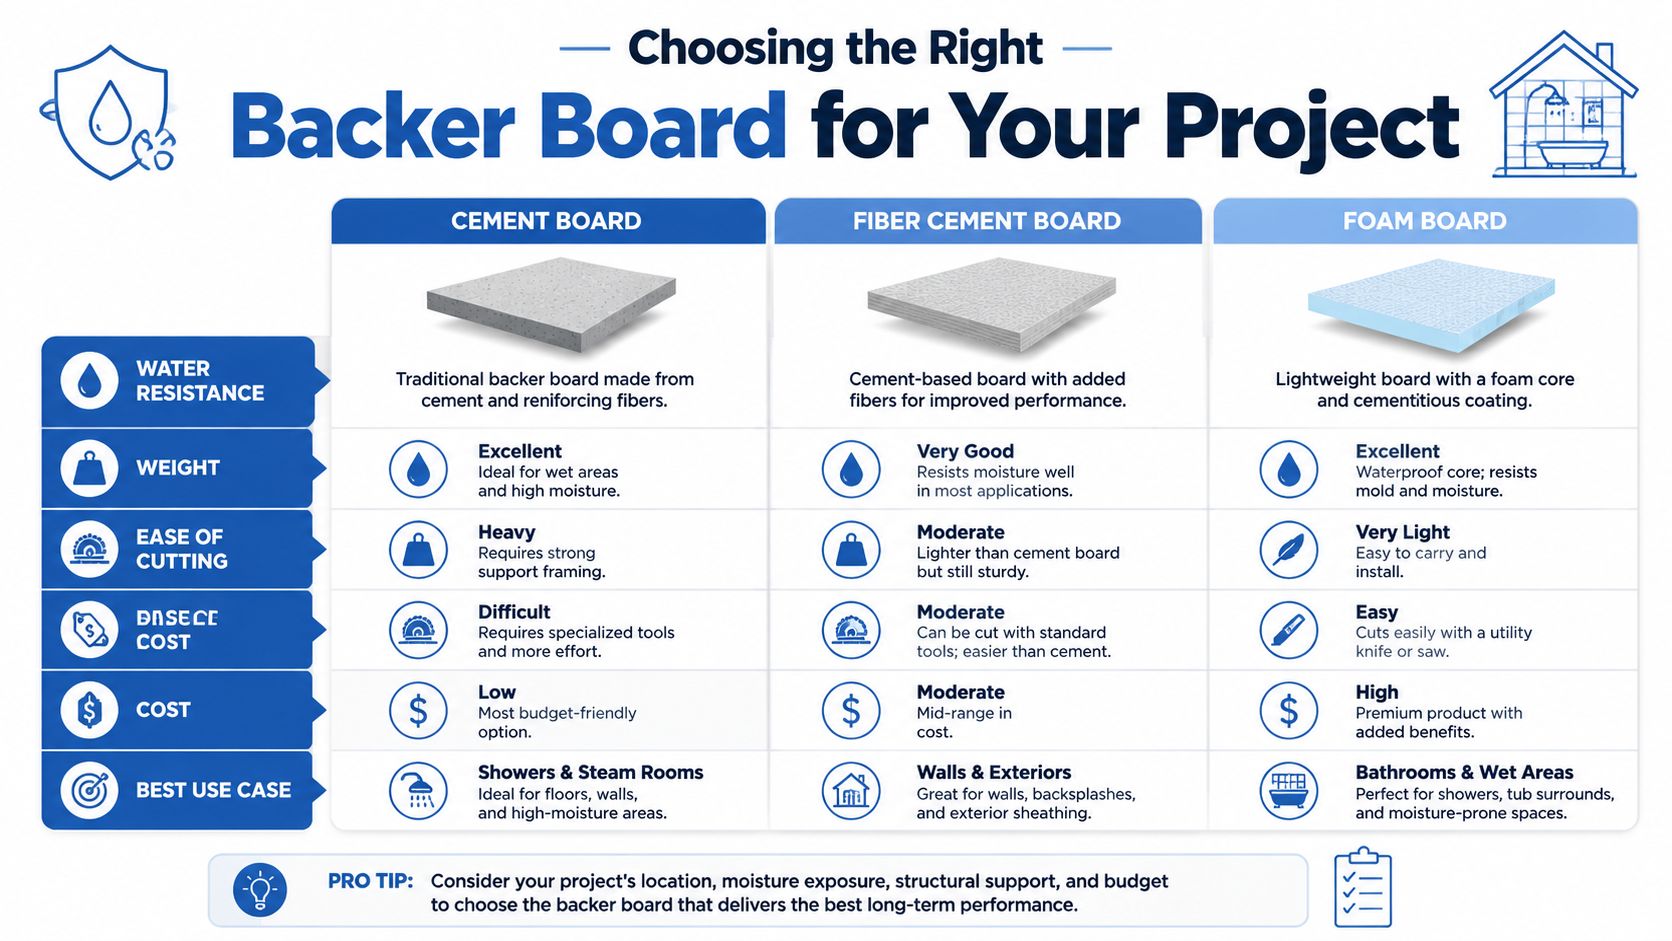
Cement board where strength matters most
Cement board is the old reliable option for a reason. It's dense, durable, and well suited for floors that need a rugged underlayment beneath ceramic or porcelain tile.
On a high-traffic mudroom or entry, that toughness helps. It's also a familiar material for many installers, and the performance is predictable when it's embedded and fastened correctly. The trade-off is labor. It's heavier, dustier, and harder on blades and knees.
Fiber cement for cleaner cuts and tighter remodel work
Fiber cement can be a smart fit when you want a board that's easier to handle and cut with more precision. In remodel work, especially where you're fitting around door jambs, vents, vanity footprints, or awkward corners, that cleaner cutting can save time and help produce tighter details.
It still needs proper support and fastening. It's not a shortcut product. It just tends to be friendlier in spaces where accuracy matters and the room doesn't offer much forgiveness.
If you're also planning the visible finish, this guide on bathroom tile installation ideas and process pairs well with substrate planning because layout decisions above the board often affect cuts below it.
Foam board for waterproof-focused wall systems
Foam board changes the workflow. It's lightweight, easier to lift into place on shower walls, and often chosen when waterproofing is a central priority. That can be especially useful in a primary bath remodel where the goal is a cleaner wall assembly and less strain handling sheets overhead.
The trade-off is feel and application. Foam board isn't the choice for every floor, and some installers prefer a denser board underfoot. On walls, though, it can make sense in the right system.
Here's a quick side-by-side view.
| Material Type | Best For | Average Cost (per sq. ft.) | Key Pro | Key Con |
|---|---|---|---|---|
| Cement Board | Floors, wet areas, durable general-use installations | Varies by brand and market | Strong, proven, durable under tile | Heavy and messier to cut |
| Fiber Cement Board | Remodels with detailed cuts and tighter layouts | Varies by brand and market | Cleaner handling and easier cutting | Still requires careful fastening and seam treatment |
| Foam Board | Shower walls, waterproof-focused assemblies | Varies by system and market | Lightweight and well suited to wet wall systems | Not the default choice for every floor application |
Pick the board based on the room, not the shelf label. The easiest panel to carry isn't automatically the best panel to build on.
For most homeowners, the right choice comes down to two questions. Is this a floor or a wall, and how much moisture will the area see over time? Once those answers are clear, the best option usually narrows quickly.
Subfloor Preparation The Foundation of a Flawless Finish
The floor tells you a lot before the first board is cut. If it dips, squeaks, moves, or carries old adhesive ridges, it's already warning you not to rush.
Professional tile backer board installation starts with the subfloor because the board can't fix structural weakness. It can help create a suitable tile base, but it doesn't turn a bad floor into a good one. If the framing or sheathing below is undersized, damaged, or flexible, that problem has to be addressed first.
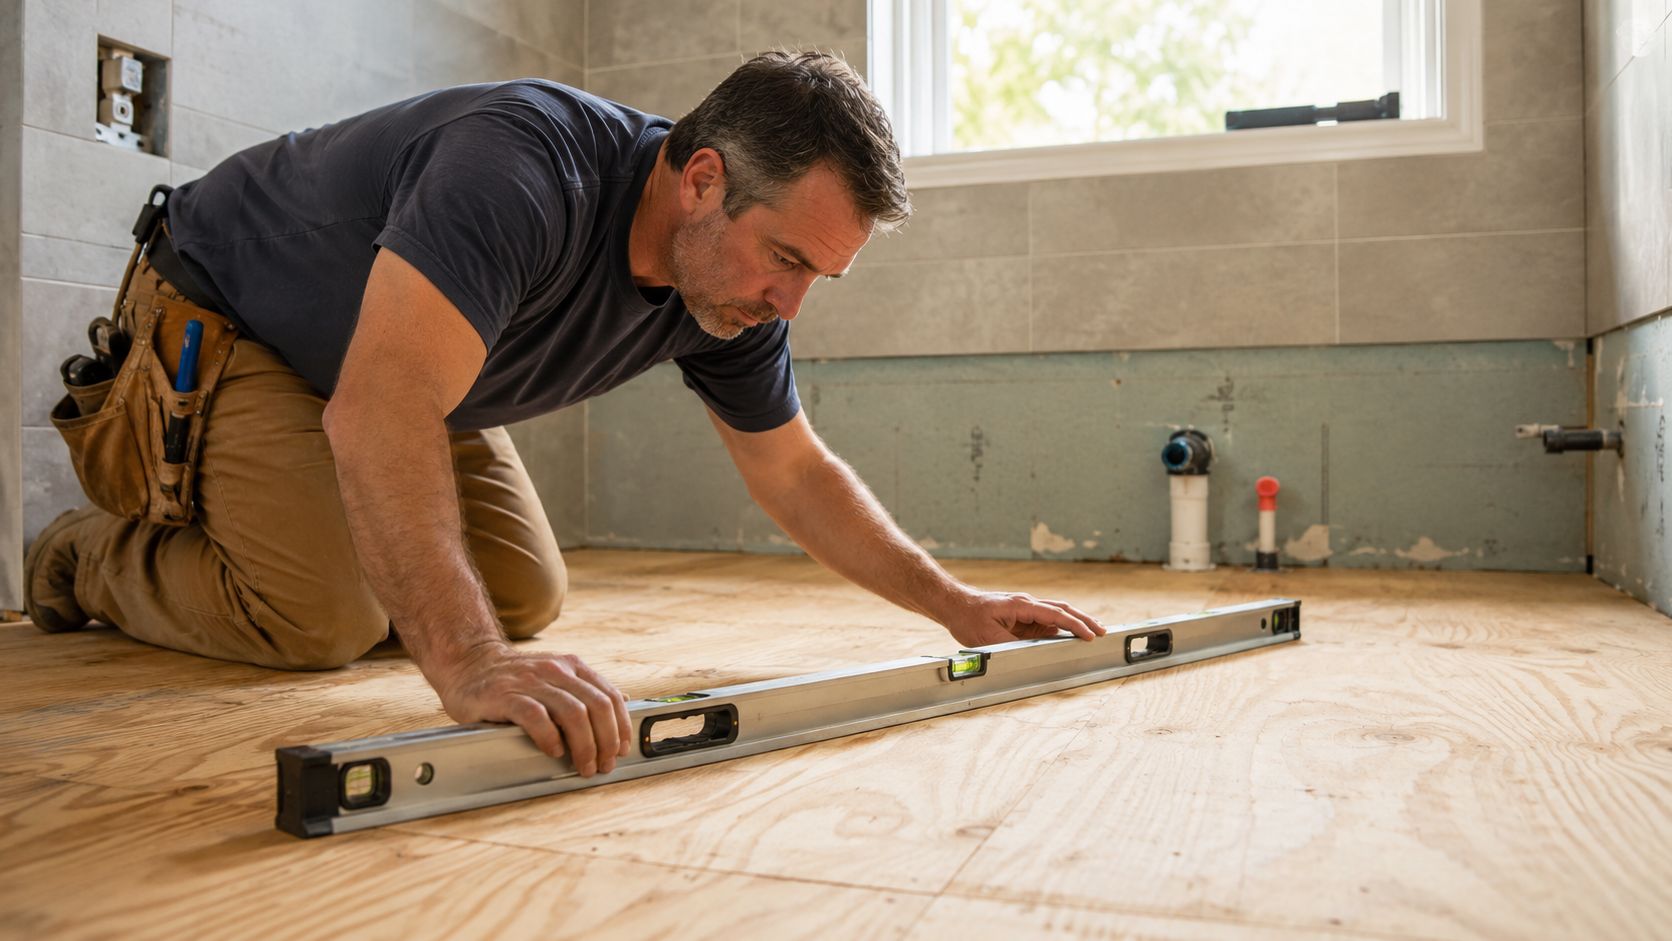
What gets checked before any board goes down
The first check is flatness. A long level or straightedge shows crowns, valleys, and patched areas that can leave voids under the board. Those voids matter because unsupported spots become pressure points.
The second check is fastening and integrity. Loose subfloor panels need to be resecured. Soft spots around toilets, tubs, exterior doors, and old leak areas need close attention. If the wood is compromised, covering it is not repair.
Then there's cleanliness. Thinset can't bed the board properly over dust piles, paint overspray, protruding fasteners, or blobs of dried compound. Prep isn't glamorous, but neat work begins here.
A few things get skipped too often:
- Panel edges: Raised seams in plywood telegraph through the assembly if left proud.
- Fastener heads: Anything sticking up keeps the board from lying flat.
- Old vinyl or residue: Unknown layers make bond and height control less predictable.
- Deflection: If the floor has spring, tile will eventually expose it.
What the 1 1/4-inch requirement means in real life
For floor installations, the minimum total substrate thickness is 1 1/4 inches, based on TCNA guidance cited in this tile backer board overview from Lili Tile. The purpose is simple. The floor assembly needs enough support to carry tile without excessive deflection over time.
For a homeowner, that means plywood alone often isn't enough, even when it seems substantial. The system has to resist movement, not just hold a person standing on it. Tile is a finish material that punishes flex.
A floor can feel strong to your feet and still be too flexible for tile.
That's why many remodels need subfloor improvement before underlayment goes down. Sometimes that means adding plywood. Sometimes it means replacing damaged sections. Sometimes it means stepping back and solving a framing issue first.
If you're comparing finished-surface options after the subfloor is corrected, this article on porcelain tile installation for floors and wet spaces is useful because porcelain performs best when the structure below it is dialed in.
A flat, clean, properly built substrate makes every step after this easier. Layout improves. Fastening goes faster. Tile sits tighter. Grout lines stay more consistent. Most of the “tile problems” people notice at the end start with prep they never see.
Layout Cutting and Fastening Your Backer Board
Once the floor or wall is ready, the job becomes about precision. At this stage, experienced installers separate efficient work from hurried work.
Good board installation doesn't start with screws. It starts with dry layout. Panels need to fit the room without creating weak points, awkward slivers, or clusters of seams in the same area. If four corners meet in one spot, that area becomes a trouble zone. Staggering joints spreads stress more intelligently across the surface.
Start with layout not fasteners
Dry-fit every sheet before mixing mortar. Mark penetrations carefully around floor vents, toilet flanges, tub fronts, and heat lines. In bathrooms around Newton and Weston, older room dimensions are rarely square, so trusting one wall without checking can throw the whole layout off.
The cleaner approach is to:
- Measure the room in multiple spots.
- Pre-plan seams so they don't align with weak subfloor joints when avoidable.
- Leave proper spacing between sheets and at perimeter transitions rather than butting everything tight.
- Number the pieces if the room has many cuts.
That sequence reduces rework and keeps the install moving once mortar is down.
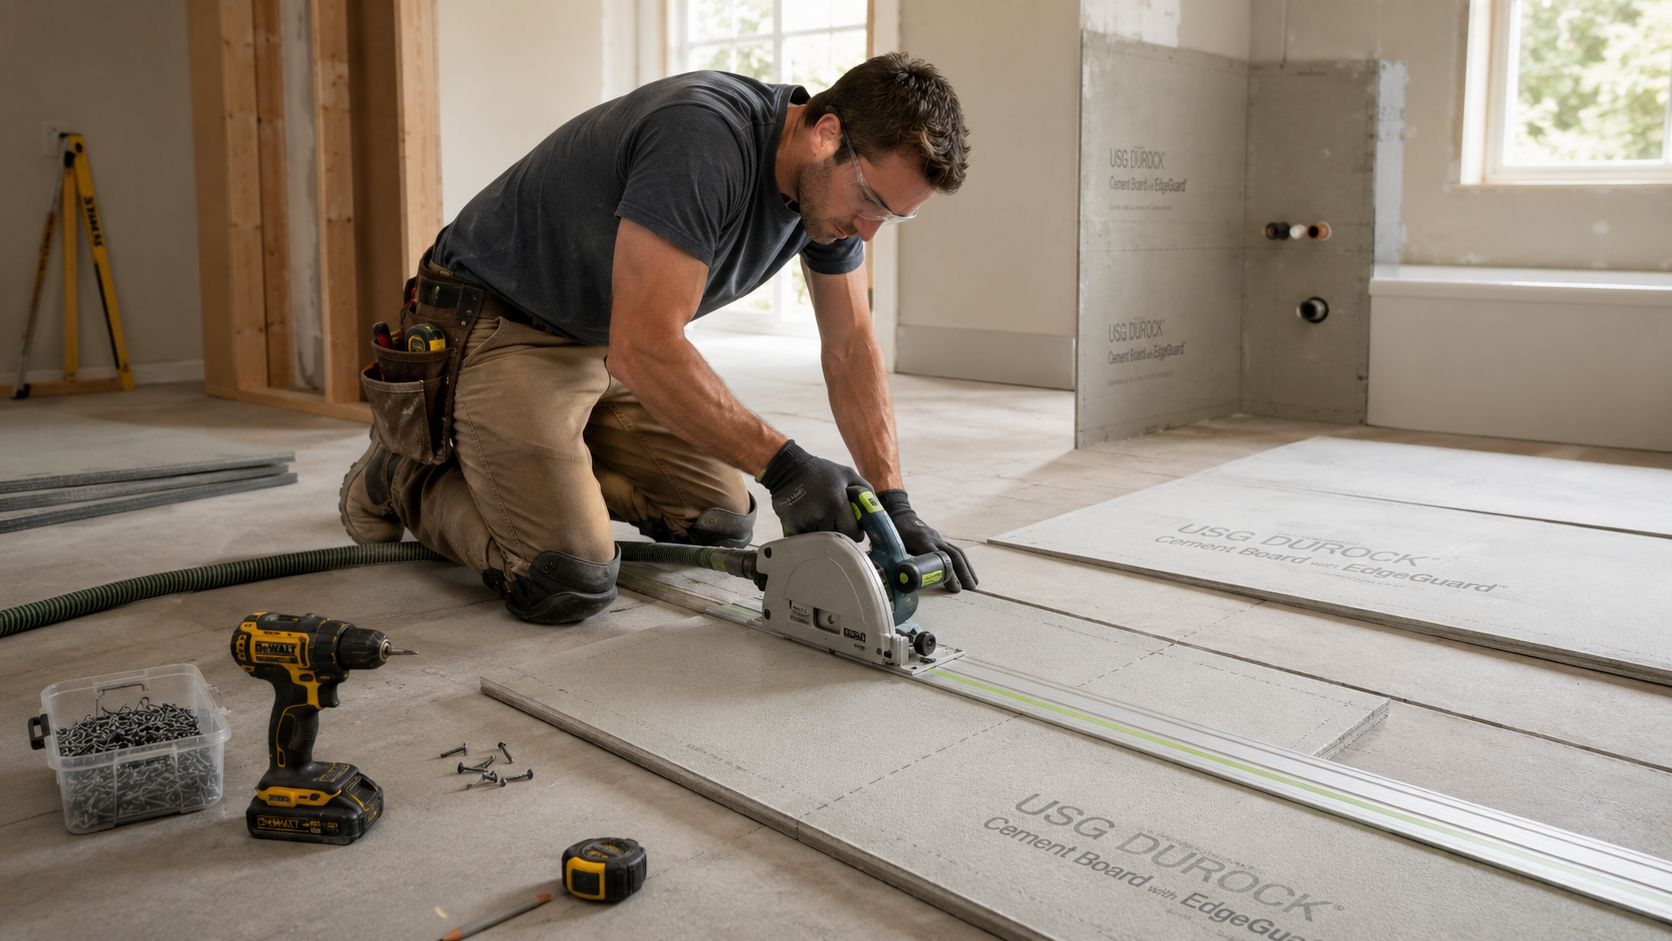
Cutting methods that match the board type
Different products want different tools. Cement board often gets scored with a carbide-tipped knife and snapped, then refined with a rasp or blade where needed. Fiber cement usually cuts more cleanly but still benefits from careful dust control and edge cleanup. Foam board often cuts with a utility knife, which makes it attractive on shower walls and detailed remodels.
What doesn't work is forcing every product through the same method and hoping the edge quality won't matter. Ragged cuts around plumbing, corners, and niches create avoidable fitting problems.
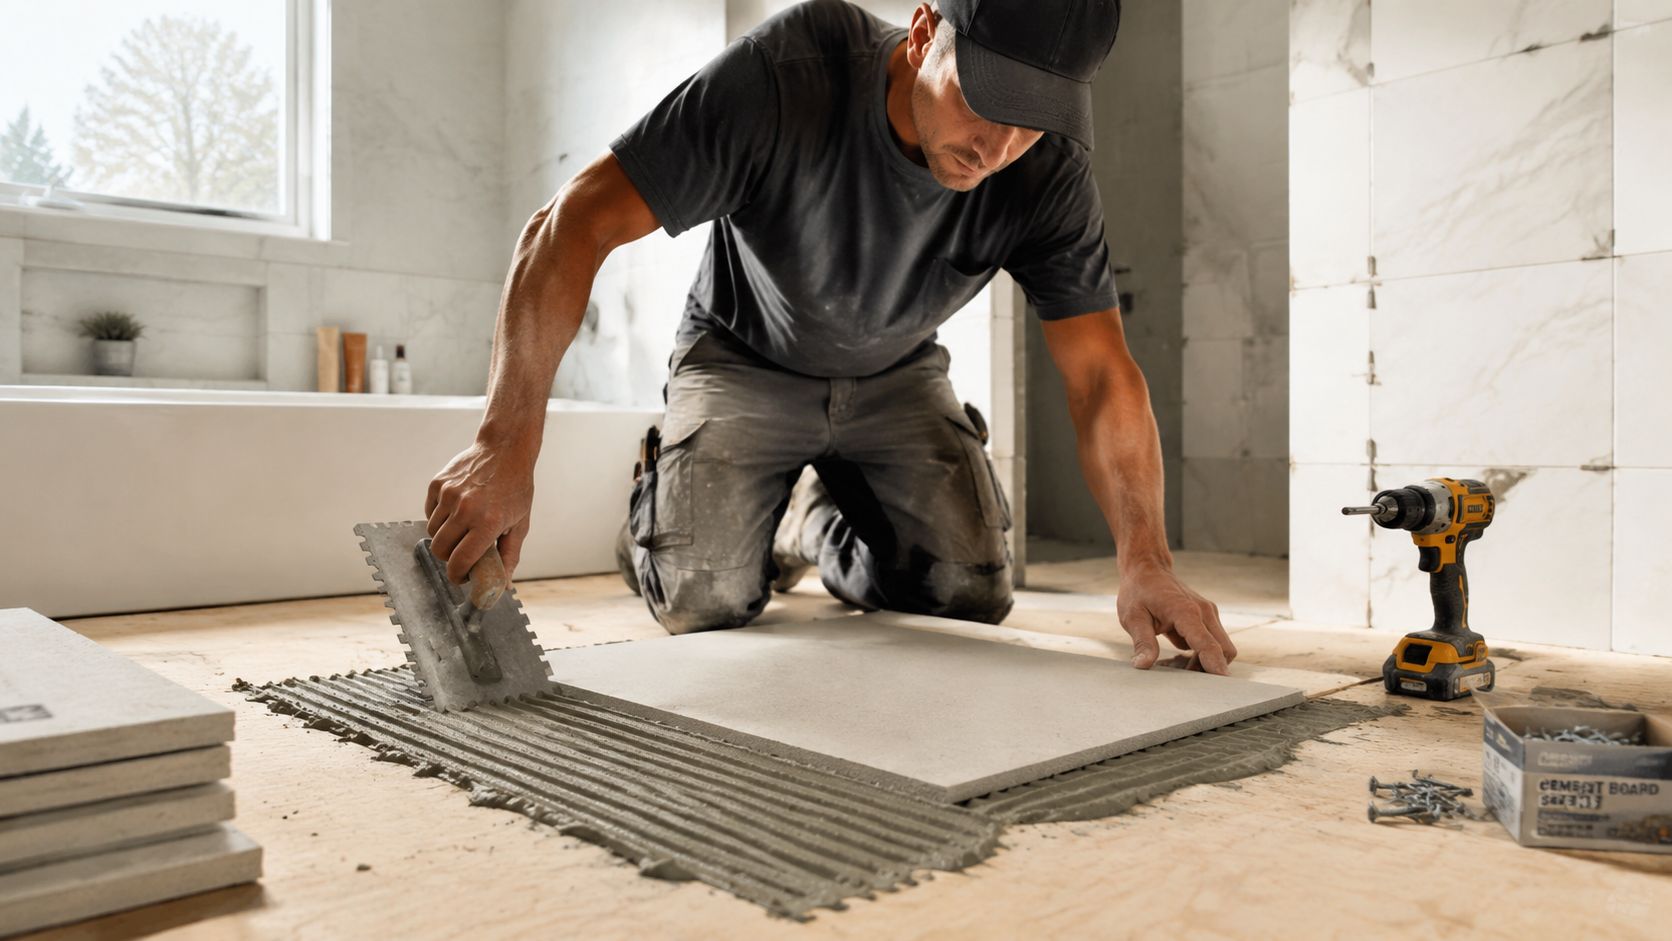
Why the mortar bed matters
This is one of the biggest DIY misunderstandings. The thinset under the board is not there to glue the panel down in the way many people imagine. Its real job is to fill voids and create continuous support.
For structural integrity, backer board should be fully embedded in a bed of thinset mortar before mechanical fastening, creating a void-free bond, with screws driven every 6 to 8 inches and set flush or slightly below the surface, as described in ProLux Materials' installation guidance. If the board bridges low spots without full support underneath, weight transfers unevenly. That's where movement starts.
Using the right trowel and combing the mortar consistently matters. So does placing the panel while the mortar is workable, not after it skins over.
Mortar under backer board supports the panel. It doesn't replace proper fastening, and fastening doesn't replace full support.
Fastening pattern that holds up
After the board is bedded, it gets mechanically fastened in a pattern that keeps it tight to the substrate without damaging the panel. Screws should be compatible with the backer board and corrosion-resistant for the application. Head depth matters. Proud screws interfere with tile setting. Overdriven screws crush the board face and weaken the hold.
For cement board floors, The Home Depot installation guide for cement board notes that screws should be placed every 6 to 8 inches, positioned at least 1/2 inch but no more than 2 inches from the sheet edge, with heads driven slightly below the surface. That edge distance matters because fasteners too close to the perimeter can break down the panel instead of securing it.
A reliable workflow looks like this:
- Set the first sheet fully: Don't fasten one side and leave the rest floating.
- Work from the center outward: That helps seat the panel evenly into the mortar bed.
- Follow a consistent pattern: Random fastening usually means missed support.
- Check every head by hand: If a trowel would catch it, the tile mortar will too.
The goal is a rigid, flat underlayment that acts like one stable plane. Once the board is down correctly, tile installation gets far less dramatic.
Joint Treatment Waterproofing and Pro-Level Details
A tile job can look perfect on day one and still fail at the seams six months later. I see that in Massachusetts bathrooms all the time, especially in older houses where seasonal movement, patched framing, and years of moisture exposure put extra stress on every joint.
Treat the seams as structural, not cosmetic
Backer board panels do not become one stable surface until the joints are taped and mortared. Leaving seams untreated gives movement a place to concentrate, and tile usually cracks where the substrate was allowed to act like separate pieces.
According to Hydroblok's backer board installation article, joints should be reinforced with alkali-resistant fiberglass mesh tape embedded in thinset, and fasteners placed too close to the edge can fracture the board. That tracks with what holds up in the field. Good seam treatment spreads stress across the assembly instead of letting it collect at one line.
The method matters:
- Use alkali-resistant mesh tape made for tile work: Drywall tape breaks down in cement-based materials.
- Embed the tape in thinset, not on a dry surface: The mortar does the bonding work.
- Knife the joint flat: A hump at every seam turns into lippage trouble, especially with smaller tile.
- Take corners and board transitions seriously: Those are common crack points because movement changes direction there.
One bad seam can print through an otherwise well-built floor or wall.
Waterproofing is a system
Backer board handles tile well. It does not stop water by itself. In showers, tub surrounds, and other wet areas, the board needs to be part of a full waterproofing plan.
That usually means a liquid-applied membrane or a sheet membrane over the face of the board, with special attention at corners, niches, valve penetrations, mixing valves, shower heads, and any change of plane. Flat field areas are the easy part. Leaks start at interruptions and transitions.
In older Massachusetts homes, I pay even closer attention to that layer. Many bathrooms here have seen multiple remodels, uneven framing, and hidden moisture damage around tubs and exterior walls. A waterproofing membrane gives the assembly a controlled way to shed water instead of letting that moisture drift into the cavity and stay there.
For homeowners comparing options, our professional tile installation services in Massachusetts are built around that full-system approach, not just getting board on the wall and tile on the surface.
Pro details that prevent expensive callbacks
The small details separate work that lasts from work that just looks clean at handoff.
The board-to-flange area is a good example. In a shower or tub surround, the board should stop short of the receptor or tub flange and be integrated correctly with the waterproofing layer. If that area is handled poorly, water can collect where it should be draining, and the failure often stays hidden until trim, paint, or the room below starts showing it.
The same standard applies around fastener penetrations, plumbing cutouts, niches, benches, and inside corners. Membrane coverage has to be continuous. Fasteners belong where the manufacturer allows them. Openings around valves should be tight and sealed as part of the system, not left as oversized cuts hidden behind trim plates.
Anyone can install panels and call it ready. Professional work shows up in the details that keep water moving in the right direction and keep the substrate acting like one solid surface for years.
Common Mistakes and When to Call Sunny Day Pro Services
Most failed tile jobs don't come from one dramatic mistake. They come from a string of small shortcuts that looked harmless at the time.
A board gets installed over a weak patch. Screws are overdriven. Seams aren't taped. Panels are butted too tightly. A shower wall misses a waterproofing detail around a valve. Then the tile goes in, everything looks clean, and the problems start months later when the house moves or the bathroom stays wet day after day.

Mistakes that show up after the tile is installed
Some errors reveal themselves almost immediately. Others wait. The expensive part is that tile often has to come back out before the root issue can be fixed.
Watch for these failure points:
- Skipping the flange gap: In showers and tub surrounds, the board belongs 1/4 inch above the pan or tub flange, not over it, as highlighted in this tub and shower flange guidance. Missing that clearance can trap water and lead to leaks, delamination, and voided warranties.
- Driving screws too deep: A crushed face doesn't hold like an intact one.
- Ignoring board spacing: Tight joints leave no room for proper seam treatment.
- Treating backer board as waterproof by itself: In wet walls, that assumption causes trouble.
- Installing over a dirty or uneven substrate: Mortar can't compensate for neglect.
Another common issue is false confidence from online shortcuts. A fast video can make the job look linear and easy. Real rooms aren't. Floors are out of level, walls are out of plumb, and corners aren't clean ninety-degree corners. That's why experienced tile installers spend so much time on prep and dry fitting.
When a pro install is the better call
If the room is a simple, dry, square space and you're comfortable with layout, cutting, substrate repair, and waterproofing details, you may be able to tackle it carefully.
If the project includes a shower, tub surround, old subfloor, structural questions, multiple penetrations, large-format tile, or expensive finish materials, professional installation usually makes more sense. The hidden work under the tile decides whether the visible work survives.
Homeowners in Wayland, Wellesley, Weston, Needham, Newton, and nearby communities often reach the same conclusion after pricing tools, materials, disposal, and the cost of a redo. A clean result is great. A durable result is the standard that matters.
If you're weighing DIY against a professional installation, review Sunny Day Pro Services tile services to see the kinds of projects their team handles across Massachusetts homes.
If you want the tile to look right and stay right, Sunny Day Pro Services is a strong local choice for Massachusetts homeowners who don't want guesswork under the finished surface. Request a quote, get clear communication, and move forward with a team that understands the difference between a fast install and a lasting one.

