
Your Complete Guide to Bathroom Tile Installation in 2026
A complete guide to bathroom tile installation in Massachusetts. Learn about costs, choosing tiles, and how to hire a pro for your Wayland or Newton home.
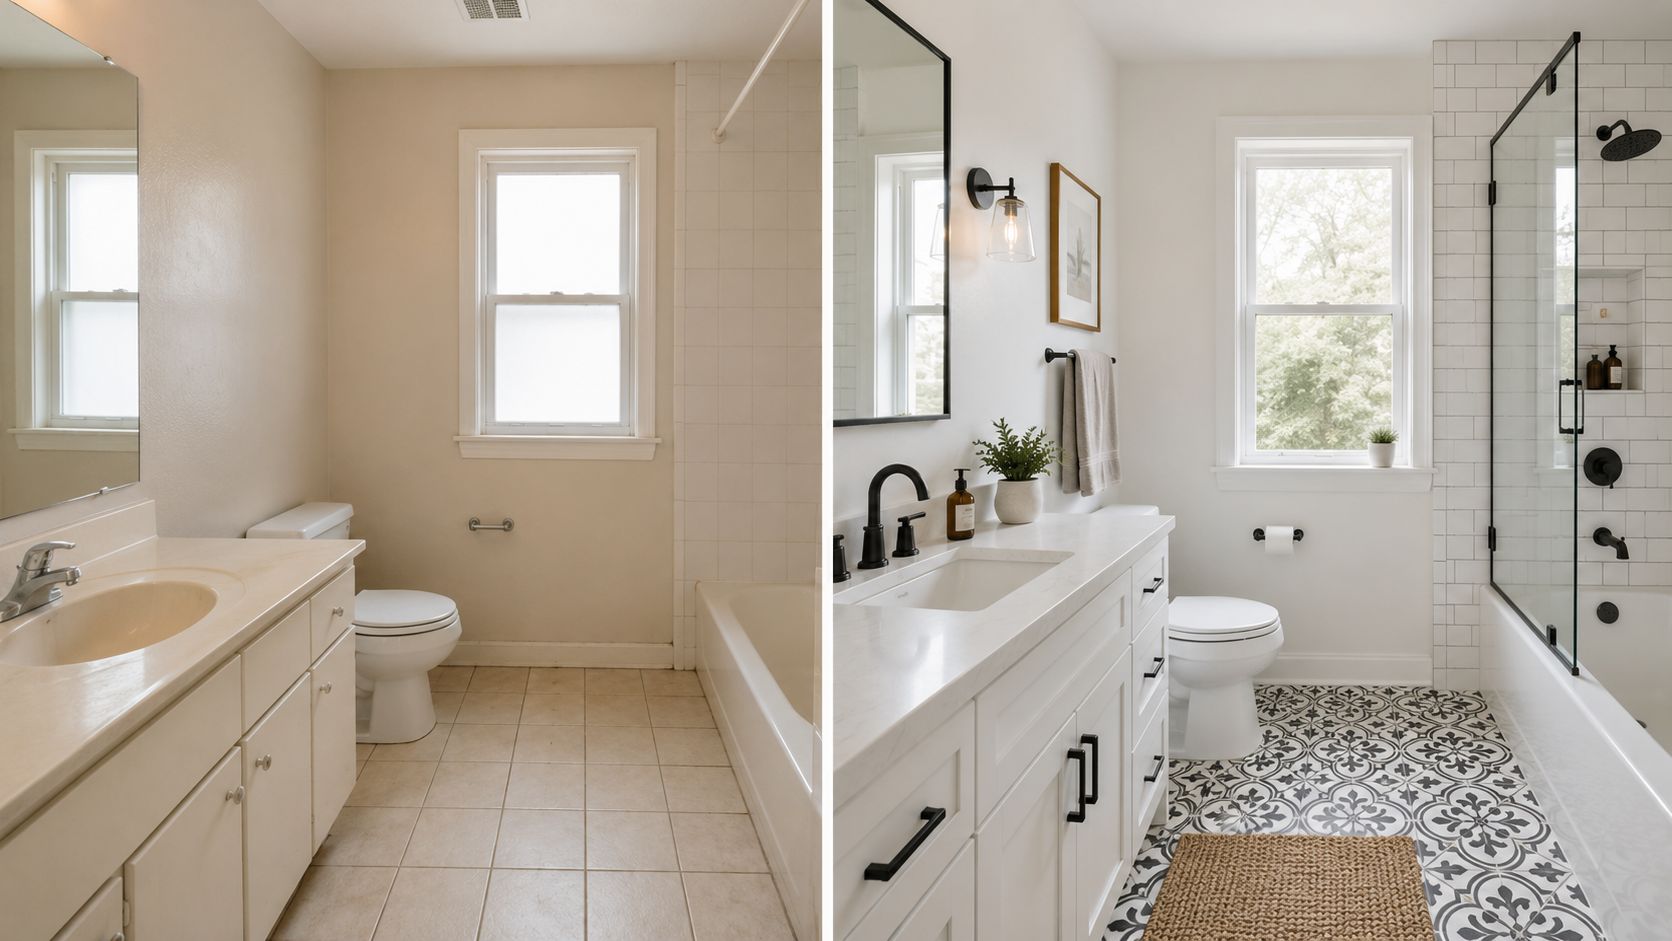
A bathroom remodel is one of the most impactful upgrades you can make to your home, and tile is almost always the star of the show. It sets the tone for the entire space, from a spa-like retreat to a sleek, modern oasis. But a successful bathroom tile installation is about so much more than just picking a pretty color. It’s a technical process that demands precision, skill, and an expert’s touch to ensure it lasts for decades.
This guide is designed to demystify the entire process for homeowners. We'll break down what can feel like a massive project into simple, understandable steps—from choosing the right materials for a high-moisture environment to knowing what a high-quality, professional job actually looks like.
Table of Contents
- Your Roadmap to a Flawless Bathroom Tile Transformation
- Ceramic vs. Porcelain: The Workhorse Materials
- Natural Stone and Glass: The Luxury Options
- How Long Does a Professional Bathroom Tile Installation Take?
- Can I Shower Immediately After the Tile Is Installed?
- What Is the Best Way to Clean My New Bathroom Tile?
Your Roadmap to a Flawless Bathroom Tile Transformation
For homeowners in communities like Wayland, Newton, and Wellesley, our goal is to give you the confidence to move forward. We want to take you from a saved folder of inspiration photos to a stunning finished bathroom you'll love for years to come.
Here’s what we’ll cover to help you get there:
- Choosing the perfect tile that not only fits your style but can handle the demanding, moist environment of a bathroom.
- Getting a handle on the true costs of a professional installation so there are no surprises.
- Learning to spot quality workmanship and avoid the common mistakes that can ruin a project.
Step 1: Choosing the Perfect Tile for Your Massachusetts Bathroom
Picking out tile is easily the most exciting part of any bathroom remodel. For those of us here in Massachusetts, especially in towns like Needham and Weston, it’s all about finding that sweet spot between the style you love and the durability a hardworking bathroom demands. Your tile choice has to stand up to daily moisture, be easy to maintain, and fit within your budget.
Let's walk through the most popular options, focusing on what truly works in a New England home.
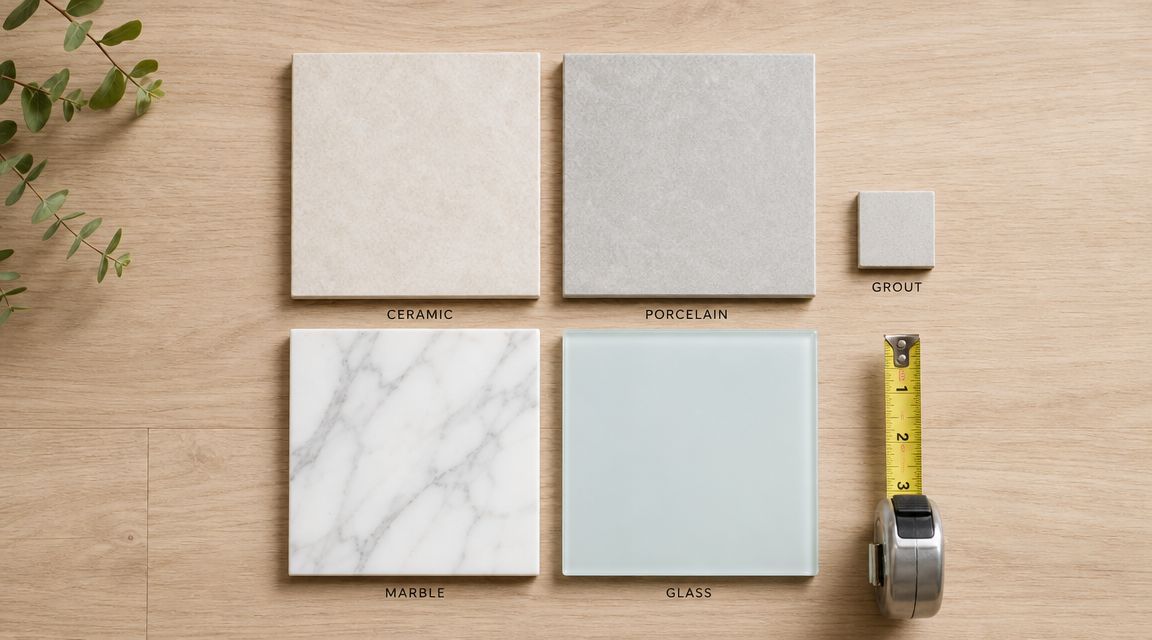
Ceramic vs. Porcelain: The Workhorse Materials
At first glance, ceramic and porcelain seem almost interchangeable. While they’re both clay-based products fired in a kiln, the manufacturing process creates crucial differences that are especially important in a bathroom.
Porcelain is made from a finer, purer clay and is fired at much higher temperatures. This intense process makes porcelain denser, less porous, and more durable than standard ceramic. With a water absorption rate of less than 0.5%, it's practically waterproof, making it the gold standard for shower floors, wet walls, and any high-traffic floor.
Ceramic is still a fantastic and reliable option. It’s a bit more absorbent but offers excellent performance for its price point, making it a budget-savvy choice for bathroom floors and walls outside the direct splash zone of a shower. Plus, the design options are nearly endless.
Expert Insight: Here’s a design rule I always share with my clients: let one surface be the star. If you fall in love with a bold, patterned floor tile, pair it with a simpler, solid-colored tile on the shower walls. If you’re dreaming of an intricate mosaic in the shower, keep the floor classic and quiet. This simple "one pattern" approach keeps the room from feeling busy and overwhelming.
Natural Stone and Glass: The Luxury Options
If you're aiming for a touch of opulence, natural stone or glass tile can elevate your bathroom from functional to fabulous.
Marble Tile: Nothing says luxury quite like marble. It delivers a timeless, high-end look that’s hard to beat. The trade-off? Marble is porous and needs to be sealed regularly to guard against stains and water damage. It's also softer than porcelain, so it can scratch. It’s a stunning choice for a powder room or as an accent wall in a master bath where moisture and foot traffic are less of a concern.
Glass Tile: For a pop of color and light, glass tile is a showstopper. It’s perfect for creating a vibrant backsplash or a shimmering decorative border in a shower. Since it's non-porous, it’s completely waterproof. Just keep in mind that it's often more expensive and its surface can be too slick for floors.
To help you weigh these popular options, here is a quick comparison of what you can expect from each material.
| Tile Type | Average Material Cost (per sq ft) | Best For | Key Feature |
|---|---|---|---|
| Ceramic | $2 - $15 | Floors, walls, backsplashes | Unbeatable value and design variety |
| Porcelain | $4 - $25 | Shower floors, wet walls, high-traffic floors | Extremely durable and water-resistant |
| Natural Stone | $8 - $50+ | Accent walls, low-traffic floors | Unmatched luxury and unique veining |
| Glass | $10 - $40+ | Shower accents, backsplashes | Luminous, vibrant color and waterproof |
Ultimately, choosing the best material is about finding what works for your lifestyle, budget, and aesthetic. For a deeper dive into creating a cohesive look, check out our guide on how to choose tile for a bathroom for more tips.
Step 2: Decoding the Cost of Bathroom Tile Installation
When you're planning a bathroom tile project in Massachusetts, the first question is always, "How much will this cost?" It’s a simple question, but the answer involves more than just the price of the tile. The final cost for homeowners in Wellesley or Weston reflects the skilled labor, meticulous preparation, and quality materials required for a beautiful, long-lasting job.
Think of the initial quote as a starting point. The true cost becomes clear once we factor in the unique conditions of your existing bathroom.
Key Cost Factors You Should Know
Understanding what drives the total investment in a tile project can save you from expensive surprises. While a complete project can run anywhere from $15 to $75 per square foot for materials and labor, several critical services determine where your project lands in that range. You can find more details about tile installation costs on Angi.com.
- Demolition and Removal: Before new tile goes in, the old materials have to come out. Tearing out and disposing of existing tile, backer board, and flooring is a dusty, labor-intensive job that can add $3 to $7 per square foot to your budget.
- Subfloor Preparation: This is non-negotiable. For tile to last, the surface beneath it must be perfectly flat and stable. If your floor has a dip of more than 1/8 inch over a 10-foot span, it needs to be corrected. Applying a self-leveling compound is the professional solution, and that typically adds $2 to $5 per square foot.
- Layout Complexity and Waste: The pattern you choose directly impacts the bottom line. A classic grid pattern is straightforward, but intricate designs like herringbone or diagonal layouts require far more precision cutting and time. For these complex patterns, we plan for a 15% to 20% waste factor to account for the additional cuts.
From Powder Rooms to Walk-In Showers
The size and complexity of your project are the biggest factors in your final price. Tiling a small, 30-square-foot powder room floor with standard ceramic tile will be on the most affordable end of the spectrum.
On the other hand, a custom walk-in shower is a completely different project. These installations are incredibly involved, requiring extensive waterproofing, precise cuts for shampoo niches and drains, and meticulous work on vertical surfaces. This level of detail places it firmly at the higher end of the cost range.
A professional quote isn’t just a number; it’s a detailed plan. It should clearly outline every step, from demolition to the final grout seal, ensuring you understand exactly what you’re paying for. This transparency protects your investment and prevents hidden costs.
We believe in providing honest quotes that truly reflect the scope of the work. For a more detailed breakdown, you might find our article on understanding your bathroom tile installation price helpful.
Step 3: What to Expect During a Professional Tile Installation
Hiring a pro to tile your bathroom isn't just about getting someone to stick tiles to the wall. It’s a multi-stage process where precision and expertise are everything. Understanding what a high-quality installation looks like from start to finish helps you know what you're paying for and ensures the final product is built to last.
A true professional’s work starts long before the first tile is ever set. It all begins with a solid, well-prepared foundation.
Surface Preparation and Waterproofing
This is, without a doubt, the most important part of the job. If the prep work is sloppy, nothing else matters. A professional crew will inspect and prepare the subfloor and walls, making sure everything is perfectly level, structurally sound, and clean. Any dips, bumps, or flexibility in the surface will eventually "telegraph" through the tile, leading to an uneven finish and, worse, cracks.
Next, and this is crucial for showers and tub surrounds, comes waterproofing. This involves applying a special membrane or a liquid-applied coating to create a seamless, watertight barrier. This step is your single best defense against the water damage and mold growth we so often see in poorly executed projects.
Expert Insight: Here's a pro tip: a properly waterproofed shower should be able to hold water before any tile is even installed. That's the level of detail that separates a job that looks good for a year from one that performs flawlessly for decades.
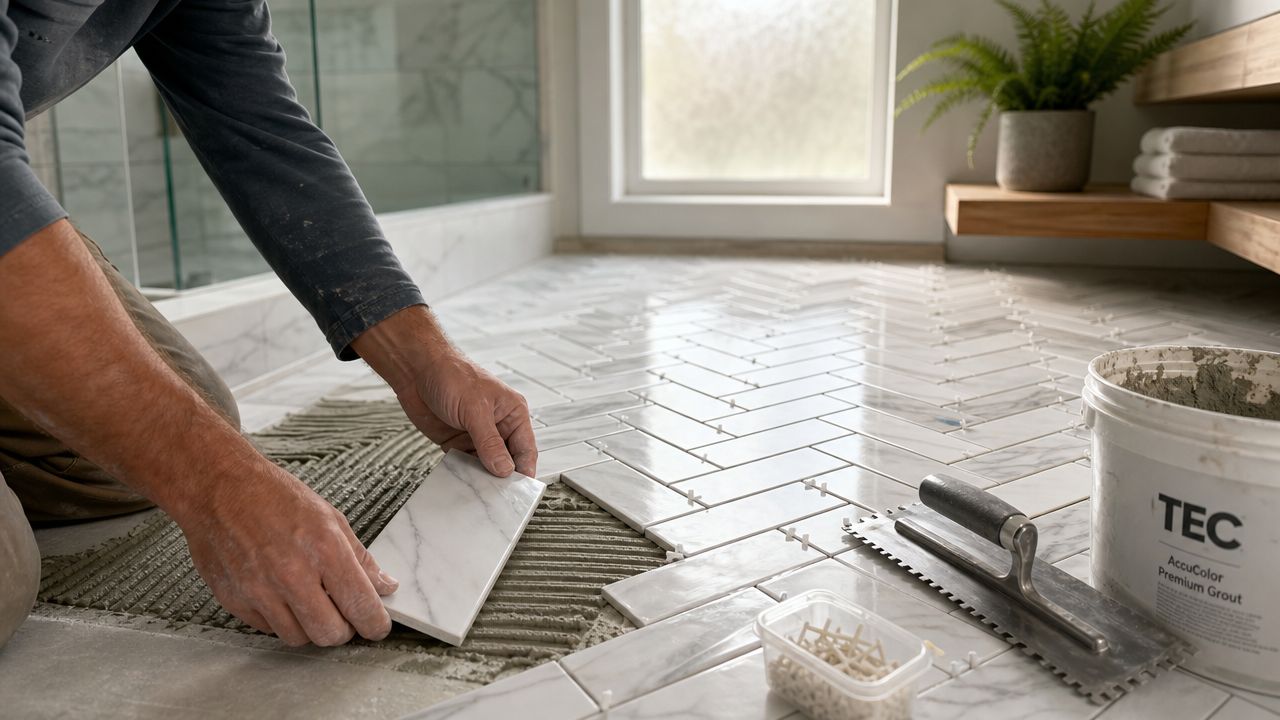
Layout, Setting, and Grouting
With the surface perfectly prepped, the focus shifts to bringing your vision to life. A skilled installer won’t just start laying tile from a random corner. They will carefully plan the layout to create balanced, symmetrical sightlines and minimize awkward-looking small cuts, especially around your vanity or in the shower niche.
Then, using a premium thin-set mortar, they’ll begin setting the tiles. This is where an experienced hand really makes a difference. They work to achieve 100% mortar coverage on the back of each tile, which is essential for a strong bond and a perfectly level surface.
This infographic shows how these critical stages—along with your tile choice and project complexity—factor into the final cost.

As you can see, demolition and subfloor prep aren't just minor details; they are significant drivers of the overall project investment.
After the tiles have had about 24 hours to set, the joints are filled with grout. The final touches involve meticulously cleaning off any grout haze, applying a quality sealant to protect against stains and moisture, and leaving your new bathroom absolutely pristine. If you're using one of the most popular and durable materials, our guide on porcelain tile installation offers a closer look at that specific process.
Step 4: Why a Professional Tile Installer Is Your Best Investment
It’s always tempting to tackle a bathroom tile project yourself to save a few dollars. But when it comes to a space that sees constant water and moisture, a DIY job can quickly turn from a weekend project into a costly, long-term nightmare. A bathroom is no place to cut corners. Hiring an experienced professional isn't just about convenience—it's a critical investment in your home's health and value.
Setting tile correctly is so much more than just getting the lines straight. It requires specialized tools, a deep understanding of modern waterproofing methods, and the kind of technical skill that only comes from years of practice.
The Hidden Risks of a DIY Tile Job
We’ve been called in to fix countless amateur tiling jobs, and the problems are almost always the same. They often stem from a simple lack of experience with the steps that absolutely cannot be skipped.
These mistakes can unfortunately lead to some serious headaches down the road:
- Hidden Water Damage: The biggest threat. Even a pinhole-sized gap in the waterproofing can let moisture slowly seep into your walls and subfloor. By the time you notice it, you could be dealing with rotted wood and major structural issues.
- Mold and Mildew Growth: When moisture gets trapped behind improperly sealed tiles, it creates the perfect breeding ground for mold. This isn't just ugly; it's a serious health concern for your family.
- Cracked Tiles and Grout: A professional knows the subfloor must be perfectly rigid and prepared. If it isn't, the natural settling and movement of your house will eventually cause tiles to crack and grout to crumble away.
- An Uneven, Unprofessional Finish: There’s nothing more frustrating than seeing a brand-new bathroom with a poorly planned layout, uneven tiles, or wide, sloppy grout lines. This kind of work can seriously hurt your home’s aesthetic and resale value.
Peace of Mind and Guaranteed Quality
When you hire a pro, you’re also ensuring the work meets all local building codes here in Massachusetts towns like Newton and Needham, which is non-negotiable for safety and compliance. It’s true that professional labor is a significant part of the cost—a 2026 survey noted that 51% of homeowners view labor as a top expense—but that figure reflects the immense skill involved. You can get a better sense of the trade from the U.S. Bureau of Labor Statistics.
At the end of the day, a professional installer delivers true peace of mind. Your investment is protected by experience, proven techniques, and, in many cases, a workmanship guarantee. That’s how you ensure your beautiful new bathroom will stand the test of time.
Step 5: Your Checklist for Hiring a Tile Contractor in Massachusetts
Finding the right contractor for your bathroom tile installation is the single most important decision you'll make. The quality of their work determines not just how your new bathroom looks, but how it holds up for years to come. For homeowners in Wayland, Wellesley, and our surrounding Massachusetts towns, this checklist will help you vet and hire a true professional with confidence.
Initial Screening and Vetting
Before you even pick up the phone to schedule an estimate, a little homework can save you a world of headaches. Doing some quick online research will help you separate the genuine pros from everyone else.
Verify Licensing and Insurance: This is the first, most critical step. Any contractor you consider must have a valid Massachusetts Home Improvement Contractor (HIC) license. They also need to carry both liability insurance and workers' compensation. This protects you and your home from any accidents on the job.
Check Online Reviews and Portfolios: Look at their past work on their website, Houzz, or social media. Do the photos show projects similar to what you have in mind? Pay close attention to the details. Also, see how they respond to feedback, both positive and negative.
Ask for Local References: A contractor who is proud of their work will be happy to provide references. Ask for contact information for 2-3 recent clients in your area. Speaking to a past customer is one of the best ways to get a real feel for their process and professionalism.
Key Questions to Ask Every Contractor
When a potential contractor comes to your home for the estimate, it's your opportunity to gauge their expertise. Their answers to a few specific questions will tell you everything you need to know about the quality you can expect.
Don't ever feel shy about asking detailed, technical questions. A true expert will be happy to explain their process and show you they know their craft. If someone gets defensive or vague, that's a major red flag.
"Can you detail your waterproofing method for showers?" This is non-negotiable. Look for specific product names in their answer, like a Schluter-Kerdi membrane, a liquid-applied membrane (such as RedGard or Hydro Ban), or a hot mop system. A vague answer like "we'll make it waterproof" isn't good enough.
"How do you ensure the subfloor is properly prepared?" A great tile job starts with a solid foundation. The contractor should talk about checking for a level surface and, just as importantly, addressing any deflection (flex) in the floor. Skipping this is a primary cause of cracked tiles and grout down the road.
"What does your written estimate include?" A professional bid is far more than just a price. It should be a detailed document that clearly outlines the full scope of work, specific materials, a project timeline, and a payment schedule. This transparency prevents costly "surprises" later on.
Common Questions About Bathroom Tiling Projects
It’s only natural to have questions when you’re planning a bathroom renovation. We hear many of the same great questions from homeowners all over our Massachusetts service area, from Wayland to Newton, so we’ve put together some straightforward answers to help you feel confident about the process.
How Long Does a Professional Bathroom Tile Installation Take?
For a standard bathroom, you can expect a professional retiling project to take about three to five days. This schedule gives us the time to do the job right, without rushing any of the crucial steps.
That timeframe covers everything from demolishing the old tile and preparing the surface to carefully setting the new tile, waiting for the grout to cure, and applying the final sealant. Of course, more complex designs with intricate mosaics or projects that require significant subfloor repair might extend the timeline. This efficiency is a huge part of hiring a seasoned pro—getting it right the first time is why the tile installation market has grown into a $17.2 billion industry in the U.S. You can explore tile installer marketing statistics to see just how much this field has grown.
A proper timeline isn't about speed; it's about durability. Rushing the curing time for thin-set or grout can compromise the entire job. We build in the time needed to guarantee a waterproof finish that will last for decades.
Can I Shower Immediately After the Tile Is Installed?
This is a big one, and the answer is a firm no. It’s absolutely critical to wait for all the materials to cure before you get them wet. As a general rule, we tell clients to wait at least 24 to 48 hours after the grout has been sealed before using the shower.
Giving it that extra day or two allows the grout to fully harden and the sealant to create an impenetrable, waterproof barrier. If you use the shower too early, moisture can seep in, weaken the grout, and cause problems down the road. We’ll always give you the specific curing times for the exact products used in your bathroom.
What Is the Best Way to Clean My New Bathroom Tile?
Keeping your new tile beautiful for years is easier than you might think. For most porcelain and ceramic tiles, a simple pH-neutral cleaner mixed with warm water is perfect for regular cleaning.
Stay away from harsh chemicals like vinegar or abrasive scrubbers. They can slowly eat away at your grout and might even scratch the tile’s finish. To keep grout lines looking fresh and prevent mold or mildew, it's also a good idea to have them resealed every one to two years, especially in a high-moisture area like a shower stall.
Ready to start your own bathroom transformation? The team at Sunny Day Pro Services has the expertise to bring your vision to life with flawless tile installation. Request your free estimate today

