
Bathroom Floor Drain Installation: A Complete How-To Guide
Master bathroom floor drain installation with this step-by-step guide covering tools, codes, waterproofing, and troubleshooting for Massachusetts homeowners.
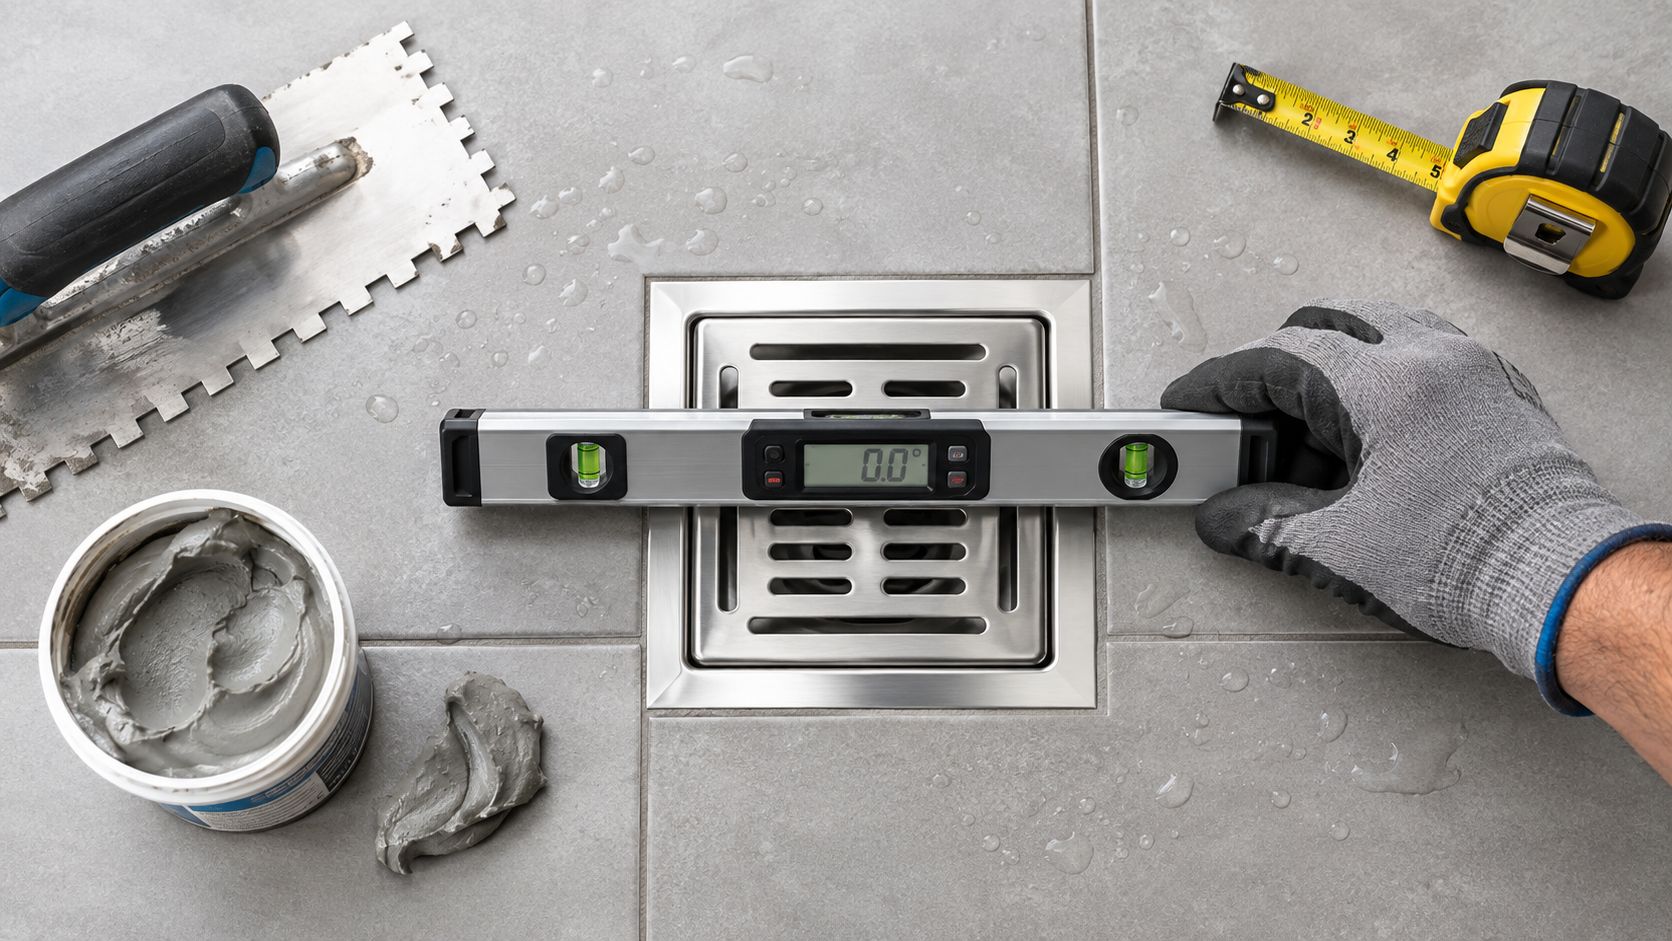
A bathroom floor drain usually fails long before the tile does. I've seen nice-looking floors hide a bad membrane tie-in, a blocked weep path, or a trap that dries out and starts smelling like a sewer. That's why bathroom floor drain installation has to be treated as a plumbing assembly, a waterproofing assembly, and a tile layout decision at the same time.
The job goes wrong when people start with the grate instead of the system beneath it. The drain body, trap, slope, flange, membrane, and finished floor height all have to line up before the first tile is set. Miss one of those details, and the repair gets expensive fast.
Table of Contents
Planning Your Bathroom Floor Drain Installation
Start by mapping the drain before anyone cuts anything. The right sequence is simple, rough-in verification first, drain selection second, waterproofing coordination third, and tile layout last. If you reverse that order, you can end up with a drain that looks centered but sits wrong under the finished floor, or a trap and vent arrangement that can't be approved once the walls are closed.

Read the room before you cut the floor
A good layout starts with the finished-surface low point. That low point needs to work with the framing, the waste line route, and the trap elevation, not fight them. If you're renovating an older bathroom, especially in Massachusetts, you also need to confirm whether you're dealing with a simple replacement or a full rebuild that affects venting, access, and permits.
The plumbing code baseline matters here. The International Plumbing Code sets a minimum 2-inch drain outlet and requires recognized product standards, removable strainers, cleanable construction, and ready access to the inlet, along with trap seals and approved sanitary discharge paths. Those details are spelled out in the IPC floor-drain provisions at up.codes.
Decide whether the floor can actually support the plan
A drain body is only as good as the floor around it. If the subfloor has no room for proper slope, or the existing structure forces an above-floor connection, you may need to open more than the finished tile. That's the part homeowners don't expect, but the hidden work is what keeps the drain from becoming a permanent weak spot.
Practical rule: If the drain can't be tied into the floor with proper slope, access, and a cleanable trap, it isn't a straightforward drain job.
In real remodels, I look for three things before promising a smooth install. First, where the vent and waste line already run. Second, whether the floor can be built to a uniform pitch. Third, whether the drain can be accessed later without tearing up tile. If those answers aren't clean, the project needs a different plan before waterproofing starts.
Choosing the Right Drain Type for Your Bathroom
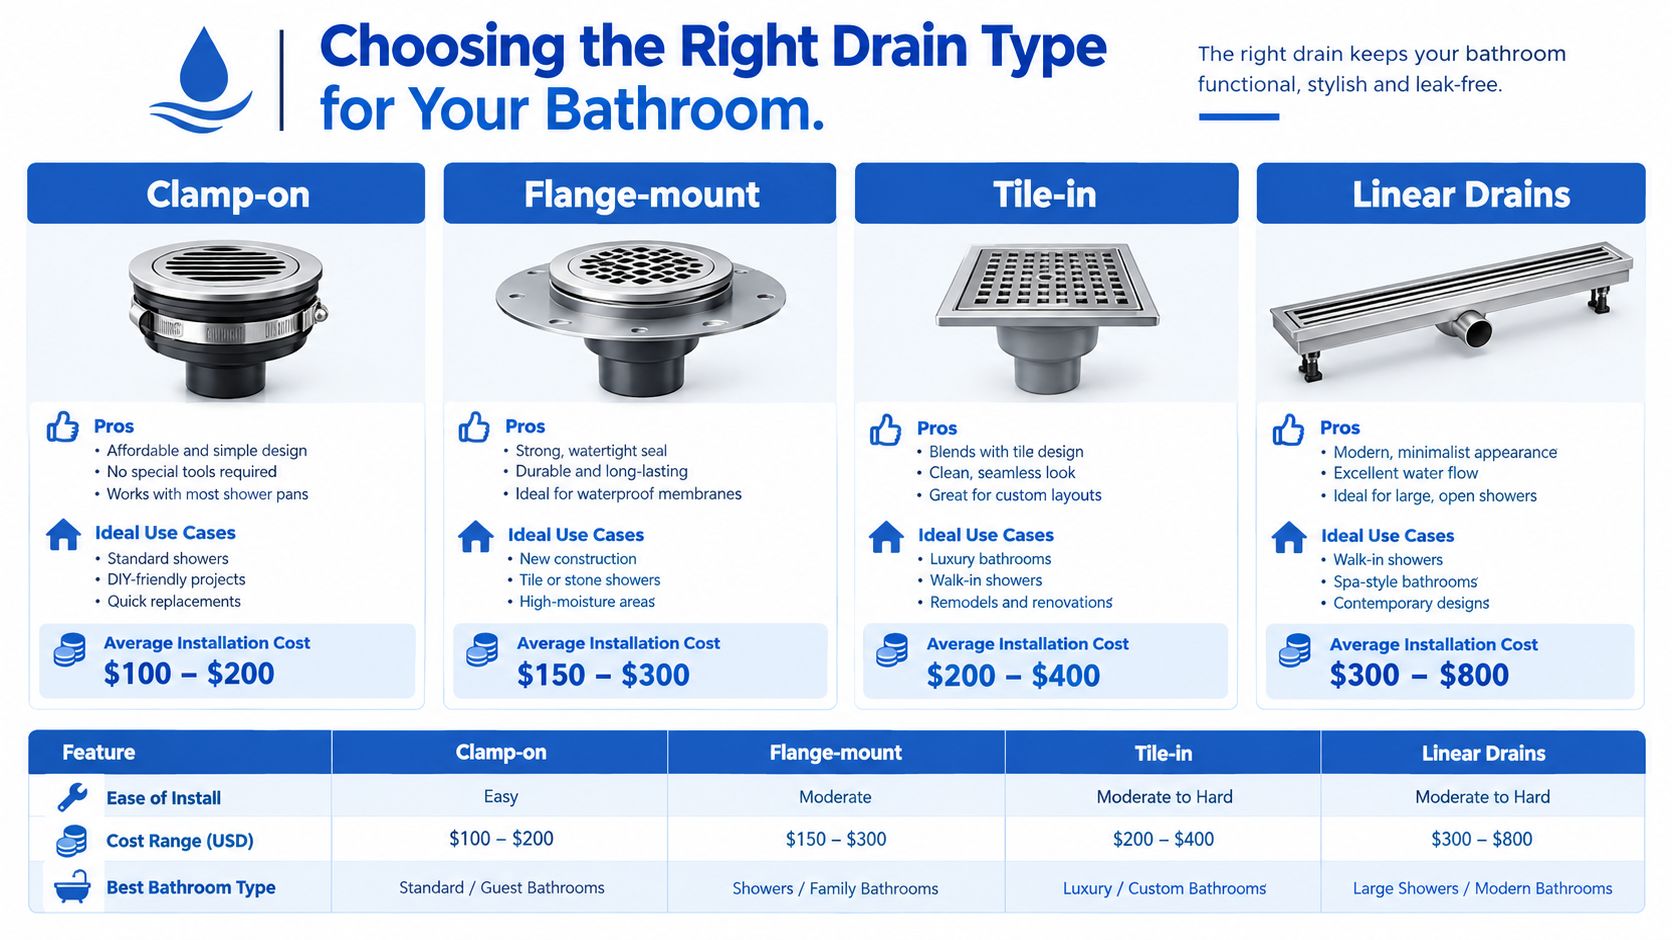
Drain selection should follow the floor build-up, not the other way around. A drain that looks sharp in a catalog can be a poor fit if the membrane won't terminate cleanly at the flange, if the tile thickness is awkward, or if the floor can't be sloped evenly around it. For a lot of bathrooms, the decision is less about style and more about whether the drain can be installed, serviced, and inspected without creating hidden failures.
Match the drain body to the floor system
A clamp-on drain makes sense when you need a straightforward connection in a traditional assembly. A flange-mount drain is better when the waterproofing system needs a direct mechanical tie-in. A tile-in drain can disappear visually, but only if the tile thickness and surrounding slope are planned carefully. A linear drain works best when the design calls for a cleaner shower edge or a more accessible wet-room layout, but it still has to connect properly to the membrane and waste piping.
The code side of the decision is real, not cosmetic. The IPC requires floor drains to be built for cleaning and access, and current code language expects proper sanitary drainage connections with approved exceptions and indirect arrangements where applicable. That's why the drain body has to work with the concealed piping, not just the visible opening at the surface.
Use the floor geometry as the deciding factor
The best drain for a small bathroom isn't always the best drain for a curbless shower or a wet-room floor. Substrate thickness, tile size, and the direction of the slope all affect how well the drain sits in the room. A drain that forces awkward cut tiles or leaves shallow low spots usually creates maintenance trouble later.
A quick field check keeps mistakes down:
- Confirm the finished floor build-up: Measure tile, mortar, and underlayment so the drain height lands correctly.
- Check access needs: Choose a body that can be cleaned and serviced without demolition.
- Match the slope pattern: Pick the drain that fits the planned pitch, not the other way around.
- Respect the membrane connection: Make sure the flange system matches the waterproofing method.
The installed drain should also align with the trap and the waste line. A 2-inch surface opening doesn't help if the concealed components are undersized or poorly arranged. If the body, trap, and piping don't agree, the floor will tell on you later.
Setting Slope and Integrating Waterproofing
Slope and waterproofing belong in the same conversation. If the floor pitches correctly but the membrane stops short of the flange, water still finds the weak point. If the membrane is continuous but the floor is flat or reverse-pitched, water lingers where it shouldn't.
The drainage surface needs a deliberate fall toward the outlet. Published wet-area guidance specifies a minimum slope of 1/4 inch per foot, or 2%, and many installations avoid going steeper than 1/2 inch per foot, or 4%, because the transition gets hard to tile and harder to stand on. A drain that sits four feet from a wall would typically need about one inch of fall at the 1/4-inch-per-foot rate, which is exactly why layout needs to be checked before the mud or backer board goes in. The technical basis for that slope guidance is summarized by Schluter's tiled shower water-management guidance.
Build the slope around the drain, not after it
The drain body has to be fixed at the right elevation before the floor gets closed in. Once the substrate is set, I check slope in multiple directions with a straightedge or digital level, because a floor can look pitched and still have flat spots. That matters even more in bathrooms with large-format tile, where a slight dip becomes obvious fast.
The waterproofing membrane needs a compatible clamping or bonding flange, not a loose edge stopped around the drain opening. In traditional assemblies, the membrane has to work with the drain so water reaches the path designed to move it away, not the setting bed. If the drain connection isn't mechanically secure, or if the membrane is interrupted at penetrations, you're building a hidden leak point.
Keep the weep path open
One failure I see too often is mortar packed where the system needs drainage. In traditional assemblies, blocking the weep holes traps moisture in the setting bed, and the floor stays saturated longer than it should. That's not a cosmetic issue, it's a durability issue.
Water doesn't need a dramatic leak to ruin a floor. A blocked drainage path can keep the bed wet long after the surface looks dry.
A solid quality check is simple. Confirm the grate is level, the flange is fully supported, the membrane wraps continuously around the drain area, and the assembly still allows water to move where it's supposed to go. For waterproofing best practices beyond the drain itself, this shower waterproofing guide is a useful companion reference.
Testing Before Tile Conceals the Work
A drain can look fine from the room and still fail where no one sees it, at the flange, the plug, the perimeter, or a joint below the floor. That is why pre-tile testing matters on a real job. Once tile goes in, hidden leaks turn into callbacks, loose grout, and rotten framing.
Flood test the assembly, not just the visible drain
Use a test plug that seals the pipe, not the grate. Fill the waterproofed area to a level that covers the low point, then mark the water line before you walk away. Industry flood-test practice calls for a 24 to 72 hour test, with checks below the assembly at 1 to 2 hour intervals. Any unexplained drop, dampness, or leakage means the assembly gets repaired and tested again before tile goes in. A commercial plumbing specification for piping also uses a water test with at least a 10-foot head and requires the water level to stay stable through the inspection period, with all joints checked for leaks. Those testing practices are summarized in Dartmouth's plumbing test specification.
Isolate the failure before you cover it
If the water level drops, do not assume the drain body is the only problem. A slow loss can come from the flange, the perimeter, or a penetration that was not sealed well enough. Testing in stages helps sort out a bad plug from a true membrane failure before you cover the floor.
A pre-tile checklist keeps rework down:
- Seal the right point: Plug the pipe, not the grate.
- Mark the water line: Use a clear reference so movement is easy to spot.
- Check beneath the floor: Look for dampness, staining, or seepage.
- Retest after repair: Do not tile over a failed test.
Until the water test holds steady, the job is not done.
A common mistake is covering the drain before membrane inspection is complete. Another is forgetting that the drain, the membrane termination at the flange, and the perimeter all need to perform together. Once the assembly passes, the next step is a proper tile installation over the verified substrate, like the work covered in this bathroom tile installation guide.
Understanding Massachusetts Plumbing Code Requirements
Massachusetts is stricter than a lot of people expect, and the drain has to meet state rules, not just general installation habits. For floor and trough drains, Massachusetts plumbing rules require an integral or separate trap with a minimum 3-inch water seal, and they also require removable strainers so debris can be cleared without replacing the assembly. The state code text is laid out in the Massachusetts Uniform State Plumbing Code at Mass.gov.
Know what the state requires before the inspector does
The state rule also requires the floor to be graded so it can drain completely from all directions. That means the drain can't just be placed where it seems convenient. If the surrounding floor doesn't fall properly, standing water stays behind and you've built a maintenance problem into the room.
For homeowners in Wayland, Newton, Needham, Wellesley, Weston, and nearby towns, this matters because local enforcement can be strict about the rough-in and the finished condition. The IPC gives a baseline, but the authority having jurisdiction can add requirements or interpret the work more tightly. That's why the drain body, trap seal, access, and finished-floor elevation need to be checked before the tile is ordered.
Code history still matters during remodels
Drain geometry has also changed across IPC editions. The 2003 code treated combination drain-and-vent systems differently than later editions, which is one reason the publication year of the governing code matters during renovation. Current IPC language also ties floor drains to sanitary drainage, with only specified exceptions and approved indirect-waste arrangements, which is why changing a drain location without checking the code edition can create a permit problem later.
A floor drain isn't just a tile detail. It's a regulated plumbing system component with access, sealing, and drainage rules attached to it.
That's the part DIY guides often skip. You can cut the hole, set the grate, and still fail inspection if the hidden work doesn't match the state's requirements.
Troubleshooting Common Installation Problems
Most drain complaints fall into a few predictable buckets. Slow drainage usually means the slope is wrong, the trap is undersized, or the concealed piping isn't moving water cleanly. Persistent odors usually point to a dry trap or an assembly that lacks proper trap-seal protection. Standing water near the grate usually means the floor was never formed to fall consistently toward the drain.
Read the symptom before you start tearing things apart
Cracked tile near the drain often comes from movement, poor support, or an elevation mismatch at the drain body. Membrane delamination usually comes from a bad bond, a wrong product combination, or a termination that wasn't continuous at the flange. Those failures can look unrelated on the surface, but the root problem is usually the same, the assembly was built in pieces instead of as one system.
Some problems can be corrected without full demolition. A dry trap may be addressed with regular replenishment or an approved trap-seal device if the design allows it. A minor slope issue on a small section can sometimes be improved during a targeted repair. But if the membrane tie-in failed, or the weep path is buried, the fix usually means opening the floor.
Decide what's repairable and what isn't
Use this simple split:
- Repairable: A dry trap, a removable debris blockage, a loose strainer, or a local surface defect.
- Needs opening: A failed membrane termination, reverse pitch, a saturated setting bed, or a concealed leak.
The hidden assembly matters more than the visible finish. A drain that looks fine from above can still be leaking into the subfloor, and that's where rot and mold start. If the problem keeps returning after a surface fix, stop patching and inspect the assembly.
Maintenance, Costs, and When to Hire a Professional
A floor drain is easy to ignore until it starts smelling or backing up. Keep the trap seal alive, remove hair and sediment from the strainer, and check that water still reaches the drain instead of sitting in low spots. That maintenance habit protects the parts nobody sees, especially the trap and the membrane edge.
Keep the drain usable, not just visible
The drain should remain cleanable and accessible, because those are core code expectations, not extras. If a grate is hard to remove or the inlet can't be reached, the next clog becomes a demolition problem. For wet-room and accessibility-focused bathrooms, the maintenance burden is even more important because the floor is supposed to handle more frequent water exposure.
That's where the plumbing and flooring decisions overlap. If the bathroom layout, subfloor access, or trap location is complicated, the job can become more technical than a normal tile replacement. For homeowners comparing options, this flooring installation services overview is a useful reminder that floor prep matters as much as the finish.
Know when to hire help
Hire a pro when the project involves any of these:
- Relocating the drain: Moving waste lines and preserving code-compliant venting takes real plumbing skill.
- Opening the slab or subfloor: Hidden structure changes fast.
- Building a wet room: Slope, membrane, and access all have to work together.
- Passing inspection in Massachusetts: Local requirements can be stricter than a homeowner expects.
The right contractor should verify the code edition, confirm the trap and vent arrangement, and test the waterproofing before tile closes the work in. That's the difference between a floor that drains for years and one that damages the structure under it.
If you want the drain installed the right way the first time, Sunny Day Pro Services can help with the tile, floor prep, and finish work that bathroom projects in Massachusetts demand. They serve Wayland, Newton, Needham, Wellesley, Weston, and nearby communities with careful workmanship and dependable communication, and you can visit Sunny Day Pro Services to request help with your bathroom floor drain installation.

