
Ceramic Tile Flooring Guide for Massachusetts Homes
Explore ceramic tile flooring types, costs, room suitability, installation, and care with practical guidance for Massachusetts homeowners.
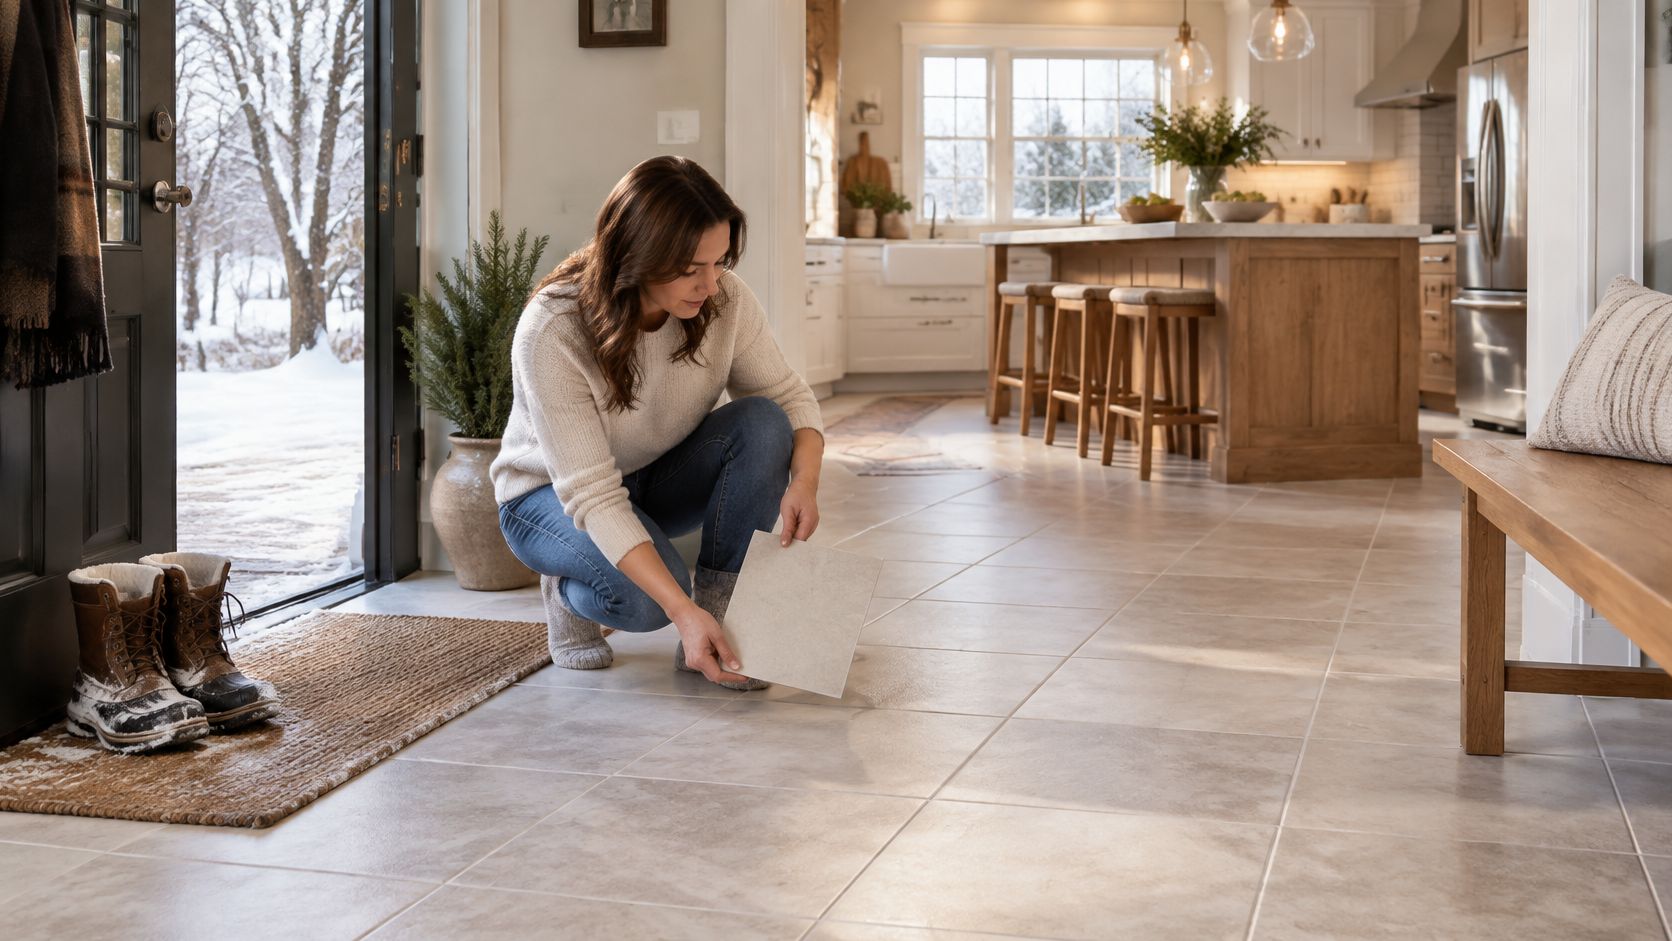
You're standing in a showroom in Wayland with three samples that all look right for your kitchen, and the salesperson keeps talking about color. Color is the easy part. The harder question is whether that tile will handle tracked-in snow in January, cooking grease by the range, and daily mopping for years without turning slippery or tired. That's the decision this guide helps you make, room by room, before you order a single box.
Table of Contents
- Choosing Ceramic Tile Flooring for Your Home
- The Parts You See and the Parts You Don't
- Water Absorption as a Screening Tool
Choosing Ceramic Tile Flooring for Your Home
A Newton bathroom, a Wellesley entryway, and a Weston kitchen can all use ceramic tile flooring and still need three different products. The bathroom floor gets wet feet and soap residue. The entryway gets grit, salt, and boots. The kitchen gets dropped pans, spills, and long hours standing at the counter. If you choose by appearance alone, you're guessing on the factors that determine whether the floor works.
Think of your choice as five linked decisions. First, format and finish affect how many grout joints you'll clean and how the surface feels underfoot. Second, water absorption tells you whether the tile body suits wet exposure. Third, tested wet traction matters more than whether a sample feels rough in the store. Fourth, the substrate, setting materials, and movement joints decide whether the installation stays stable. Fifth, your cleaning habits decide whether grout and finish hold up.
Ceramic tile isn't a niche finish, and that scale helps explain the range of sizes, colors, and textures you'll see locally. Worldwide production reached 14.950 billion square meters in 2024, down 6.2% from the prior year, according to the MECS/Acimac worldwide production summary. Asia produced approximately 10.9 billion square meters, about 72.8% of global output, in that same summary. Broad supply gives you options, but it doesn't guarantee the right match for a specific room. It also means lead times and shade lots deserve attention before demolition starts.
Don't start with the prettiest sample. Start with the room's water, traffic, and cleaning reality, then narrow to tiles that meet those conditions.
Use this snapshot to frame early conversations with an installer or designer.
| Room or condition | Primary performance concern | What to evaluate | Planning priority |
|---|---|---|---|
| Kitchen | Spills, grease, heavy use | Finish, traction, grout cleaning | Easy spill cleanup |
| Bathroom | Moisture and bare feet | Absorption, wet traction, waterproofing | Safe, moisture-ready assembly |
| Mudroom or entryway | Tracked water, grit, salt | Durable finish, transitions, drainage habits | Traction and grit control |
| Basement | Below-grade moisture risk | Substrate condition and underlayment | Moisture assessment first |
| Hallway | Repeated foot traffic | Format, layout, grout pattern | Stable, repairable layout |
Keep that room first mindset as you compare products. It's the difference between a floor that photographs well and one you still like living on.
How Ceramic Tile Flooring Works
A finished tile floor works as an assembly, not a loose product laid on top of a room. The ceramic tile is the visible wear surface. Below and around it, the substrate provides support, setting material bonds the tile, grout fills joints, and movement joints and transitions relieve stress where materials change or planes meet. If any layer is wrong for the room, the surface can look perfect on day one and still disappoint later.
The Parts You See and the Parts You Don't
Your visible choices include size, shape, edge profile, glaze, texture, color, and pattern. Larger formats reduce the number of grout lines and can make a small Needham bath feel calmer. Smaller formats add more joints, which changes both pattern and cleaning effort. Rectified edges allow tighter-looking joints, while softer edges suit a more relaxed layout. None of those choices should be made before you know how flat the floor is and how the pattern will land at doorways, cabinets, and drains.
The hidden choices carry equal weight. Mortar must suit the tile and substrate. Grout must suit joint width and exposure. Underlayment and waterproofing, where they're needed, must match the room's moisture conditions. A beautiful glaze can't compensate for an unstable or uneven base.
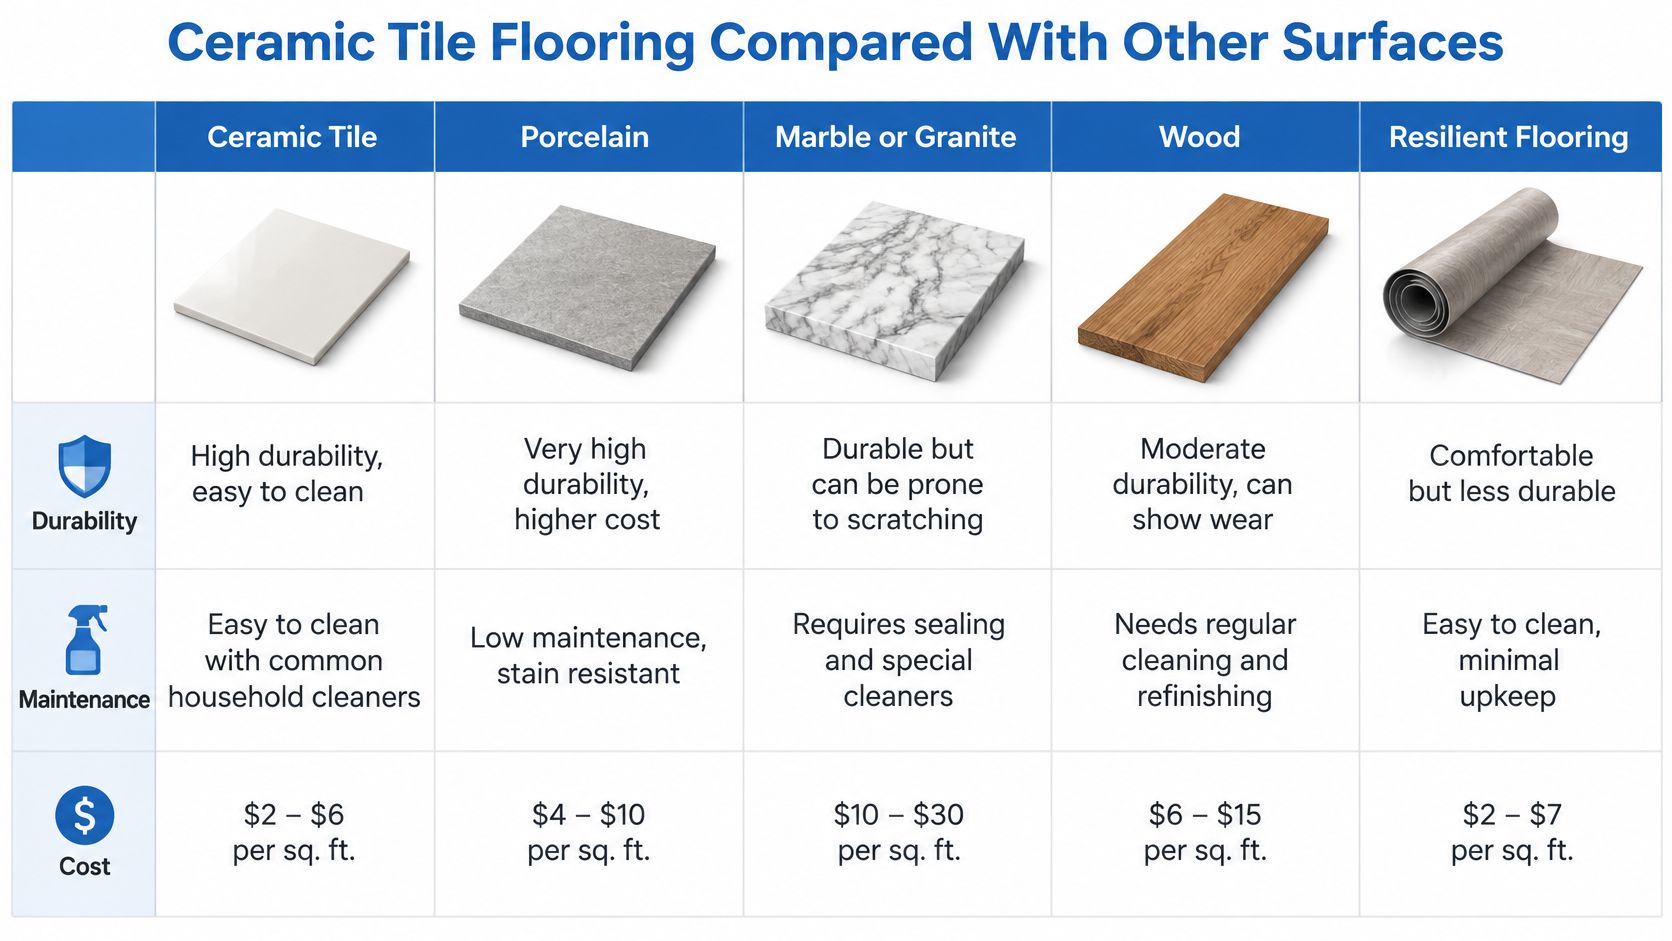
The chart below puts ceramic in context with other common surfaces before you narrow your shortlist.
Water Absorption as a Screening Tool
Water absorption measures how much water the tile body can take in, and it's a practical first screen for porosity. ANSI classification commonly distinguishes non-vitreous tile above 7%, semi-vitreous tile at 3% to 7%, vitreous tile above 0.5% but below 3%, and impervious tile below 0.5%, as summarized in Home Depot's ceramic tile absorption guide. Porcelain falls within that impervious category in the same summary. Higher absorption generally raises concern about moisture penetration, staining, and freeze-thaw stress.
Don't overread that number. A low-absorption tile doesn't make the whole floor waterproof. Grout joints, substrate preparation, slope, drainage, and membranes control much of the assembly's real moisture performance. Likewise, a matte or textured look doesn't prove safe wet traction. You need the manufacturer's tested value for the intended use.
- Use absorption to screen products: Match the category to expected moisture before debating color.
- Use format to plan maintenance: More joints mean more grout to clean and inspect.
- Use finish with caution: Appearance and feel in a dry showroom don't establish wet performance.
- Judge the whole system: Tile, mortar, grout, joints, and substrate succeed or fail together.
Once you see ceramic tile flooring as a system, comparisons with other materials become clearer and more honest.
Ceramic Tile Flooring Compared With Other Surfaces
Compare full room conditions, not samples on a counter. A material that performs beautifully in a dry hallway can be a poor choice for a shower floor or a mudroom in February. Your best comparison asks the same questions of every option. How does it handle water? How much maintenance does it demand? How complex is installation and repair? How does it feel and look in your light?
Ceramic and Porcelain
Ceramic and porcelain are related, but they aren't interchangeable for every use. Porcelain belongs to the impervious absorption category noted earlier, which makes absorption a useful distinction when moisture exposure is high. Ceramic offers broad design variety and can be entirely appropriate where its absorption category, finish, and assembly match the room. If you're weighing these two closely, this porcelain versus ceramic tile comparison is a helpful next read before you commit to a product line.
Don't assume the denser-sounding option automatically wins. Either material can fail over a poorly prepared substrate or with the wrong setting system. Either can also be wrong for wet barefoot use if the tested traction doesn't match the exposure.
Stone, Wood, Resilient Flooring, and Polished Tile
Marble or granite brings natural variation and a substantial feel. Stone also brings product-specific sealing and care questions you should settle before purchase, especially in kitchens where spills sit on the surface. Wood feels warm and suits dry living areas, but kitchens, baths, and entries ask you to be realistic about standing water and refinishing over time. Resilient flooring can feel comfortable underfoot and may simplify some renovations, yet you should compare its repair path and long-term wear expectations with a tiled assembly rather than assuming all hard surfaces age the same way.
Polished tile deserves special caution. A polished finish can look refined in a dry space and still be the wrong call where floors are walked on wet. Available guidance on non-slip tile stresses that ratings are context specific and depend on wetness, footwear, contaminants, slope, grout condition, and cleaning residue, as discussed in JG Carpet Cleaning's overview of non-slip tile coatings. That nuance matters because maximum texture isn't automatically safest either. A surface that's hard to clean can hold residue that undermines traction.
Practical rule: If a salesperson calls a tile slip resistant, ask for the tested wet value, the test standard, and the intended use. If they can't provide it, treat the claim as marketing.
My recommendation is straightforward. Choose ceramic where its absorption category, tested traction, format, and maintenance profile match the room. Choose porcelain, stone, wood, or resilient flooring only when that full profile fits better, not because one sample looked warmer or glossier under store lighting.
Matching Ceramic Tile to Rooms and Climate
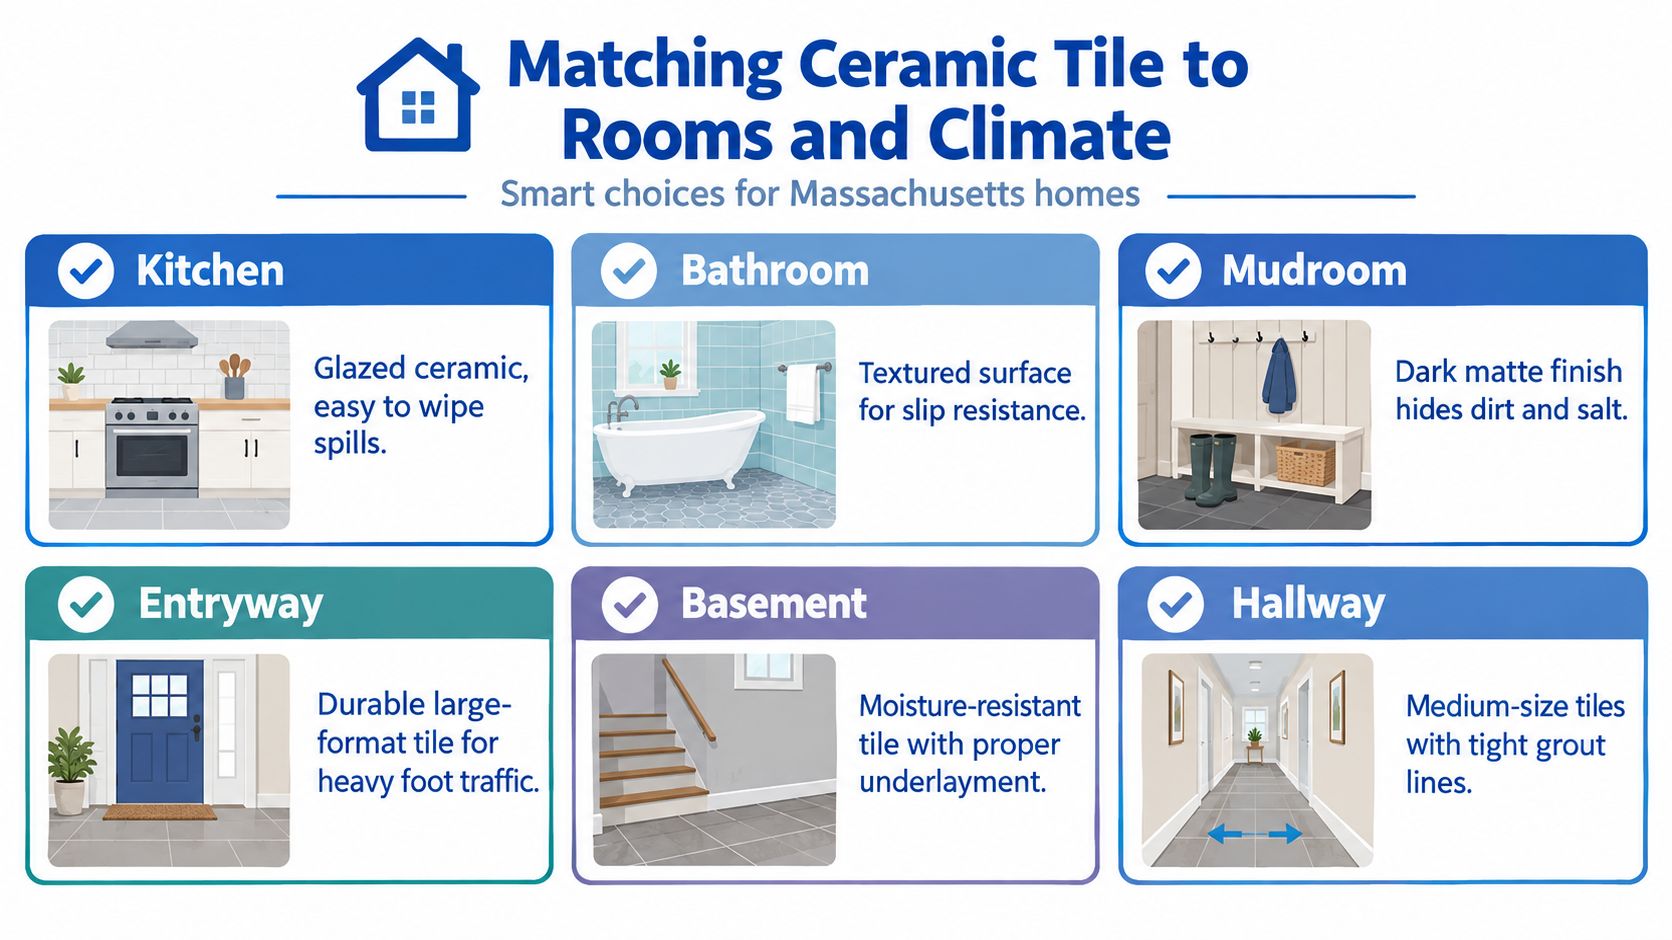
Massachusetts homes put floors through wet boots, road salt, humid summers, and cold entries that cycle through temperature swings. Your tile choice should reflect that reality. The same product line might work in a kitchen and fail your expectations in a mudroom if traction, finish, or grout planning is off.
Kitchens, Bathrooms, and Wet Zones
In kitchens, prioritize a finish you can clean after grease and food spills without leaving a film. You'll stand on this floor daily, so test samples at home under your own lighting with your cabinets. In bathrooms, moisture and bare feet raise the bar. You need the right absorption category, a waterproofing plan where the assembly requires it, and slope and drainage handled correctly in wet areas. In showers, small decisions about joints and transitions affect both safety and upkeep.
For product screening, tile labeled nonvitreous absorbs more than 7% water and is generally unsuitable for bathrooms or outdoor areas, while semivitreous tile absorbs 3% to 7% and is also not recommended for wet rooms, according to the Home Depot ceramic tile label information sheet. That sheet places vitreous tile at 0.5% to 3% and impervious tile at less than 0.5%. A practical specification is to select tile with below 3% absorption for wet rooms and below 0.5% where persistent moisture or exterior exposure may occur. That specification still doesn't replace waterproofing, slope, grout selection, or installation detailing.
For traction, specify by test result. ANSI A326.3 uses controlled tribometer testing, and a wet DCOF of at least 0.42 is the benchmark for level interior hard-surface flooring expected to be walked on when wet, as explained in Sherwin-Williams guidance on slip resistance and DCOF. That guidance also identifies at least 0.60 for more demanding wet conditions, including showers, pool decks, outdoor walkways, and areas exposed to oils or grease. Treat 0.42 as a minimum benchmark for the defined condition, not a slip-proof promise. Contaminants, footwear, slope, drainage, cleaning residue, and wear change real-world traction.
Mudrooms, Entryways, Basements, and Hallways
Mudrooms and entryways in Wayland and Needham need a finish that hides some grit between cleanings without trapping soil so aggressively that mopping becomes a chore. Plan thresholds so water and salt stay near the door where you can remove them quickly. Darker or patterned fields can help visually, but they don't reduce the need for prompt grit removal.
Basements require a moisture conversation before a design conversation. Confirm substrate condition and whether the assembly needs a specific underlayment approach for below-grade conditions. Hallways reward a layout that handles transitions cleanly and a format that won't make small cuts look chaotic at every doorway.
Room-by-room checklist
- Bathroom: Confirm absorption, wet DCOF, waterproofing, slope, and transitions.
- Kitchen: Confirm grease cleanup, traction near sinks, and grout maintenance.
- Mudroom and entry: Confirm traction when wet, grit tolerance, and threshold design.
- Basement: Confirm substrate moisture conditions and compatible underlayment.
- Hallway: Confirm layout direction, cuts at doors, and repair quantities.
If a tile can't pass that checklist for the room, don't talk yourself into it because the color is perfect.
Planning Ceramic Tile Installation
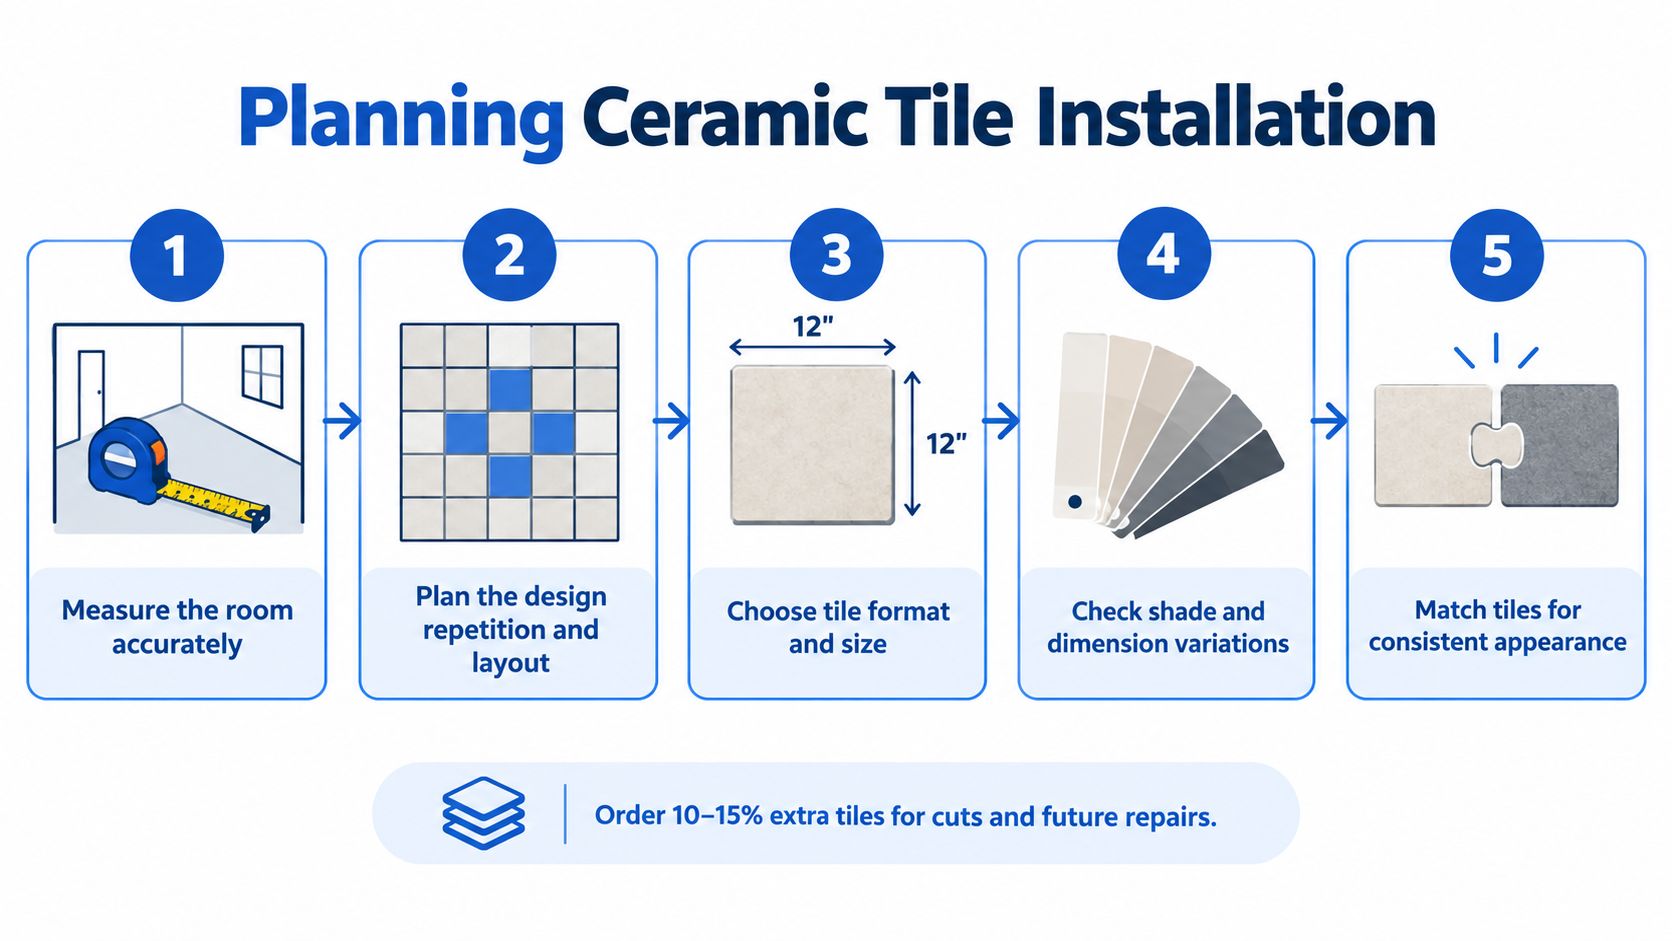
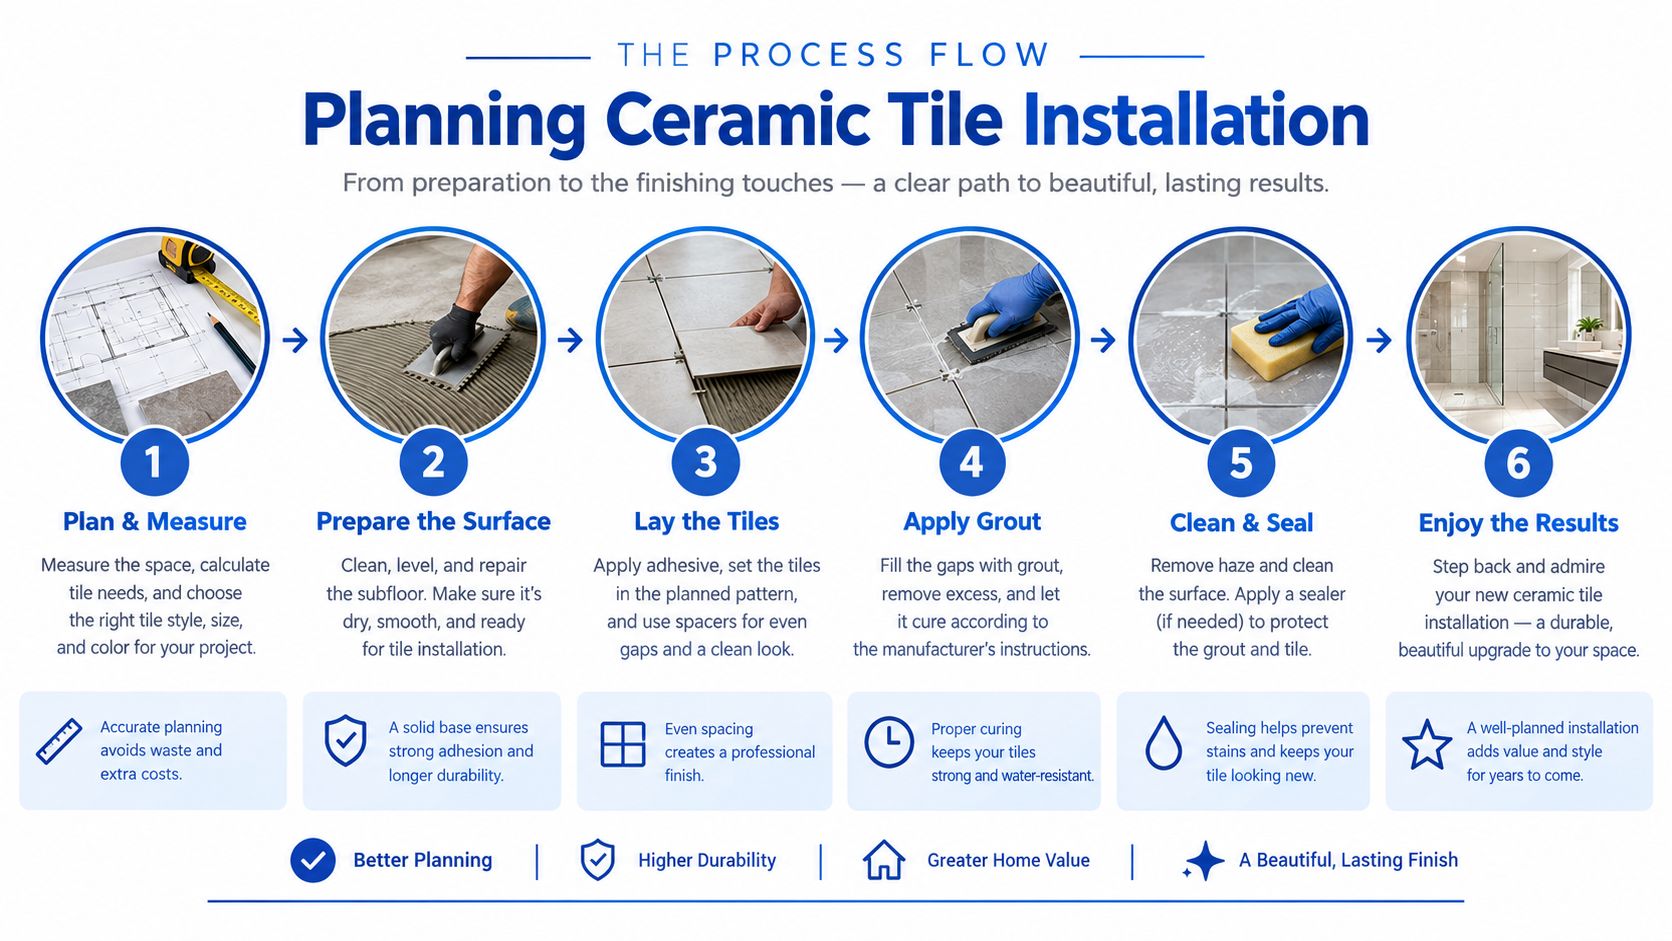
Good installations are planned on paper before mortar is mixed. Start with accurate room measurements, including closets, niches, and transitions into adjacent floors. Decide how the pattern repeats, where focal points land, and where cuts will fall. A centered layout that leaves slivers at the walls is a planning failure, not bad luck. Confirm tile format early because size affects layout, handling, substrate flatness needs, and the number of joints.
Quantities, Shade Lots, and Layout
Order with cuts, breakage, and future repairs in mind. Check shade and dimension variation across boxes before installation day, and keep replacement tile from the same lot stored after the project. Dry lay or map critical areas so pattern direction, grout joints, and edge treatments are settled before setting begins. If your design includes a border, medallion, or directional pattern, mark the starting point clearly and confirm it with the installer in the room, not by text message.
The sequence below shows how planning steps connect from measurement through final matching.
Substrate, Setting Materials, and Movement Joints
Substrate condition predicts long-term performance more reliably than surface pattern. The Ceramic Tile Foundation summary of the TCNA Handbook explains that each installation method requires a properly designed, constructed, and prepared substructure using recognized standards, as outlined in the Ceramic Tile Foundation overview of the TCNA Handbook. That overview covers wet areas, mortar and grout specifications, substrate flatness, grout-joint sizes, patterns, and workmanship standards drawn from ANSI requirements. Your installer should inspect flatness, structural movement, moisture exposure, and transitions, then correct uneven areas and confirm compatible setting materials before tile goes down.
Movement accommodation is not optional. The Tile Council of North America states that installers should use control joints where tile meets another material such as wood and carry existing concrete control joints through the tile assembly, as explained in TCNA ceramic tile frequently asked questions. That guidance notes movement joints are needed in every tile installation and should be placed more frequently where moisture or direct sunlight is expected. In a small interior room, a perimeter gap concealed by baseboard or shoe molding may sometimes provide needed accommodation. Larger or more exposed installations need a site-specific layout.
Ask where the movement joints will go. If the answer is vague, the plan isn't finished.
After layout and preparation, the work moves through setting, grouting, curing, and final inspection. Don't rush traffic onto the floor before the installer confirms curing requirements for the products used. At inspection, check lippage, joint consistency, transitions, sealant at changes of plane, and cleanup of grout haze.
Questions to ask before installation
- Substrate: What did you find, and what correction is included?
- Materials: Which mortar, grout, and underlayment suit this tile and room?
- Joints: Where are perimeter gaps, transitions, and slab joints handled?
- Layout: Where will cuts land, and have shade lots been checked?
- Finish: What curing, cleaning, and inspection steps close the job?
A clear written plan for those items protects you more than a low line item for tile and grout.
Cleaning and Maintaining Ceramic Tile
Ceramic tile is easy to care for compared with many surfaces, but easy doesn't mean carefree. You're maintaining two materials at once. The glazed tile face resists everyday soil, while grout joints collect residue, absorb spills differently, and show wear sooner. If you clean only for shine, you'll miss the joint deterioration that shortens the life of the installation.
A facilities-focused study reports a typical ceramic tile surface may have a life expectancy of about 50 years, while warning that grout erosion or contamination can drastically shorten useful life and require disruptive restoration or replacement, as documented in the IRBnet facilities study on ceramic tile service life. That study also cites comparisons indicating ceramic tile becomes economically viable when service life exceeds approximately 20 to 25 years. Protecting grout is how you protect that long service life.
Daily and Weekly Routines by Room
Start with grit removal. Sweep or vacuum entries, kitchens, and hallways often enough that sand and salt don't get ground across the finish. Wipe spills promptly, especially in kitchens where grease spreads and bathrooms where soap film builds. Use a neutral or manufacturer-compatible cleaner and rinse or dry as directed so residue doesn't dull the surface or reduce traction. For detailed technique, guidance on the best way to clean tile floors helps you match routine cleaning to the finish you own.
Avoid aggressive products unless the tile and grout manufacturers approve them. Harsh or inappropriate cleaners can leave films, alter a finish, or make textured surfaces harder to rinse. Textured tile needs enough agitation to lift soil from low spots, then clean water removal so dirty solution doesn't settle back into joints.
- Kitchens: Degrease near cooking zones, rinse well, and dry near sinks.
- Bathrooms: Remove soap film before it builds, and ventilate after showers.
- Entries and mudrooms: Remove grit and salt quickly, then damp clean thresholds.
- High-traffic halls: Inspect grout at doorways where wear and moisture concentrate.
Warning Signs That Need Attention
Call for an assessment if you notice cracking, tenting, loose edges, hollow sounds, persistent dampness, crumbling grout, or grout color that keeps changing after cleaning. Those signs can point to movement, moisture, or bond problems that mopping won't fix. Catching joint failure early is far less disruptive than replacing tile after water reaches the substrate.
Clean the tile for appearance. Inspect the grout for the health of the floor.
A simple routine, done consistently, preserves both looks and traction. That's the maintenance bargain ceramic offers when you honor it.
Understanding Ceramic Tile Flooring Costs
Budget for the assembly, not the box price. Your total depends on tile product and format, quantity, pattern complexity, demolition, substrate preparation, setting materials, grout, waterproofing where needed, movement joints, transitions, cuts, repairs, and labor. A straight layout over a sound, flat floor is a different project from a patterned bathroom that needs substrate correction and careful wet-area detailing. Any quote that doesn't separate those variables leaves you guessing.
Market context explains why ordering discipline matters. Total U.S. ceramic-tile consumption was 2.700 billion square feet in 2024, down 5.1% from 2.847 billion square feet in 2023, and imports supplied 1.931 billion square feet, or 71.5% of domestic consumption by volume, according to Floor Covering News reporting on Tile Council of North America data. That reporting also notes domestic manufacturers supplied about 28.5% of U.S. consumption by volume in 2024. Separate flooring-market analysis in the same reporting valued the 2024 U.S. ceramic tile category at about $2.984 billion. That category value describes the national market. It is not a price quote for your kitchen or bath.
Because so much material is imported and distributed through multiple channels, coordinate dimensions, shade lots, trim pieces, and replacement quantities before work begins. A missing trim profile or mismatched lot can stall an otherwise ready job. For a structured look at pricing variables, review ceramic tile installation price factors before you solicit bids.
Budget planning checklist
- Define scope: Rooms, demolition, pattern, trim, and transitions in writing.
- Get written bids: Collect two or more and compare inclusions line by line.
- Ask about exclusions: Substrate correction, waterproofing, disposal, and repairs.
- Verify allowances: Waste, replacement tile, and product substitutions.
- Confirm schedule assumptions: Material lead times, curing, and cleanup.
- Plan beyond installation: Post-installation cleaning and future grout care.
Don't choose on the lowest number until you know which bid includes the preparation and joints your floor needs. Request a site-specific estimate from a qualified local installer who will measure, inspect the substrate, and price the full assembly.
Designing and Installing Ceramic Tile With Confidence
Design decisions feel better when performance decisions are already settled. Once absorption, traction, substrate, and joints are handled, you can use color, scale, and layout to shape the room with confidence. A warm-toned field tile can soften a white Weston kitchen. A patterned floor can carry a small Newton powder room without heavy accessories. A continuous entryway layout can make a narrow hall feel intentional rather than patched together.
Layout, Grout, and Format Choices
Layout direction changes how a room reads. Running tile with the longer sight line can calm a hallway, while a diagonal or patterned layout adds energy and more cuts. Tile size affects grout frequency and how forgiving the layout is at walls and fixtures. Grout color can either quiet the field or emphasize every joint, so test grout with actual tile samples and let it dry before deciding. Transitions deserve the same care. Where ceramic meets wood or another floor, the edge profile and movement accommodation should look deliberate and perform correctly.
Large-format and digitally printed tiles can reduce grout lines and create convincing stone or wood looks. They can also increase handling complexity, breakage risk, and replacement difficulty if layout and substrate preparation aren't deliberate. That's not a reason to avoid them. It's a reason to confirm flatness, handling, cuts, and spare quantities before you fall for the showroom wall.
Sustainability Without the Marketing Gloss
Ask whether ceramic tile is sustainable, and you'll often hear only durability and recyclability. That's incomplete. A responsible decision considers raw-material extraction, kiln energy, transport, installation waste, cleaning, and end-of-life reuse. A 2025 cradle-to-gate life-cycle assessment specifically examines environmental impacts in ceramic-tile manufacturing, as presented in the Cambridge repository life-cycle assessment of ceramic tile manufacturing. That focus on production-stage differences is a reminder that the material label alone doesn't settle impact.
Request product-specific environmental information for the exact tile you're buying. Compare domestic and imported options with transport in mind. Distinguish recycled content from measured lifecycle impact, because they aren't the same claim. Then reduce waste through accurate layout planning, choose a format you can repair, and keep spare tile so one damaged piece doesn't force a mismatched patch years later. Longevity only helps if the installation lasts and can be maintained.
The most sustainable floor is the one that's specified correctly, installed correctly, and not torn out early because the room was misjudged.
Choosing Your Installer
Use contractor conversations to test planning depth, not just friendliness. A qualified installer should measure in person, review samples in the room, inspect substrate readiness, and explain joints and transitions without prompting. For Massachusetts homeowners comparing options, Sunny Day Pro Services is one local installer that offers ceramic tile installation for floors and walls as part of its tile services. Whichever firm you consider, apply the same checklist.
- Measurements and samples: Verified on site in your lighting.
- Substrate plan: Flatness, moisture, and corrections stated in writing.
- References and communication: Recent tile work and a clear point of contact.
- Timeline: Material arrival, setting, grouting, and curing sequenced.
- Warranty details: What is covered, for how long, and what voids it.
- Cleanup: Grout haze removal, debris handling, and final walkthrough.
Compare bids against that checklist and your design scenarios side by side. When the layout, finish, and installation plan all answer the room's real conditions, ceramic tile flooring stops being a gamble and becomes a durable, deliberate upgrade.
Ready to plan a kitchen, bathroom, or entryway floor that matches the tile to the room instead of guessing from a sample board? Sunny Day Pro Services provides ceramic tile installation for Massachusetts homes, with site-specific measurements, substrate planning, and clear communication from quote through final cleanup. Request your fast quote today at Sunny Day Pro Services and start with a plan built for how your home is used.

