
Your Complete Guide to a Flawless DIY Kitchen Backsplash Installation
Our 2026 DIY guide teaches you kitchen backsplash how to install. Get pro-level results, from wall prep to setting tiles and grouting.
A stunning kitchen backsplash doesn't just happen by accident. The secret to a project that looks professionally done—and doesn't end in frustration—is all in the prep work. Taking the time to plan your layout, materials, and measurements before you even think about mixing mortar is the single most important step in any kitchen backsplash how-to install guide. This is your roadmap to success.
Table of Contents
- What Does a Professional Backsplash Installation Cost in 2026?
- Is It Okay to Install a New Backsplash Over Existing Tile?
- How Long Does a Typical Backsplash Installation Take?
Phase 1: Planning Your Backsplash Before You Begin
Let's be honest, the difference between a weekend project you're proud of and one that sends you on multiple, frantic trips to the hardware store is planning. This is where you set the foundation for a smooth installation, demonstrating the kind of expertise that leads to beautiful, lasting results.
Measuring and Material Selection
First things first: grab a tape measure. You'll need to measure the height and width of the entire area you plan to tile. Multiply those two numbers to find the total square footage you need to cover.
Now for the golden rule of tiling: always buy at least 10% to 15% extra tile. This isn't just a suggestion; it's a project-saver. This overage accounts for the inevitable mis-cuts, tiles that might break, and any tricky pieces you'll need to shape around outlets and windows. For complex patterns like herringbone, we recommend a 20% overage.
With your measurements in hand, it’s time to think about the tile itself. The material you pick will dramatically affect the look, feel, and even the difficulty of the job.
- Ceramic and Porcelain: These are your go-to options, especially if this is your first time. They’re durable, forgiving to cut, and come in an endless variety of styles and price points.
- Natural Stone (Marble, Travertine): The beauty of natural stone is undeniable, but it comes with homework. It's porous, so it absolutely must be sealed. It’s also much more prone to chipping when you cut it, making it a better fit for someone with a few tiling projects under their belt.
- Glass Tile: Glass can look incredible with its modern, light-catching qualities. However, it's notoriously tricky to cut without a specialized wet saw and a good bit of practice. One wrong move, and you've got a cracked tile.
Here's some advice from our experience: A simple ceramic subway tile that's installed perfectly will always look a thousand times better than a pricey, complex marble tile that's installed poorly. Choose a material that aligns with your kitchen's style but also your current DIY skill level.
Finally, don't forget the glue that holds it all together. For most ceramic or porcelain tiles in dry areas, a premixed mastic is a convenient, easy-to-use option. But for heavier tiles, natural stone, or any areas that will get wet (like behind a sink), you must use thin-set mortar.
Thinking through these material choices now will save you from some serious headaches down the line. You can learn more by exploring how these decisions impact the overall kitchen backsplash cost.
Phase 2: Gathering Your Essential Tools and Materials
I can't tell you how many times I've seen a promising DIY project go sideways because of a frantic, mid-project run to the hardware store. Before you even think about setting that first tile, let's get you prepared. A well-organized toolkit is the difference between a frustrating mess and a backsplash you’ll be proud of.
Think of it this way: having every tool and material on hand before you start is your first, and most important, step. There’s nothing worse than realizing you forgot spacers when your mortar is already on the wall.
The Two Most Important Choices: Adhesive and Grout
Your tile choice dictates everything, especially the adhesive that holds it up and the grout that fills the gaps. Getting this wrong can lead to failed projects and damaged tile.
For lightweight ceramic or porcelain tiles in areas that stay dry, a pre-mixed mastic is often sufficient. But for anything heavier like natural stone, glass, or any tile behind a sink, you absolutely need thin-set mortar. Its bonding strength and water resistance are non-negotiable in those situations.
Grout is just as critical. If your grout lines are wider than 1/8 inch, you'll need sanded grout to prevent cracking. For thinner lines or easily scratched tiles like glass or polished marble, unsanded grout is the only way to go to avoid ruining the finish.
To make this easier, here's a quick cheat sheet for choosing the right products for your project.
Adhesive and Grout Selection Guide
| Scenario | Recommended Adhesive | Recommended Grout Type |
|---|---|---|
| Standard ceramic tile, 1/8" joints | Pre-mixed Mastic or Thin-set | Sanded Grout |
| Heavy natural stone (marble, slate) | Thin-set Mortar | Sanded Grout (for 1/8"+) |
| Glass or polished tile, 1/16" joints | Thin-set Mortar (white) | Unsanded Grout |
| Mosaic sheets on mesh backing | Thin-set Mortar | Sanded or Unsanded (check tile) |
This table should get you started, but always double-check the recommendations on the packaging for your specific tile and adhesive.
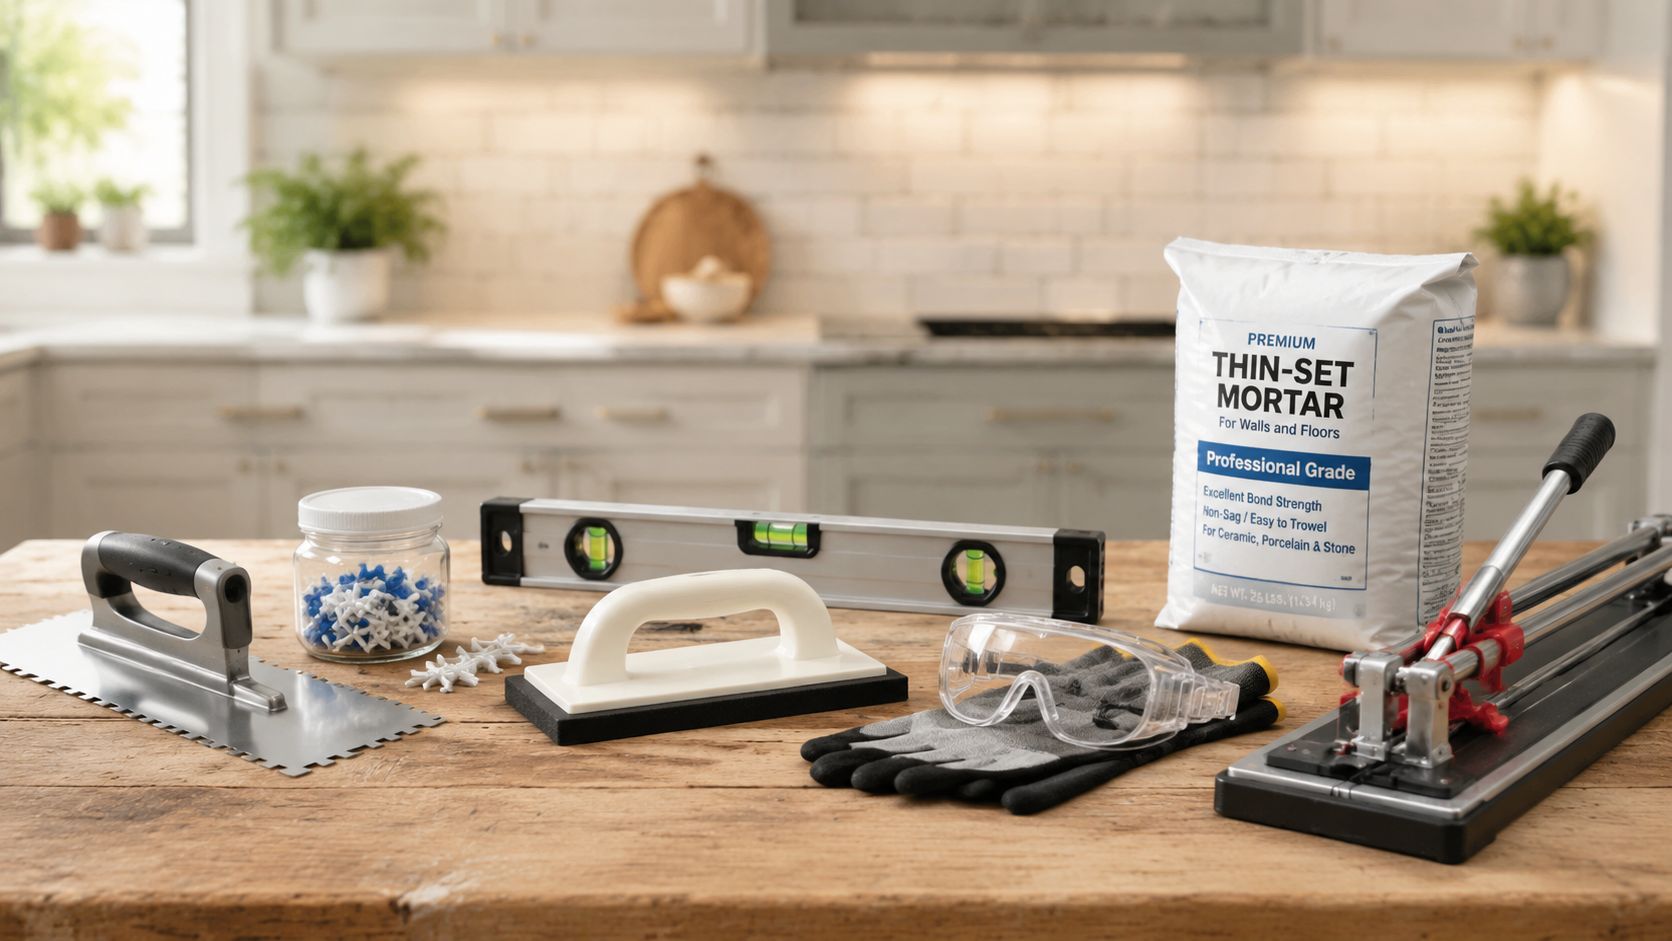
Building Your Tiling Toolkit
Beyond the big two, a handful of essential tools will make your life much easier. Don't try to get by without them.
- Measurement and Layout: A good tape measure, a level (a 24-inch one is perfect for backsplashes), and a pencil are your best friends for ensuring straight lines.
- Application Tools: You'll need a notched trowel to apply adhesive. A V-notch trowel is good for small mosaics, but a 1/4" x 1/4" square-notch is a versatile choice for most standard tiles. You’ll also need a grout float to press grout into the joints.
- Cutting Tools: A simple manual tile cutter (or snap cutter) works well for straight cuts on ceramic and porcelain. For harder materials or L-shaped cuts, a wet saw is worth renting.
- Mixing and Cleanup: Grab at least two 5-gallon buckets—one for mixing and one for clean water. A margin trowel is great for scooping and mixing small batches. Also, get plenty of sponges and some microfiber cloths.
- The Little Things: Don't forget tile spacers for consistent gaps, a utility knife, and some painter's tape.
- Safety Gear: Always wear safety goggles and gloves. Tile edges are sharp, and mortar can irritate your skin.
The principles of choosing the right, durable materials extend beyond just the kitchen. If you're planning other projects, you can check out our guide on selecting bathroom tile for more insights on what works best in different environments.
Phase 3: Prepping Your Walls for a Lasting Bond
Everyone gets excited about picking the perfect tile, but the real secret to a backsplash that looks great for decades is what happens before a single tile goes up. The wall itself is your foundation, and I can tell you from experience that rushing this stage is the number one mistake I see DIYers make.
First things first: safety. Before you do anything else, head to your breaker box and cut the power to all the outlets in your work area. Go ahead and remove the faceplates, then gently pull the outlets out from the wall just a bit. Use painter's tape to secure them and keep them protected from water and thin-set mortar.
Cleaning and Repairing the Surface
Think about all the cooking that’s happened in your kitchen. Your walls have probably collected a fine layer of grease and grime, which is the mortal enemy of tile adhesive. You need to get that surface squeaky clean. I recommend a good degreasing cleaner, like trisodium phosphate (TSP), but a simple mix of vinegar and water can also do the trick.
Once it's clean and completely dry, give the wall a thorough inspection. Run your hand over it. You're looking for any holes from old pictures, dings, or major cracks. Grab some spackle or joint compound and a putty knife, fill those imperfections, and feather the edges so you have a perfectly smooth, flat surface to work with.
I can't stress this enough: a perfectly clean and flat wall is your best insurance policy. Even a tiny bump or a small patch of grease can prevent the adhesive from bonding correctly, which leads to loose or uneven tiles down the line.
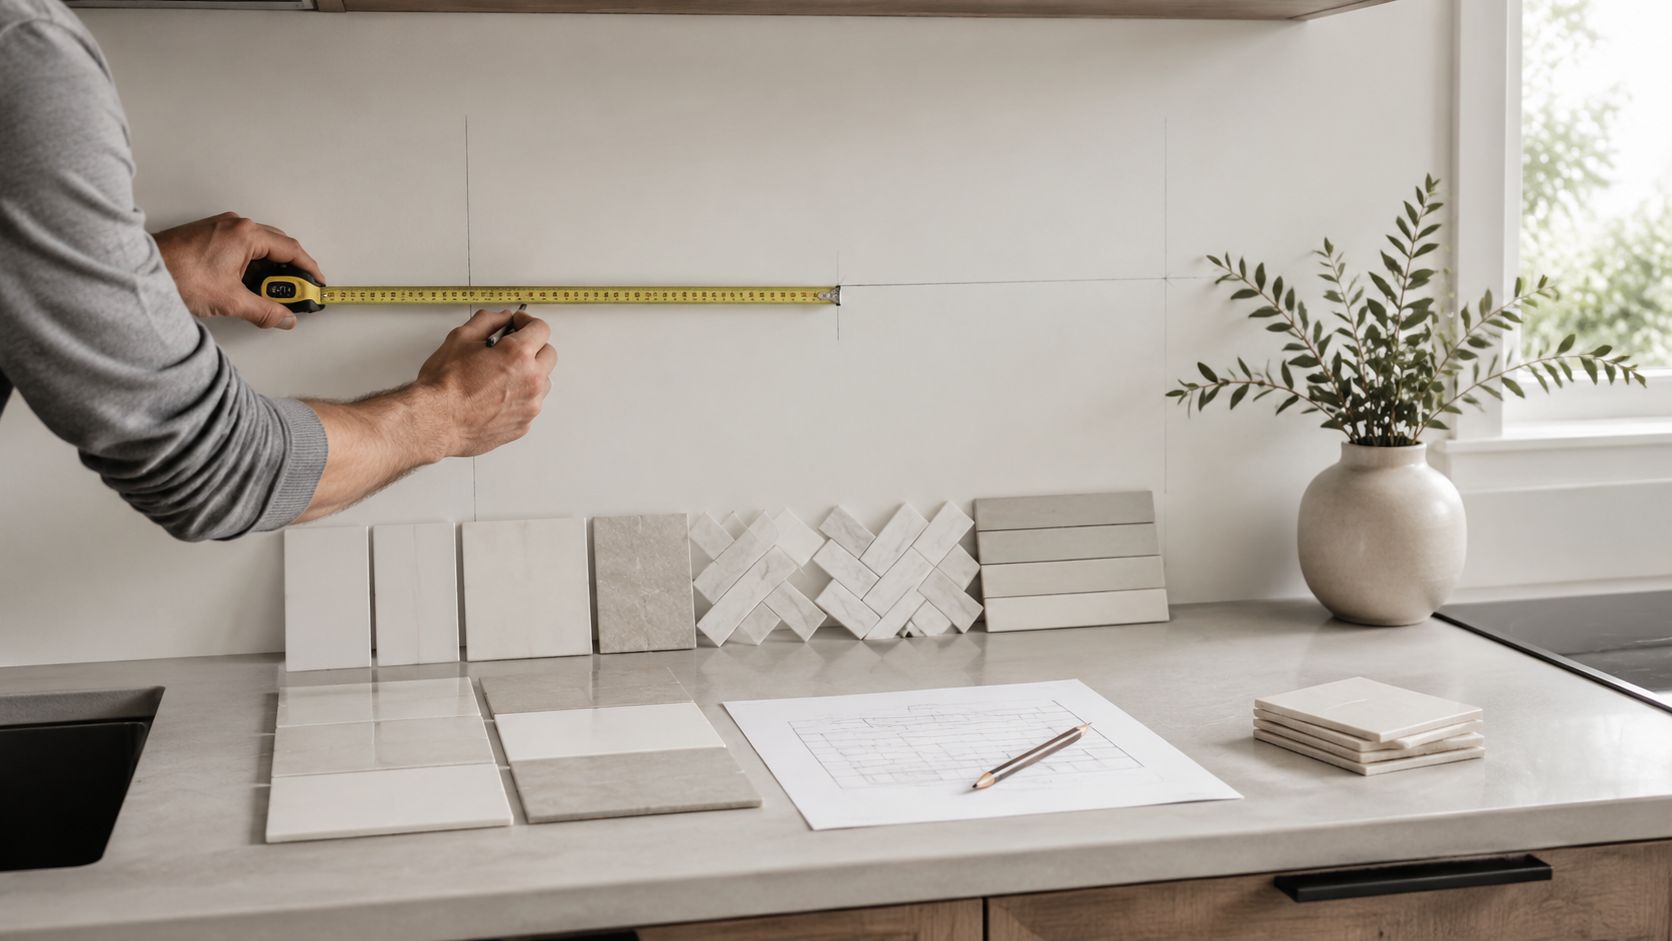
Marking Your Layout Lines
Now it's time to map out your game plan. Here’s a pro tip: never trust your countertop to be perfectly level—they almost never are. If you start your first row of tile directly on the counter, you'll likely end up with a crooked backsplash.
Instead, find the absolute lowest point of your countertop along the wall. From that spot, measure up the height of one of your tiles and make a pencil mark. Now, grab a level and draw a straight, horizontal line across the entire wall from that mark. This is the crucial line your first row of tiles will follow, guaranteeing a level start. I also like to find the vertical center of the main wall and draw a line there, too. This helps you keep your pattern centered and balanced, which is especially important for intricate designs. Getting these lines right is what will make your project look professionally installed.
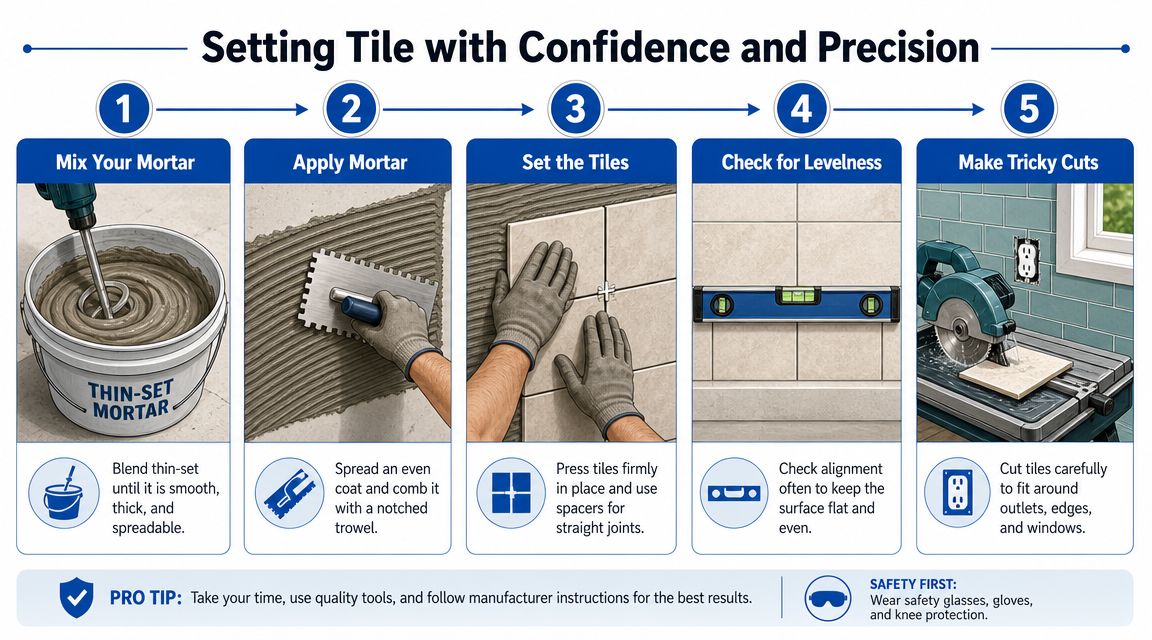
Phase 4: Setting Tile with Confidence and Precision
Alright, this is where the magic happens. Your walls are prepped, your layout is marked, and it's time to start setting some tile. This is less about brute force and more about finding a good rhythm. Don't rush it—patience here pays off big time.
First things first: your thin-set mortar. Get your mix right. You're aiming for a consistency that’s like thick, creamy peanut butter. If it’s too runny, your tiles will slide; too stiff, and you won’t get good adhesion. It should hold its shape on your trowel without dripping off.
Work in small, manageable sections, no more than two or three square feet at a time. This is a classic rookie mistake—trying to cover a huge area at once. The mortar will start to skin over and dry out, creating a weak bond that will fail down the road.
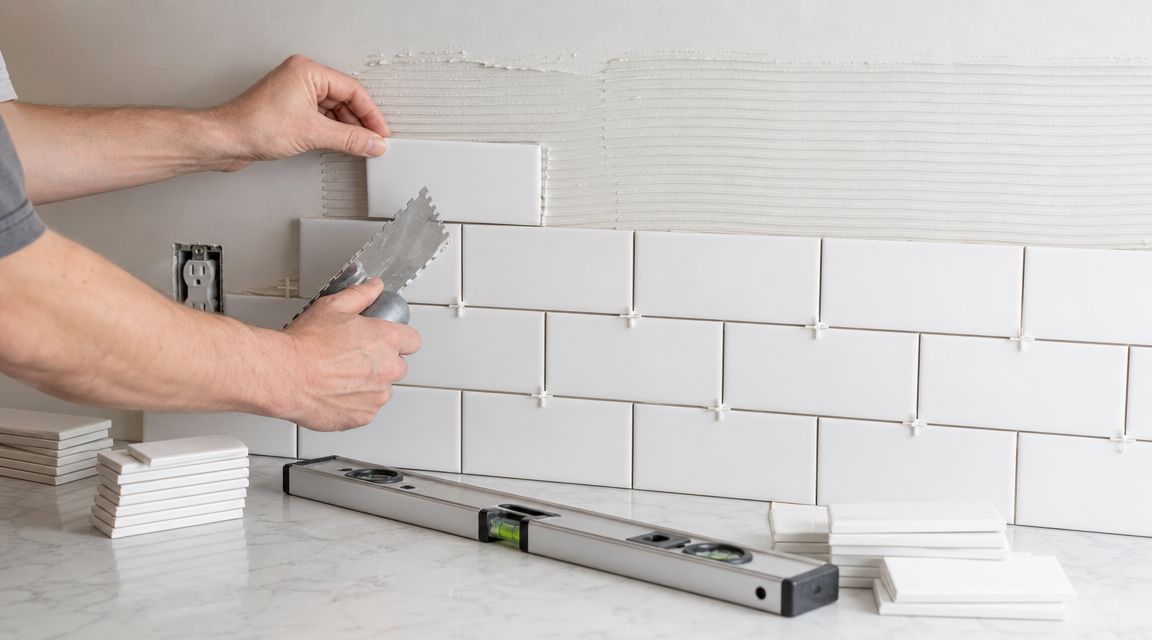
Using your notched trowel, scoop up a good amount of mortar and comb it onto the wall. Hold the trowel at a steady 45-degree angle. Those notches aren't just for show; they create uniform ridges that collapse when you press the tile in, ensuring full contact.
Placing and Spacing Your Tiles
Now for the fun part. Start with your bottom row, setting your first tile right along the level guideline you drew. Give it a gentle press and a slight back-and-forth twist. You'll feel it suction into place. This is also a good time to "back-butter" the tile—spreading a thin, flat layer of mortar on the back before you set it. This is especially important for larger formats or heavy natural stone tiles.
If you're working with trickier materials, our guide on porcelain tile installation has some extra tips you might find useful.
As you set each tile, pop tile spacers into the corners. Don't even think about skipping these! They are your secret weapon for perfectly straight, consistent grout lines. Keep your level handy and check your work often, laying it across several tiles to make sure everything is flush and even.
Pro Tip: The real test is checking your mortar coverage. After setting a few tiles, carefully pull one off the wall. The back should be at least 85-95% covered with mortar. If you see bare spots, you either need to apply a bit more thin-set or adjust the angle of your trowel.
Navigating Cuts and Obstacles
You're going to run into things—outlets, window sills, the end of a cabinet run. It's inevitable. This is where precise cuts separate a DIY job from a pro one.
For simple straight cuts on ceramic or porcelain, a snap tile cutter is fast and effective. But for anything more complex, like L-shaped cuts around cabinets or notches for outlets, a tile wet saw is your best friend. Always measure twice, mark your tile clearly with a pencil, and let the saw do the work.
The fundamental process—measure, prep, set, grout, and seal—hasn't changed for a reason. What has improved is our understanding of timing. For example, you must let your tiles set for about 12 hours before you even think about grouting. And when you do mix your grout, only make enough to use within 25 minutes before it starts hardening in the bucket. As tiling experts who have perfected the process over time will tell you, following these time-tested rules is what creates a backsplash that looks intentional and beautifully crafted.
Phase 5: Grouting, Sealing, and Finishing Touches
Alright, you’ve placed that last tile, stepped back, and admired your work. The wall is finally covered. Now for the step that truly makes or breaks the entire project: grouting and sealing.
A good grout job is what separates a DIY project from a professional installation. It’s the magic that transforms a grid of individual tiles into a single, seamless, and solid surface. Don't rush this part.
As this process shows, every single step—from your initial layout to the final grout line—builds on the last. Precision is your best friend.
Applying and Cleaning Grout
First, mix your grout until it has a smooth, lump-free consistency, kind of like thick cake frosting or peanut butter. Then, grab your grout float and start spreading it across the tiles, holding the float at a 45-degree angle to the wall.
This angle is non-negotiable. It’s what allows you to really press the grout deep into the joints, forcing out any air pockets. Make a few passes from different directions over each section to guarantee every gap is completely filled.
Once the joints are packed, switch your angle. Hold the float almost perpendicular to the wall (nearly 90 degrees) and scrape off the excess grout from the tile faces. Now, wait. After about 15-30 minutes, the grout will haze over and start to firm up. This is your cleanup window.
Using a damp—not soaking wet—grout sponge, gently wipe away the haze. Be sure to rinse your sponge often in a separate bucket of clean water to avoid just spreading a thin film of grout everywhere.
A Pro’s Two Cents: The most common mistake I see is using way too much water during cleanup. It seems helpful, but excess water can actually pull the pigment out of colored grout and weaken the joints you just packed. The goal is to clean the tile, not wash out the grout lines.
Sealing and Caulking for Durability
Let the grout cure completely. This usually takes 48-72 hours, but always double-check the manufacturer’s instructions on the bag. Once it's fully cured, it's time to seal it.
In a high-traffic area like a kitchen, applying a quality grout sealer is absolutely essential. This creates an invisible shield that repels water, grease, and spaghetti sauce, preventing nasty stains and making your backsplash a breeze to wipe down.
The final touch is caulk. Run a clean bead of flexible, kitchen-and-bath caulk where the backsplash meets the countertop and along the bottom of the cabinets. This flexible seal accommodates the tiny shifts and movements in your house, preventing cracks and creating a waterproof barrier for a finish that will last.
Knowing When to Call a Professional
Tackling your own backsplash is a fantastic way to put your personal stamp on your kitchen, and it can be a really satisfying project. But let's be honest—sometimes, the smartest tool you can have is the phone number for a good professional. Knowing when a project has moved beyond a fun DIY challenge and into "I'm in over my head" territory is key to avoiding a lot of frustration and wasted money.
So, when should you consider handing the trowel over to an expert? I always tell homeowners to pause and get a quote if their project involves a few specific red flags.
Red Flags for a DIY Backsplash
- Complex Patterns: Are you dreaming of a sharp herringbone or a detailed mosaic? These intricate designs look amazing, but they demand an incredible amount of precision. One slightly off-center cut can throw off the entire pattern, and it’s a mistake that’s tough for a beginner to recover from.
- Tricky Materials: Working with expensive materials like natural marble or sleek glass tile is a different ballgame. Marble is surprisingly soft and can chip easily, while glass tile is notorious for cracking if you don’t have the right blade and a steady hand. A pro has the specialized tools and experience to protect your investment.
- Imperfect Walls: Let’s face it, very few walls are perfectly flat and plumb. A professional installer knows how to prep and float a wall to create a flawlessly even surface, ensuring your tiles lie flat and the grout lines are clean.
For homeowners in communities like Wayland, Newton, Needham, and Wellesley, MA, bringing in a pro offers valuable peace of mind. While the tiles and adhesive might make up 30% to 40% of the project's budget, the labor often accounts for the other 60% to 70%. There's a good reason for this—a skilled installer prevents costly mistakes and material waste, especially with all the small, angled cuts a complex design requires. For a deeper dive into how pros manage costs, you can explore detailed project budget insights from EdwardMartin.com.
If what you really want is a guaranteed, high-quality result without the stress and late nights, then bringing in an expert is absolutely the right call. At Sunny Day Pro Services, we handle all the tricky parts so you can just step back and enjoy your beautiful new backsplash.
When the stakes are high, professional expertise isn't a luxury; it's an investment in getting the job done right the first time. If you'd like a reliable quote for your kitchen backsplash installation, we’re here to help.
Your Top Backsplash Questions, Answered (FAQs for 2026)
If you're gearing up for a backsplash project, you probably have a few questions. We get it. Over the years, we've heard them all from homeowners just like you. Here’s some straightforward advice based on our experience in countless kitchens.
What Does a Professional Backsplash Installation Cost in 2026?
This is usually the first question, and the answer really depends on the tile you choose and the complexity of the job. Generally, you can expect professional labor to run between $10 and $30 per square foot in 2026.
For an average-sized kitchen backsplash of 20 to 30 square feet, that puts the total installed cost somewhere in the $500 to $1,800 range. Keep in mind, things like tearing out old tile or carefully cutting around lots of outlets will nudge the price up. Here in the Newton and Wellesley areas, we always provide a clear, upfront quote so there are no surprises on the final bill.
Is It Okay to Install a New Backsplash Over Existing Tile?
While you technically can do this, we almost never recommend it. Tiling over an old backsplash often leads to problems with adhesion down the road. It also creates a bulky, awkward edge where the tile meets your countertops and cabinets.
For a result that not only looks professional but is built to last, the best approach is always to take it back to the wall. Removing the old tile gives you a fresh, flat surface, ensuring a much stronger bond and a cleaner, more integrated finish. It’s an extra step, but it’s worth it.
How Long Does a Typical Backsplash Installation Take?
For a pro, installing a standard backsplash is typically a two-day job.
- Day One: The first day is all about preparation. We'll set up, lay out the pattern, set all the tiles in place, and make all those precise cuts for outlets and windows.
- Day Two: We come back after the thin-set adhesive has had at least 12-24 hours to cure properly. Day two is for grouting, giving the tiles a final cleaning, and applying the sealer.
If you’re tackling this yourself for the first time, give yourself a full weekend. Rushing the process, especially the drying times, is one of the biggest mistakes we see. You’ll want plenty of time to work carefully without feeling like you have to cut corners.
Feeling ready to go but don't want to give up your weekend? For a flawless result without the learning curve, you can always trust the experts at Sunny Day Pro Services. Request your free, no-obligation estimate today.

