
Large Format Tile Installation: Expert Guide for Homeowners
Master large format tile installation with expert tips on substrate prep, mortar selection, and lippage control. Get a flawless finish in your home remodel.
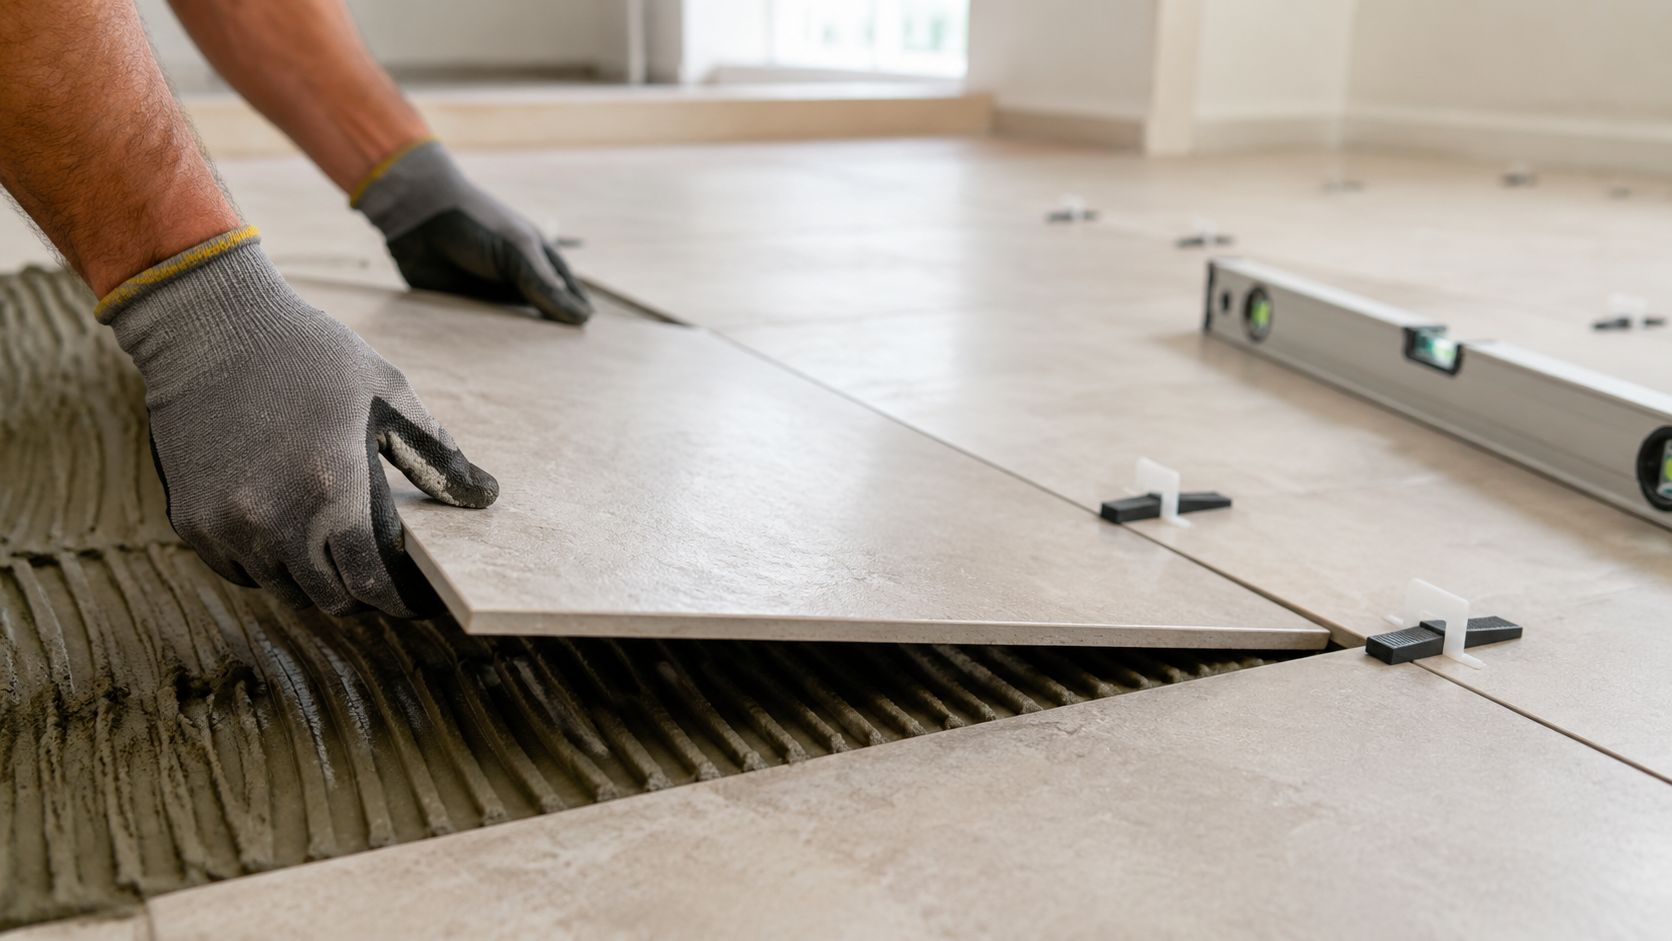
Large-format tile installation is often sold as the easier path to a clean, modern room. Fewer grout joints sound simpler, and a larger surface can make a bathroom or kitchen feel more open. The trade-off is that large tile is less forgiving, not more. A small dip, a weak mortar bond, or a rushed layout can create lippage, hollow spots, cracked grout, and loose edges that standard tile might hide.
The right question isn't only whether you like the look. It's whether the floor or wall assembly, setting materials, layout, and installation process can support it. For homeowners in Wayland, Newton, Needham, Wellesley, Weston, and nearby Massachusetts communities, that performance decision deserves as much attention as the tile's color and finish.
Table of Contents
- The straightedge comes before the mortar
- Coverage is a separate checkpoint
- Why prep often drives the labor
- 1. Inspect the assembly
- 2. Dry-layout the critical areas
- 3. Mix and spread the mortar
- 4. Set, move, and align
- 5. Protect the finished work
- Is large-format tile suitable for a small bathroom?
- How should I clean large-format tile?
- What if the tile sounds hollow?
- Can large-format tile go over existing flooring?
- When should I hire a professional?
Why Large Format Tile Is Not Just a Bigger Version of Regular Tile
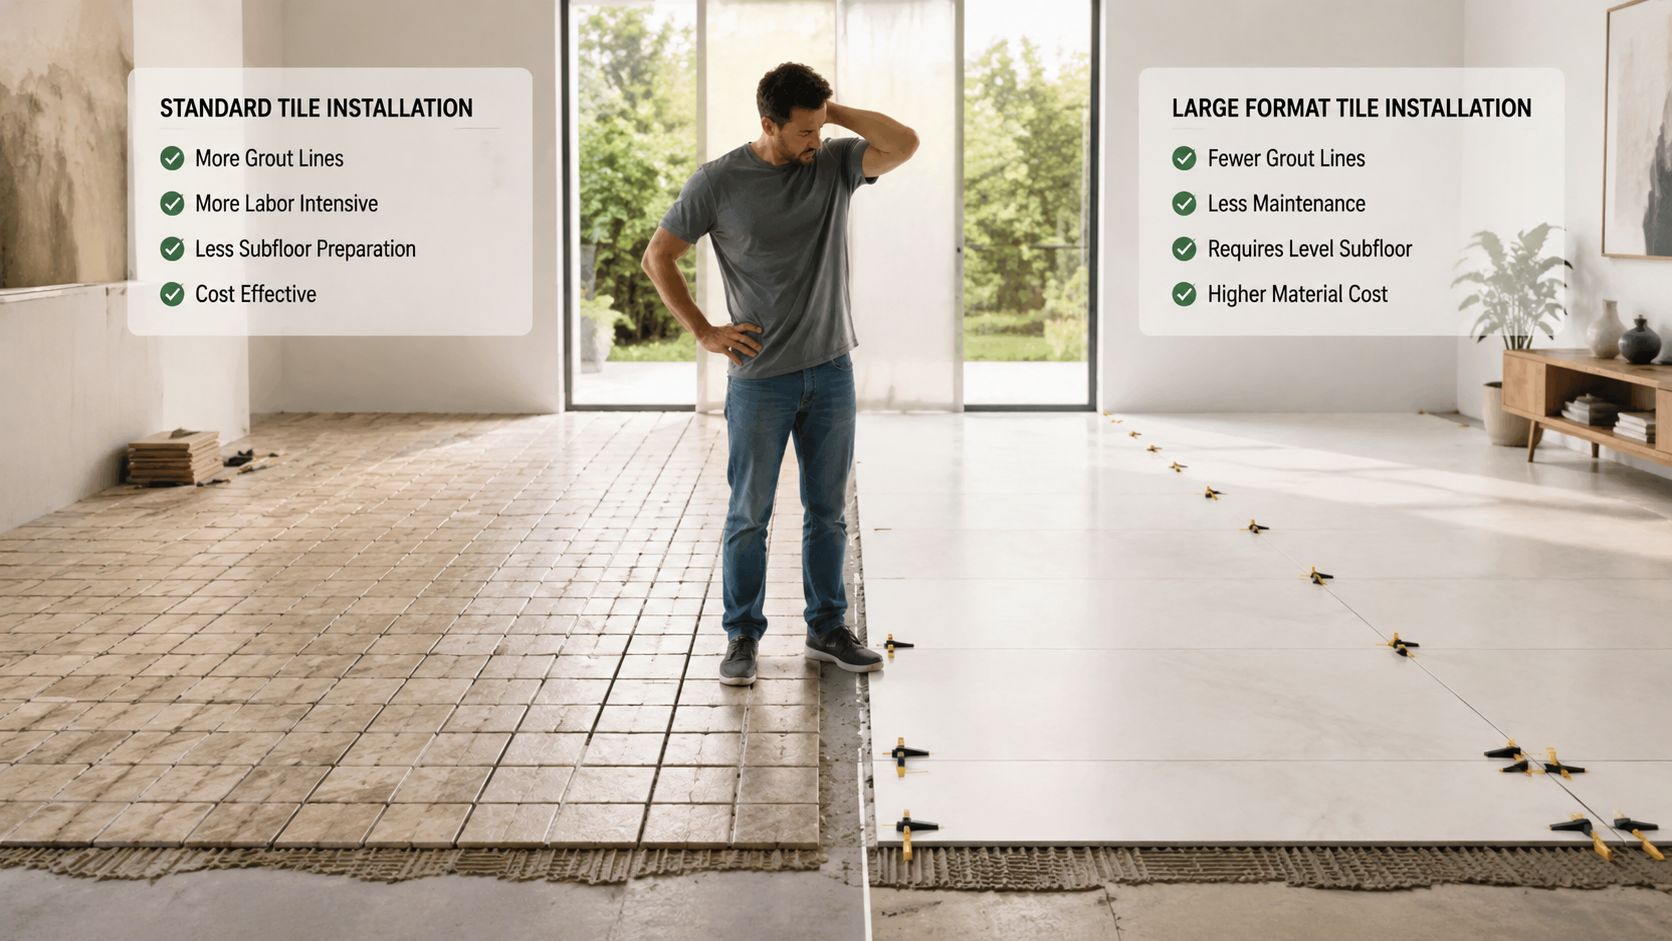
The common advice says large-format tile makes a room look bigger and installs faster because there are fewer pieces to set. The visual benefit is real. The assumption about installation is not. A large tile bridges a wider area, so it exposes variations that smaller tiles can follow without making the finished surface look uneven.
Why defects become predictable
A tile that rocks over a high spot can sit higher at one edge than the next tile. That height difference is lippage, and light shining across a large floor or shower wall makes it easy to see. A low area can prevent the mortar ridges from collapsing completely, leaving a hollow spot beneath the tile. In a wet area, those voids reduce support and can create room for moisture-related problems.
Large-format work also reduces the installer's margin for error during handling. A tile may flex while being moved, require more careful alignment, and need pressure across a broad surface rather than at one convenient corner. Traditional spacers can control the joint width, but they won't correct a substrate that's out of plane or replace proper mortar coverage.
Practical rule: Fewer grout lines reduce visual clutter, but they don't reduce the need for careful preparation.
The style decision has a performance side
Large tiles can produce a calm, continuous appearance on bathroom walls, kitchen floors, and open living areas. They can also reduce the amount of grout that needs routine cleaning. Those advantages matter, especially for homeowners who want a restrained design with fewer interruptions.
The hidden cost appears before the first tile is set. The installer may need to remove old flooring, repair the subfloor, flatten concrete, adjust transitions, or change the mortar system. If the project is priced only by the tile's surface area, the estimate may overlook the preparation that determines whether the finished installation performs.
Large-format tile isn't a shortcut. It's a system that rewards accurate prep and punishes casual installation.
What Qualifies as Large Format Tile Under Current Standards
The term large-format tile finally received a formal ANSI definition in 2024. The updated standards recognize a tile manufactured to ANSI A137.1 with a facial dimension greater than 23 inches, or 584 millimeters. That technical threshold gives manufacturers, designers, installers, and homeowners a more consistent way to discuss the category. The 2024 definition and its installation implications are outlined by the Ceramic Tile and Stone Association.
That definition includes familiar modular sizes such as 24 by 48 inches, which had often been discussed more loosely in trade practice. The size itself matters because it changes how an installer evaluates the setting surface, moves the tile, selects mortar, plans joints, and checks coverage.
Why older advice can mislead
Older articles may use a much smaller definition. The Tile Council of America handbook in 2001 described large tiles as 8 by 8 inches and greater, while industry commentary indicates that installers relied on inconsistent sizing assumptions for more than 20 years before the 2024 definition standardized the term. This historical comparison explains how the category changed over time.
That history explains why two contractors can use “large format” differently during an initial conversation. A tile that one installer treats as ordinary may still require closer attention to flatness, mortar contact, and movement accommodation than a homeowner expects.
Size is only the first screening question
The formal definition helps identify the category, but the installation plan needs more detail. Ask about:
- The longest edge: Tiles with an edge of 15 inches or greater trigger stricter substrate-flatness requirements under ANSI A108.02.
- The tile body: Porcelain, ceramic, marble, and granite can have different handling and setting considerations.
- The room conditions: Showers, bathroom floors, exterior areas, and stone installations demand higher coverage.
- The layout: Long rectangular tiles may need a limited offset pattern to control visible edge height differences.
- The substrate: Concrete, plywood, and backer-board assemblies each require an appropriate preparation plan.
A large tile isn't defined only by appearance. Its dimensions affect the physics of the installation, and the current standards reflect that reality.
Substrate Flatness and Mortar Coverage Requirements
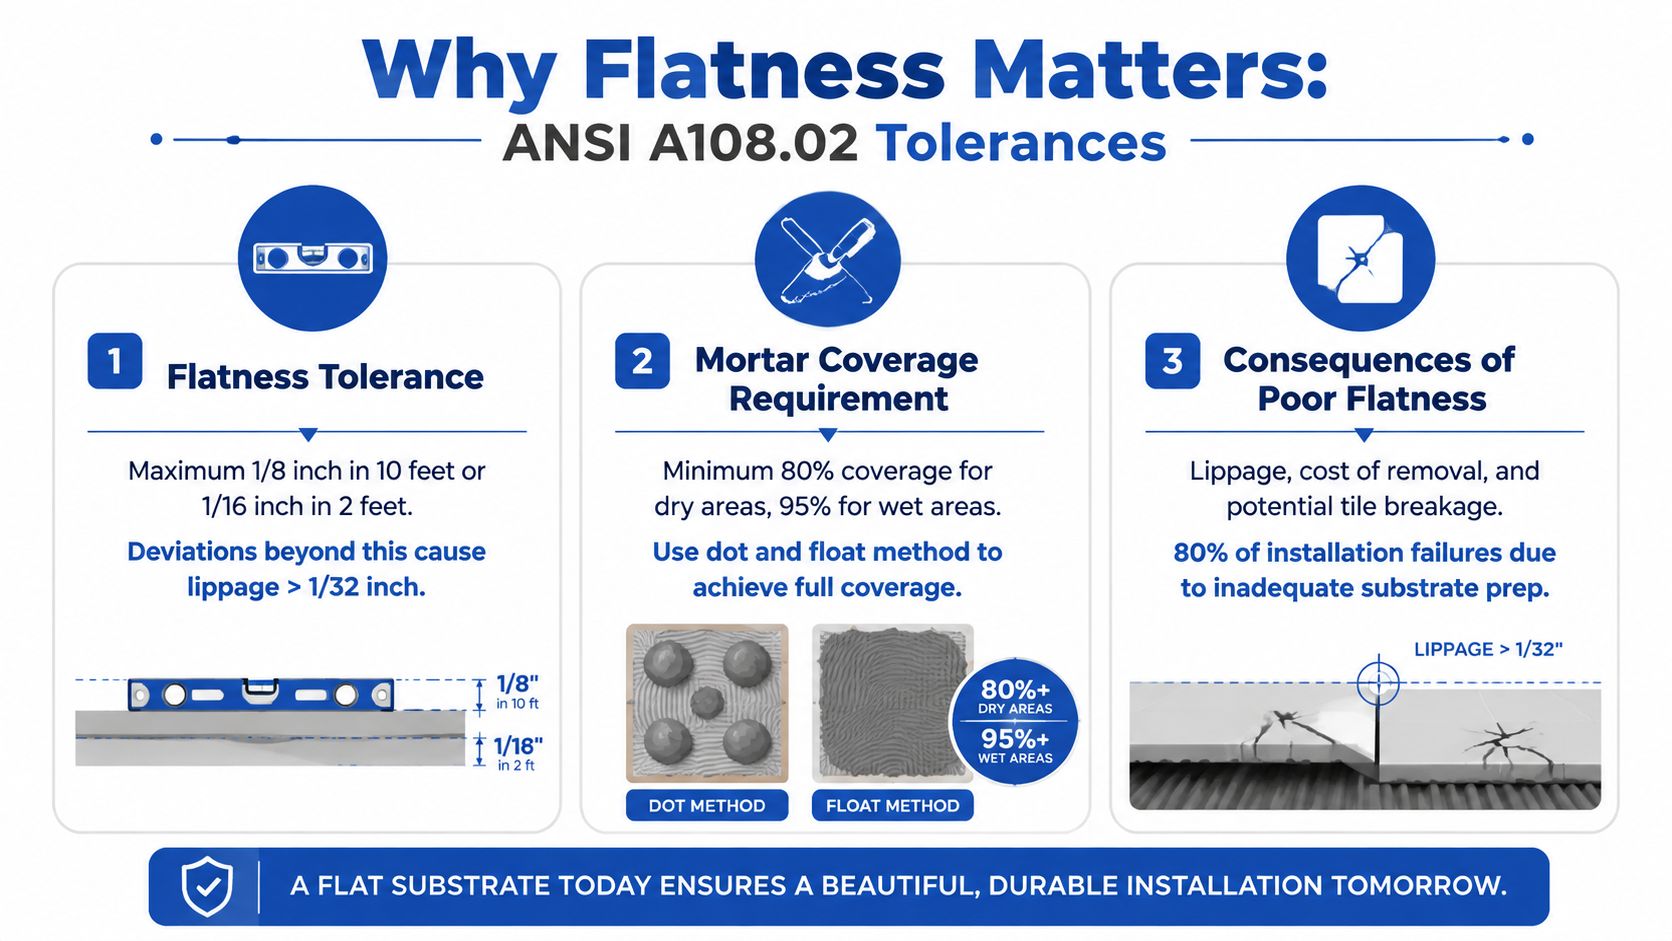
Large-format tile exposes surface problems that smaller tile can hide. For tiles with any edge 15 inches or greater, ANSI A108.02 requires the substrate to remain within 1/8 inch in 10 feet and no more than 1/16 inch in 24 inches. Smaller tiles use a looser tolerance of 3/16 inch in 10 feet. The National Tile Authority summarizes these flatness requirements and their relationship to large-format installation.
The reason is mechanical. A large tile bridges less effectively over waviness, so a bump or dip can keep it from bedding evenly. The result may be a raised edge, uneven grout joints, incomplete mortar contact, or a hollow sound when the tile is tapped.
The straightedge comes before the mortar
A professional checks the plane before spreading adhesive. A 10-foot straightedge reveals broad dips and ridges that a short level can miss. Mark each problem area, correct the surface before setting, and verify the finished plane against the required tolerance.
The repair method depends on the substrate and assembly. Concrete may need grinding, patching, or a suitable leveling product. A framed floor may require subfloor repairs or an approved tile underlayment system. Trying to correct major variation with mortar beneath individual tiles can cause slumping, uneven curing, and unsupported sections.
Ask the installer: How will you verify and correct flatness before installation? The answer should identify the measuring tool, repair method, and final check. If it does not, the preparation has probably not been planned.
Coverage is a separate checkpoint
A flat substrate does not guarantee a sound bond. ANSI-based guidance calls for at least 80% mortar coverage in dry interior areas and 95% in wet areas, exterior installations, and natural stone. Laticrete's technical guidance explains these coverage targets and the need to inspect them during installation.
The installer checks by periodically lifting a tile after pressing it into the mortar. The back should show collapsed ridges and contact across the required area. A perimeter that appears fully coated can still conceal voids beneath the center.
Why prep often drives the labor
Large-format tile work includes measuring, flattening, mixing, spreading, back-buttering, aligning, lifting test pieces, cleaning joints, and protecting the setting work. Substrate preparation and coverage verification often represent a significant part of the labor, because they address conditions that can cause failure later.
A useful estimate separates tile, mortar, labor, demolition, substrate repair, and finish work. A low price that excludes flattening may only defer the cost until the tile moves or the grout begins to fail.
For guidance on the supporting layer beneath a tiled surface, homeowners can review this tile backer board installation guide.
Recommended Mortars, Trowels, and Leveling Systems
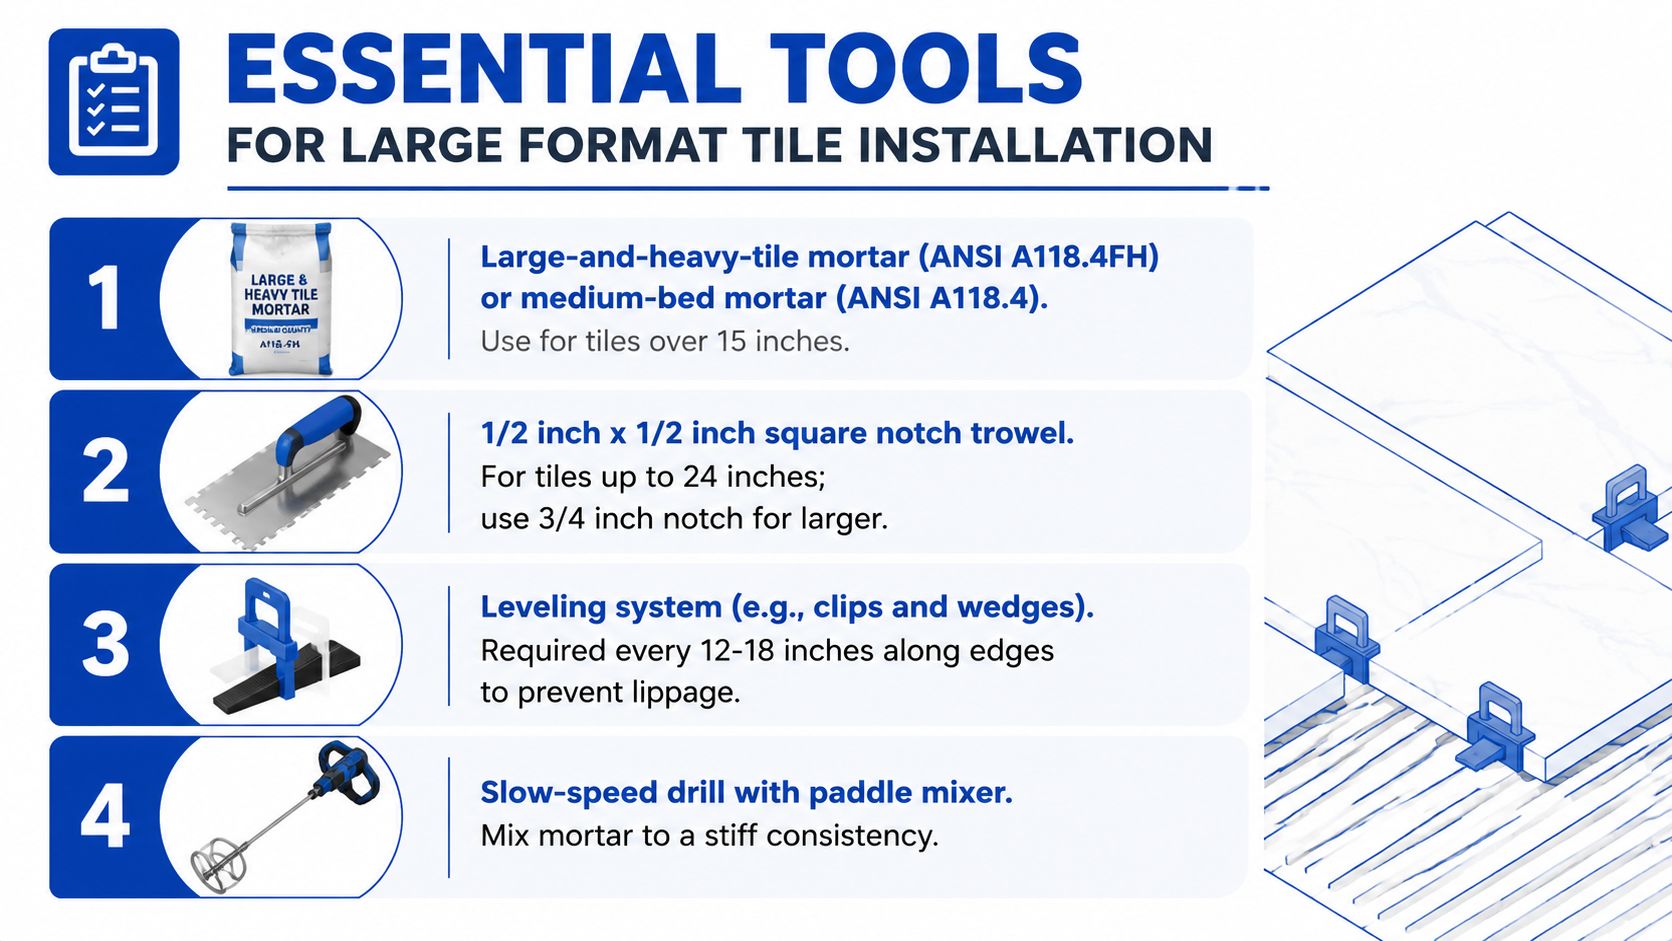
Large-format tile is sensitive to the setting system beneath it. Use large-and-heavy-tile mortar, often called LHT mortar, or a medium-bed style mortar when the product and tile require thicker embedment or better resistance to slumping. TCNA and ANSI guidance describes LHT mortars for heavier tiles with a nominal embedded bond-coat thickness of roughly 3/32 to 1/2 inch. The National Tile Authority's TCNA handbook overview discusses mortar thickness and large-format setting methods.
That range is working room, not permission to build a thick cushion under every tile. The installer needs enough mortar to fill minor surface voids, collapse the combed ridges, and maintain broad contact. A thicker layer cannot correct a broad dip in the substrate, and an unsuitable thinset may slump under the tile's weight.
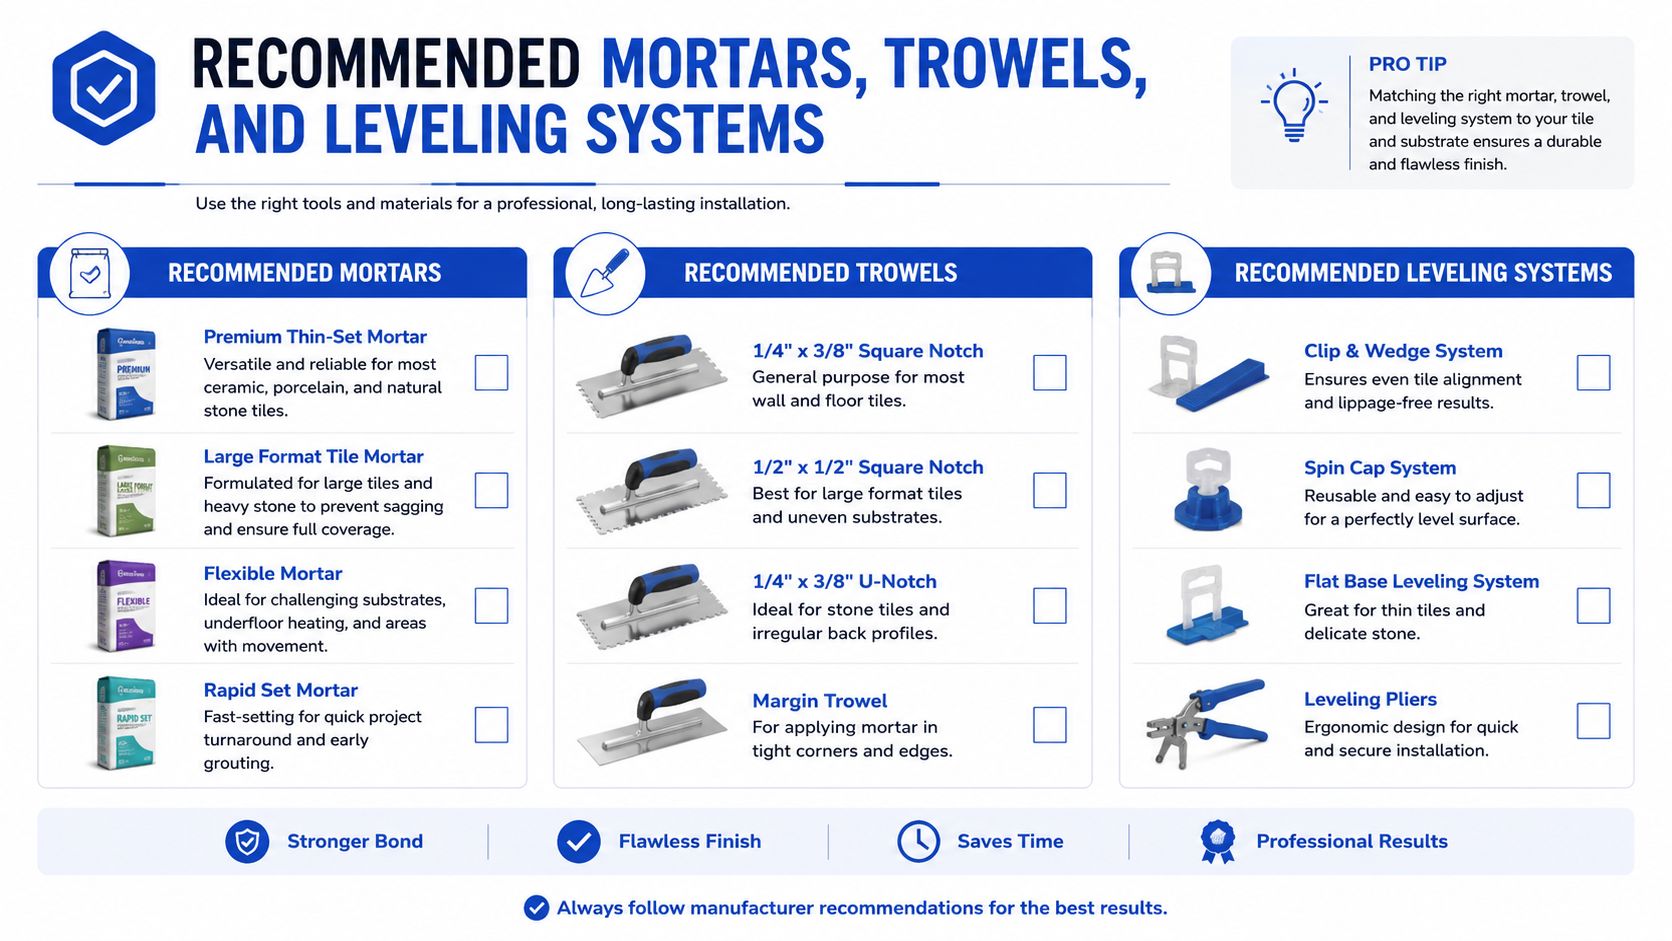
Match the trowel to the tile and substrate
The notch must provide enough mortar volume for coverage, while the installer maintains consistent pressure and direction. Larger tiles often need a larger notch than standard wall tile. Comb mortar in straight, parallel ridges, then move the tile slightly across them to collapse the ridges and reduce trapped air.
Back-buttering applies mortar to the tile back as well as the substrate. It fills surface texture and improves contact, but it does not replace a flat setting plane. Adding extra mortar beneath each tile over a broad dip can produce an unstable bond coat and uneven finished height.
Mixing also affects performance. Use a slow-speed drill with a paddle mixer, clean water, the manufacturer's instructions, and the specified slaking time. An overly wet mix can slump. Mortar that skins over before the tile is placed may not bond properly.
Control the layout before setting
Rectangular large-format tiles can bow slightly or vary in size. Industry guidance commonly limits running-bond offsets to 33% for these tiles, reducing the chance that one tile's high point meets the next tile's low point.
A clip-and-wedge leveling system helps hold adjacent edges at a consistent height while the mortar cures. It cannot flatten a warped tile or repair an uneven substrate, so use it as a lippage-control aid after the surface has been prepared.
Traditional spacers remain useful where the layout requires independent adjustment. Choose between spacers and clips according to tile shape, joint design, room geometry, and the installer's ability to maintain a consistent plane.
For equipment planning, review this guide to tile installation tools needed.
Step-by-Step Installation Workflow and Quality Checkpoints
A large-format installation succeeds or fails before the first tile is set. The sequence below protects the finished surface from hollow spots, cracked grout, and uneven edges that become difficult to correct after the mortar cures.
1. Inspect the assembly
Confirm that the substrate is sound, clean, dry where required, and compatible with the selected tile and setting system. Remove loose material, dust, paint residue, and damaged underlayment. Address movement or structural problems before mortar reaches the surface.
Use a 10-foot straightedge check across the floor or wall in multiple directions. Mark the low and high areas, then flatten the plane before layout begins. Large-format tile exposes deviations that ordinary room lighting can hide, so the applicable flatness tolerance must guide the preparation.
2. Dry-layout the critical areas
Dry-layout reveals narrow cuts, door transitions, plumbing penetrations, niches, corners, and focal points. It also shows whether the pattern creates awkward joints or small slivers along the room edges.
Review movement accommodation and perimeter details before covering the assembly. Tile and grout should not bridge changes in plane or structural movement. Confirm the joint plan, transition heights, and cut locations while every option remains available.
3. Mix and spread the mortar
Follow the mortar manufacturer's mixing instructions and spread only an area that can be covered while the mortar remains workable. Hold the trowel consistently and comb straight, parallel ridges. Consistent ridges are easier to collapse beneath a large-format tile than random or circular marks.
Back-butter the tile when its profile, the substrate, or a coverage test indicates that additional contact is needed. Apply a thin, even coat to fill surface texture. Do not use extra mortar to compensate for a broad dip in the substrate, because that can create an unstable bond coat and uneven tile height.
4. Set, move, and align
Place each tile carefully, then press and move it in a controlled direction to collapse the mortar ridges. Clips, wedges, spacers, and a straightedge can help maintain neighboring edges, but they cannot correct a warped tile or an uneven setting plane. Check alignment repeatedly instead of waiting until the field is complete.
Coverage checkpoint: Lift test tiles during installation. In a shower or other wet area, average contact must reach 95%, with no more than 5% voids. ANSI A108.5-based guidance details these wet-area and dry-area coverage requirements.
Inspect the lifted tile for collapsed ridges and consistent contact. A hollow region or an untouched mortar ridge requires an immediate change in spreading or setting technique. Grout will conceal the defect temporarily, not correct it.
5. Protect the finished work
Keep the installation free from traffic, vibration, shifting materials, and premature washing while the mortar cures. Protect the surface according to the setting material's requirements, and keep joints clean enough to accept grout.
Apply grout only after the tile has stabilized. Remove excess mortar from the joints, fill them consistently, and maintain movement joints at changes in plane and around perimeter locations. The finished appearance depends on the flatness, coverage, and alignment decisions made before grouting.
Timeline, Cost Estimates, and When to Hire Professionals
Large-format tile is a performance decision, so the schedule depends on preparation as much as setting. A flat, sound bathroom floor may progress quickly. A shower, kitchen, or open living area can take longer once demolition, waterproofing, floor correction, transitions, and detailed cuts enter the scope.
A reliable estimate separates visible materials from work that happens before tile is installed:
- Tile and trim: Porcelain, ceramic, marble, and granite differ in weight, handling, cutting, edge treatment, and waste planning.
- Setting materials: LHT or medium-bed mortar, grout, movement-joint materials, waterproofing components, and leveling accessories should appear in writing.
- Labor: Large panels require careful movement, alignment, coverage checks, and protection during curing.
- Substrate remediation: Grinding, patching, underlayment replacement, or subfloor repair may be required before setting begins.
- Removal and disposal: Existing tile, adhesive, damaged backer board, and flooring may need removal before the substrate can be evaluated.
For a practical way to compare labor and material line items, review this guide to tile installation cost per square foot.
DIY risk versus professional value
DIY work becomes risky when the installer cannot verify substrate flatness, select mortar for the tile, or confirm coverage by lifting test tiles. Wet areas leave less room for error because poor contact can contribute to debonding and moisture problems.
Ask a qualified installer to explain:
- How the substrate will be measured and corrected.
- Which mortar system will be used and why.
- How the layout will account for tile bowing and offsets.
- How mortar coverage will be checked during installation.
- How movement joints, transitions, corners, and penetrations will be treated.
- What the satisfaction guarantee covers, including workmanship corrections and exclusions.
A written estimate should identify preparation instead of hiding it inside a vague installation allowance. Homeowners in Wayland, Newton, Needham, Wellesley, Weston, and nearby areas may also need a contractor familiar with uneven floors, older remodel layers, and restricted access in existing homes.
Call a professional for showers, natural stone, extensive floor correction, complicated transitions, or large rectangular layouts where lippage and coverage are difficult to verify. If removal is needed later, the cheapest installation can cost more than a properly prepared one. Professional value comes from controlling failure points before they become visible.
Frequently Asked Questions About Large Format Tile
Is large-format tile suitable for a small bathroom?
Yes, provided the layout and substrate support it. Fewer grout lines can make a compact room feel calmer, but narrow cuts, plumbing openings, corners, and shower slopes require careful planning. A professional should dry-layout the room before ordering or setting tile.
How should I clean large-format tile?
Clean the tile with a product appropriate for its surface and use a soft tool that won't scratch the finish. Because there are fewer grout joints, routine cleaning may involve less grout maintenance, but spills still need prompt attention, especially with porous natural stone.
What if the tile sounds hollow?
A hollow sound doesn't prove failure by itself, but it deserves inspection. The installer should check the affected area, look for movement or cracked grout, and determine whether mortar coverage is adequate. Don't inject a repair product without identifying the cause.
Can large-format tile go over existing flooring?
Sometimes, but only after checking bond, movement, height, cleanliness, and flatness. Existing flooring that's loose, damaged, contaminated, or outside the required plane should be removed or corrected before the new tile is installed.
When should I hire a professional?
Hire a pro for showers, natural stone, extensive floor correction, complicated transitions, large rectangular layouts, or any project where you can't verify coverage and flatness yourself.
Sunny Day Pro Services provides professional tile installation and remodeling for kitchens, bathrooms, floors, backsplashes, and high-traffic spaces across Massachusetts. Visit Sunny Day Pro Services to request a quote and discuss a large-format tile installation plan built around proper substrate preparation, mortar coverage, and clean finishing.

