
Post Construction Cleaning Before and After You Need to See
See real post construction cleaning before and after results, a room-by-room checklist, timeline, and tips for Massachusetts homeowners hiring pros.
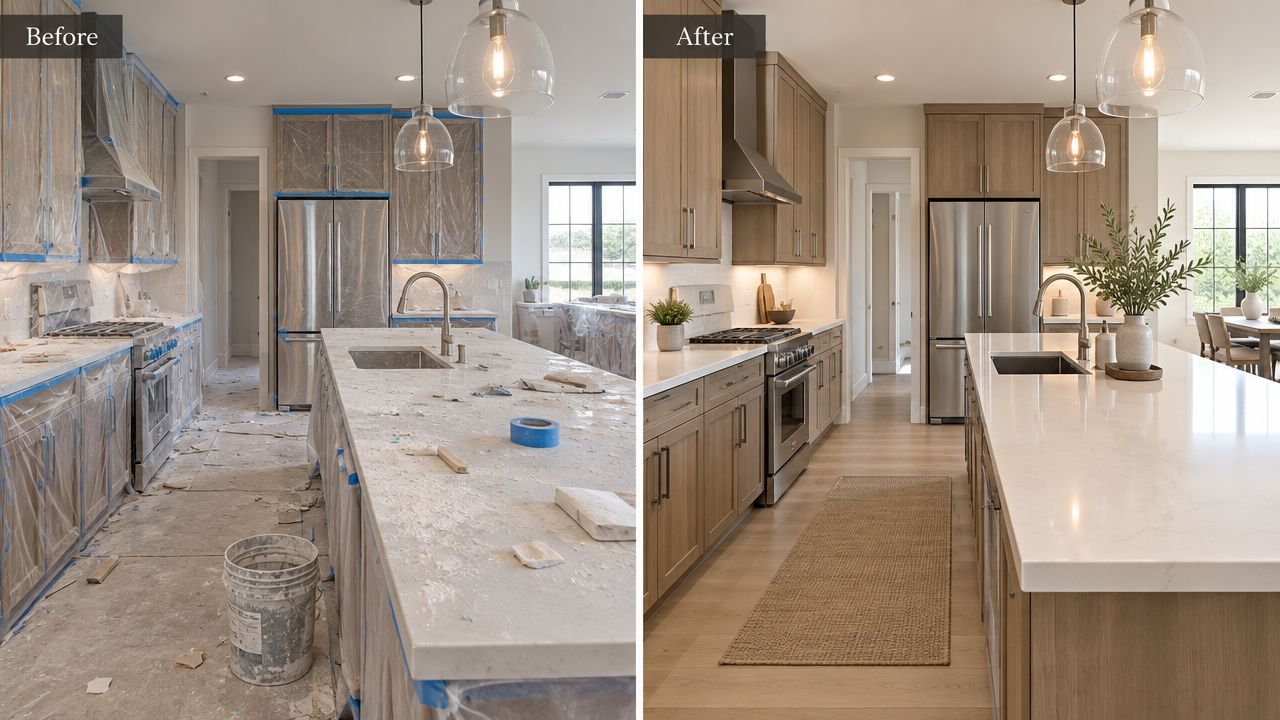
You've finished a kitchen renovation in your Massachusetts home. The new quartz is installed, the cabinets are back in place, and the contractor has swept the obvious scraps away. Then sunlight crosses the room and exposes a white film on every surface, paint specks on the glass, grit in the drawer slides, and dust packed around the HVAC returns. A quick mop won't make that room move-in ready.
Post construction cleaning before and after is less about making a messy room look presentable and more about controlling what renovation work leaves behind. The effective approach removes bulk debris first, captures fine dust before wet cleaning, and finishes with a detailed inspection after particles have had time to settle. That staged process protects new finishes, improves the handoff, and gives homeowners a realistic standard for judging the result.
Table of Contents
- Phase one removes the job-site load
- Phase two delivers the detailed transformation
- Phase three verifies move-in readiness
- How much does post-construction cleaning cost in Massachusetts?
- What should you do before cleaners arrive?
- What if dust comes back within 48 hours?
- Should the crew return for missed spots?
- How do you protect the result during punch-list work?
What Post Construction Cleaning Before and After Looks Like
A newly renovated Massachusetts kitchen can pass as finished from the doorway. Up close, the remaining work becomes clear. Contractor tape clings to the quartz edge, drywall dust covers cabinet faces, plastic remains over HVAC returns, and sawdust fills the drawer slides. The floor may appear clean until fine grit shifts under your shoes.
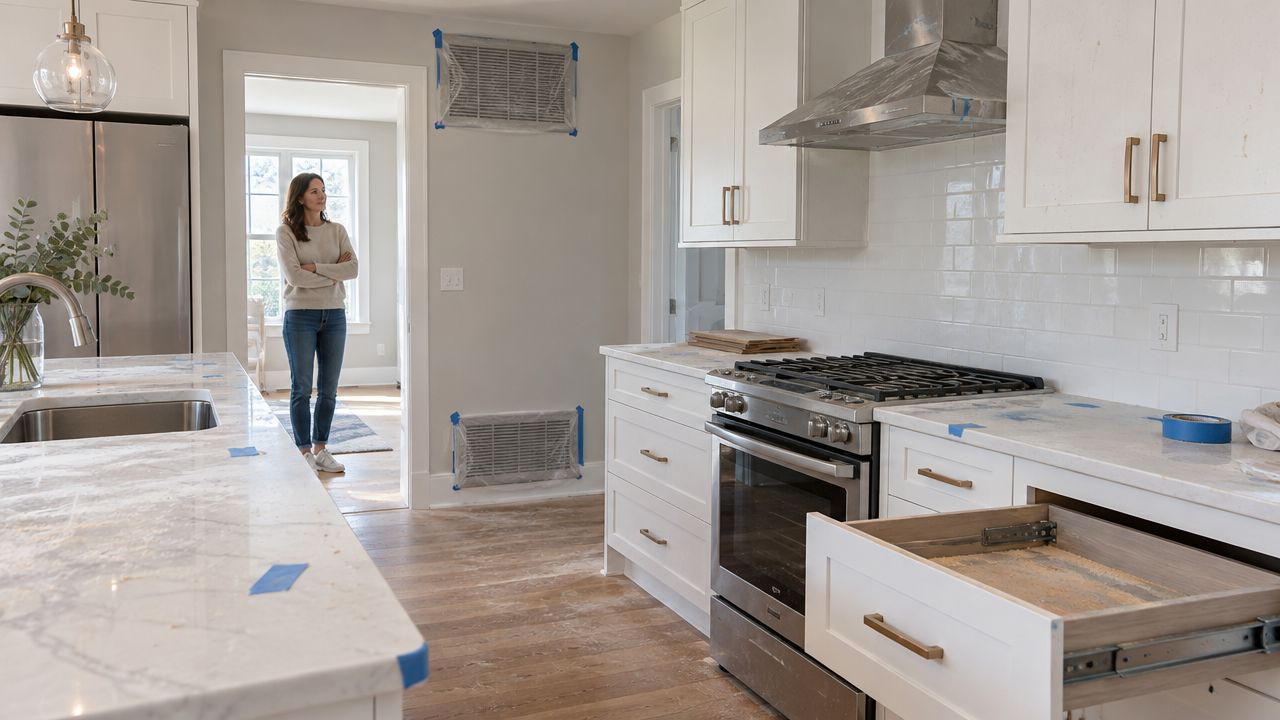
The before state includes residue in places a quick cleanup misses:
- Horizontal surfaces: A pale film settles on counters, cabinet tops, shelves, trim, and appliances.
- Glass and mirrors: Paint splatter, adhesive marks, and drywall haze appear when sunlight hits at an angle.
- Tile and grout: Grout haze can leave a new bathroom or backsplash looking dull.
- Edges and corners: Debris collects behind doors, beneath radiators, along baseboards, and inside tracks.
- Hidden areas: Dust lands on door-frame tops, outlet covers, vent grilles, and fixture bases.
The after state should hold up both at arm's length and under close inspection. Stickers and protective film are removed without harming the finish. Fingerprints disappear from stainless steel and cabinet fronts. Window tracks are vacuumed, baseboards are wiped, drawer runners are cleared, and the floor feels smooth instead of sandy.
A finished room should hold up in ordinary daylight, not just look clean from across the room.
The distinction protects new materials. If grit is pushed across glass, flooring, or painted trim, it can scratch or leave residue behind. A reliable before-and-after comparison shows the same room from a similar angle, with dusty edges, tracks, ledges, and residue visible before cleaning and clear afterward.
The change is practical, not cosmetic. The room moves from an active work area to a space where someone can cook, unpack, and live without carrying renovation dust through the rest of the home.
How Post Construction Cleaning Differs From a Regular Deep Clean
A regular deep clean starts with a home that has been lived in and maintained. Post-construction cleaning starts with a property that has been altered, exposed to building materials, and filled with residues ordinary housekeeping wasn't designed to remove.
The construction-specific target includes drywall dust, fine silica-containing particles, sawdust, packaging, adhesive residue, paint flecks, grout haze, protective film, and small pieces of tile or trim. It also includes contamination in places a routine cleaner may reasonably skip, such as cabinet interiors, window tracks, vent covers, door-frame tops, and the backs of new fixtures.
The work and tools are different
A standard cleaner may vacuum and mop efficiently, but a post-build crew must control loose particulate before it scratches or spreads. The usual sequence is high-to-low and dry-to-wet:
- Remove bulk debris and loose material.
- HEPA-vacuum ceilings, ledges, trim, walls, vents, and floors.
- Wet-wipe hard surfaces after loose dust has been captured.
- Detail glass, tracks, fixtures, cabinetry, tile, and floors.
- Inspect under natural light and correct residue or missed edges.
Most household vacuums and many basic shop vacuums aren't designed for this level of fine-dust control. A suitable crew may use HEPA vacuums, extension poles, microfiber wall systems, protective equipment, and purpose-rated scrapers. Scraping dried paint or thinset takes judgment because the wrong blade, angle, or pressure can damage a new finish.
| Task or Area | Regular Deep Clean | Post Construction Clean |
|---|---|---|
| Floors | Vacuum and mop normal household soil | Remove construction grit, dust film, residue, and tracked debris before wet cleaning |
| Windows | Clean accessible glass and frames | Detail glass, tracks, sills, screens, paint specks, film, and adhesive residue |
| Cabinetry | Wipe accessible fronts and handles | Clean interiors, edges, tops, drawer slides, labels, and installation dust |
| HVAC returns | Light surface dusting | Careful vacuuming and wet wiping to limit fine dust movement around the system |
The cost difference reflects labor, equipment, surface risk, and dust control, not a longer version of house cleaning. A mop can make a floor look wet and temporarily darker. It can't remove the construction residue embedded in tracks, corners, and textured finishes.
The Three Phases of a Post Construction Clean
The most reliable before-and-after result comes from treating cleanup as a sequence. Rough cleaning makes the site workable. Final cleaning removes residue after the trades are finished. Touch-up cleaning catches particles and marks that appear during the handoff.
Phase one removes the job-site load
The rough clean happens while trades may still be completing work. The crew removes bulk debris, gathers packaging, bags sawdust, clears pathways, and moves loose material out of finished areas. Its purpose is access and control, not a polished move-in finish.
For an average 1,500 to 2,500 square foot Massachusetts home, the exact crew size and duration depend on debris volume, room count, access, and whether contractors are still present. A small crew may handle a light rough pass, while a debris-heavy renovation needs more hands and repeated removal. The tools are practical: collection bags, bins, brooms for controlled bulk material, dustpans, hand tools, and protective materials.
Phase two delivers the detailed transformation
The final clean should wait until construction and punch-list work are complete, the space is vacated, and no trade is likely to create fresh dust. The crew works from high surfaces down, using HEPA equipment before wet wiping. Walls, trim, cabinetry, vents, fixtures, glass, tile, floors, and hardware all receive attention.
A typical home in this size range may require a multi-person crew and a substantial workday or more, depending on the finish level and residue. That estimate should be based on a walkthrough, not square footage alone. A compact home with extensive tile, divided windows, adhesive, or paint residue can demand more detail work than a larger open-plan space.
Phase three verifies move-in readiness
The touch-up pass is lighter and faster. It occurs after fine dust has resettled and after any contractor returns have left new fingerprints or debris. Depending on site conditions, the gap may be 24 to 72 hours, but the right timing depends on ventilation, activity, and the amount of dust released.
This final visit focuses on ledges, tracks, baseboards, glass edges, fixtures, floors, and visible marks. The post-construction cleaning process works best when each phase has a distinct purpose.
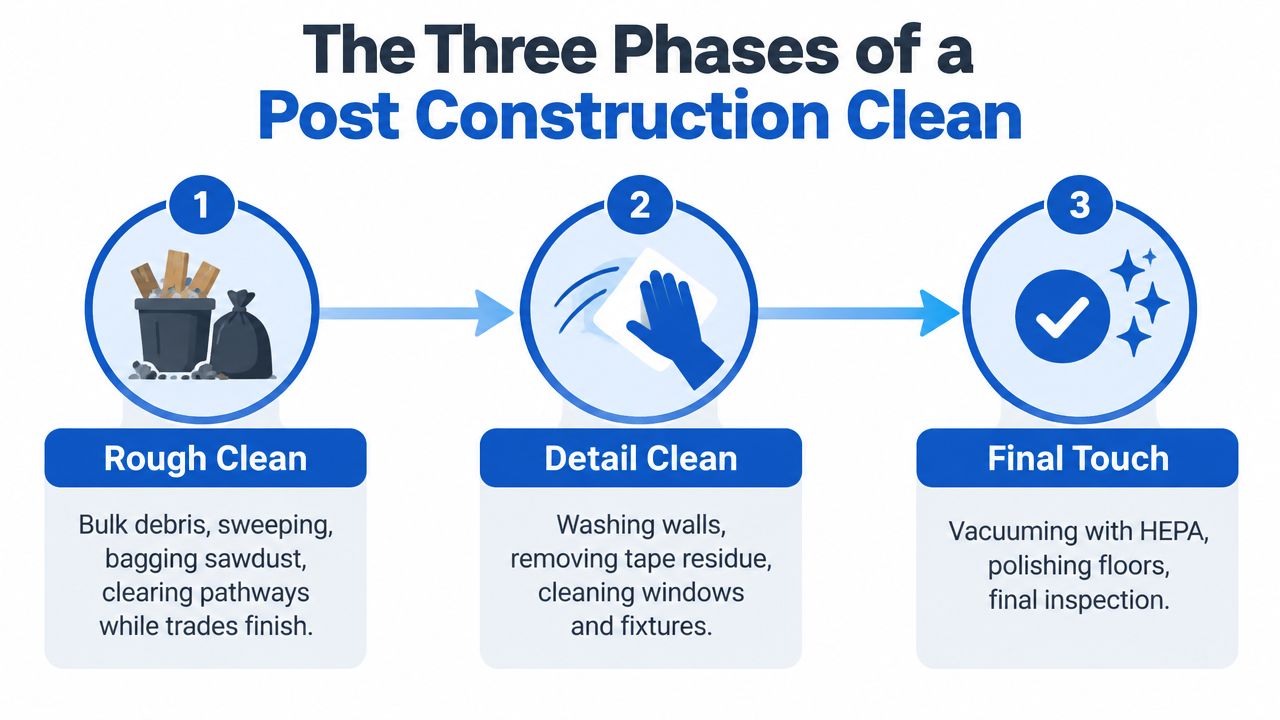
The dramatic transformation isn't one wipe-down. It appears when debris removal, detailed cleaning, and final verification happen in order.
Room by Room Results You Can Expect
Every room leaves a different signature after renovation. A kitchen produces installation residue and cabinet dust. A bathroom exposes grout haze and mineral-looking spots on new fixtures. A basement can hold sanding residue around utilities long after the floor appears swept.
Kitchens and bathrooms show the smallest misses
In the kitchen, a finished clean means more than a bright countertop. Cabinet interiors, drawer slides, range hood surfaces, appliance labels, backsplash edges, toe-kicks, and floor transitions need inspection. Dust left inside a drawer often returns to the room every time the drawer opens.
Bathrooms require careful work around tile, grout, mirrors, glass enclosures, faucets, toilets, and vanity interiors. Grout haze can remain after a casual wipe, while construction dust on mirrors often appears as a cloudy reflection rather than an obvious stain.
Bedrooms and living areas tend to look clean sooner, but they still hide residue along long edges. Window sills, closet tracks, baseboard profiles, outlet plates, fireplace surrounds, and built-in shelving catch dust that overhead lighting may not reveal.
| Room | Before, Typical Debris | After, Finished State |
|---|---|---|
| Kitchen | Cabinet dust, labels, range hood film, sawdust in drawers, residue around appliances | Clean interiors, clear hardware, smooth counters, detailed toe-kicks, dust-free tracks |
| Bathroom | Grout haze, mirror dust, fixture spots, packaging, residue around tile edges | Clear mirrors, clean grout lines, polished fixtures, residue-free tile and glass |
| Bedroom | Dust on sills, closet-track grit, baseboard film, debris in corners | Clean edges, smooth floors, clear tracks, dust-free trim and storage areas |
| Living area | Fireplace dust, outlet-plate film, floor grit, shelving residue | Clean surrounds, clear plates, detailed built-ins, even flooring finish |
| Basement or utility room | Drywall sanding residue, concrete dust, exposed-utility buildup, loose scraps | Clear pathways, controlled dust, clean utility surfaces, swept and vacuumed floors |
Basements deserve extra scrutiny because exposed pipes, ductwork, electrical equipment, and unfinished concrete create more ledges and textured surfaces. A good crew won't treat the basement as an afterthought. It should be safe to walk through, free of loose debris, and clean enough that remaining maintenance work doesn't spread dust into finished rooms.
Why HEPA Filtration and Sequencing Matter for Your Health
A renovated Massachusetts home can look finished while fine dust remains on ledges, inside vents, and in floor joints. Drywall, concrete, mortar, and stone work can release respirable crystalline silica. See our guide to cleaning drywall dust for the full removal sequence. The UK Health and Safety Executive lists a silica workplace exposure limit of 0.1 mg/m³ averaged over 8 hours, while dry sweeping can produce peak exposures of approximately 1 to 2 mg/m³, or 10 to 20 times that limit, according to HSE guidance on sweeping and cleaning.
OSHA's construction standard prohibits dry sweeping or dry brushing when those methods could expose workers to respirable crystalline silica, unless safer alternatives are not feasible. It also limits compressed-air cleaning unless effective dust-capture ventilation is in use or no alternative is feasible, as explained in OSHA's silica construction information.
Capture dust before you move it
A household vacuum may collect visible debris while finer particles pass through or recirculate. A properly defined HEPA vacuum uses the HEPA filter as its final filtration stage and captures 99.97% of particles at 0.3 microns, according to EPA guidance on HEPA vacuums.
Sequence the work from high surfaces down:
- Start with ceilings, light fixtures, upper walls, and high ledges.
- Clean door frames, trim, cabinets, vents, and other horizontal surfaces.
- HEPA-vacuum loose dust before adding moisture.
- Wet-wipe hard surfaces and wet-mop floors after grit is removed.
- Run suitable air-cleaning equipment while the area remains controlled.
Dry feather dusting and blowers redistribute fine material onto surfaces that were already cleaned. Applying a wet mop directly to dry construction dust can form a paste that settles into grout, textured surfaces, and floor joints. A staged process removes the material instead of shifting it from room to room.
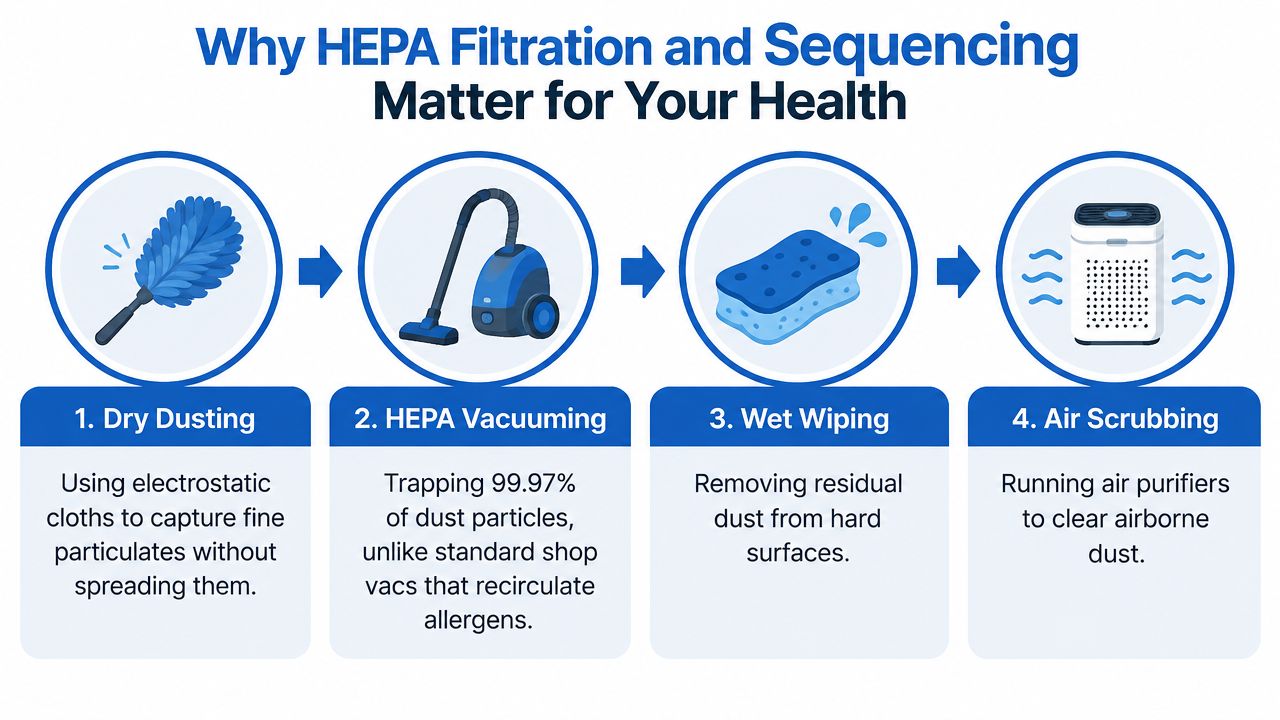
Fine dust may remain airborne for up to 2 days, and some independent guidance recommends waiting 24 to 48 hours after construction ends before a deep cleaning pass, as described in this post-construction indoor-air-quality guide. Allergy-sensitive residents, people with asthma, children, and pets require careful containment and sequencing.
For lead-related renovation work, EPA guidance calls for containing the work area, covering floors and furniture with heavy-duty plastic and tape, keeping children, pregnant women, and pets out, then using HEPA vacuuming, wet wiping, and wet mopping before removing barriers. The EPA homeowner lead-dust guidance provides that procedure.
When to DIY and When to Hire a Massachusetts Pro
DIY can make sense for a limited project. If you repainted one room without drywall sanding or tile work, have time for two long weekends, and are willing to rent suitable HEPA equipment, you may be able to handle the cleanup carefully. Protect the adjacent rooms, remove loose debris first, and don't assume a regular vacuum and mop are enough.
The calculation changes after a gut renovation. Multiple rooms, new drywall, tile installation, basement work, extensive glass, and occupied homes create more opportunities for dust migration and surface damage. Allergy, asthma, small children, or a tight move-in date also make professional dust control more valuable.
The real DIY cost is focused labor
Most homeowners underestimate how long detail work takes. A full post-construction clean can require 12 to 25 hours of focused labor, depending on the property, residue, and scope. That time includes moving protection, vacuuming high surfaces, cleaning cabinetry, detailing tracks, wet-wiping walls, treating glass, inspecting edges, and repeating areas where dust returns.
A rental HEPA vacuum is only one part of the equipment gap. You may also need extension-pole systems, microfiber wall kits, suitable scrapers, protective equipment, sealed disposal bags, ladders, and enough time to work without rushing. A standard shop vacuum, compressed air, or dry broom can make the air and finish worse.
When a crew earns its fee
A professional crew becomes worthwhile when the project is large, the surfaces are new and vulnerable, or the household can't absorb a long cleanup. The value isn't just speed. It includes a planned sequence, appropriate filtration, safer residue removal, and a final inspection that catches the areas homeowners commonly miss.
Sunny Day Pro Services is a Massachusetts option for post-construction cleanup, with trained crews, project equipment, flexible scheduling, and a satisfaction guarantee that sends the team back when expectations aren't met. Its professional post-construction cleaning service is relevant for homeowners in Wayland, Newton, Needham, Wellesley, Weston, and surrounding communities.
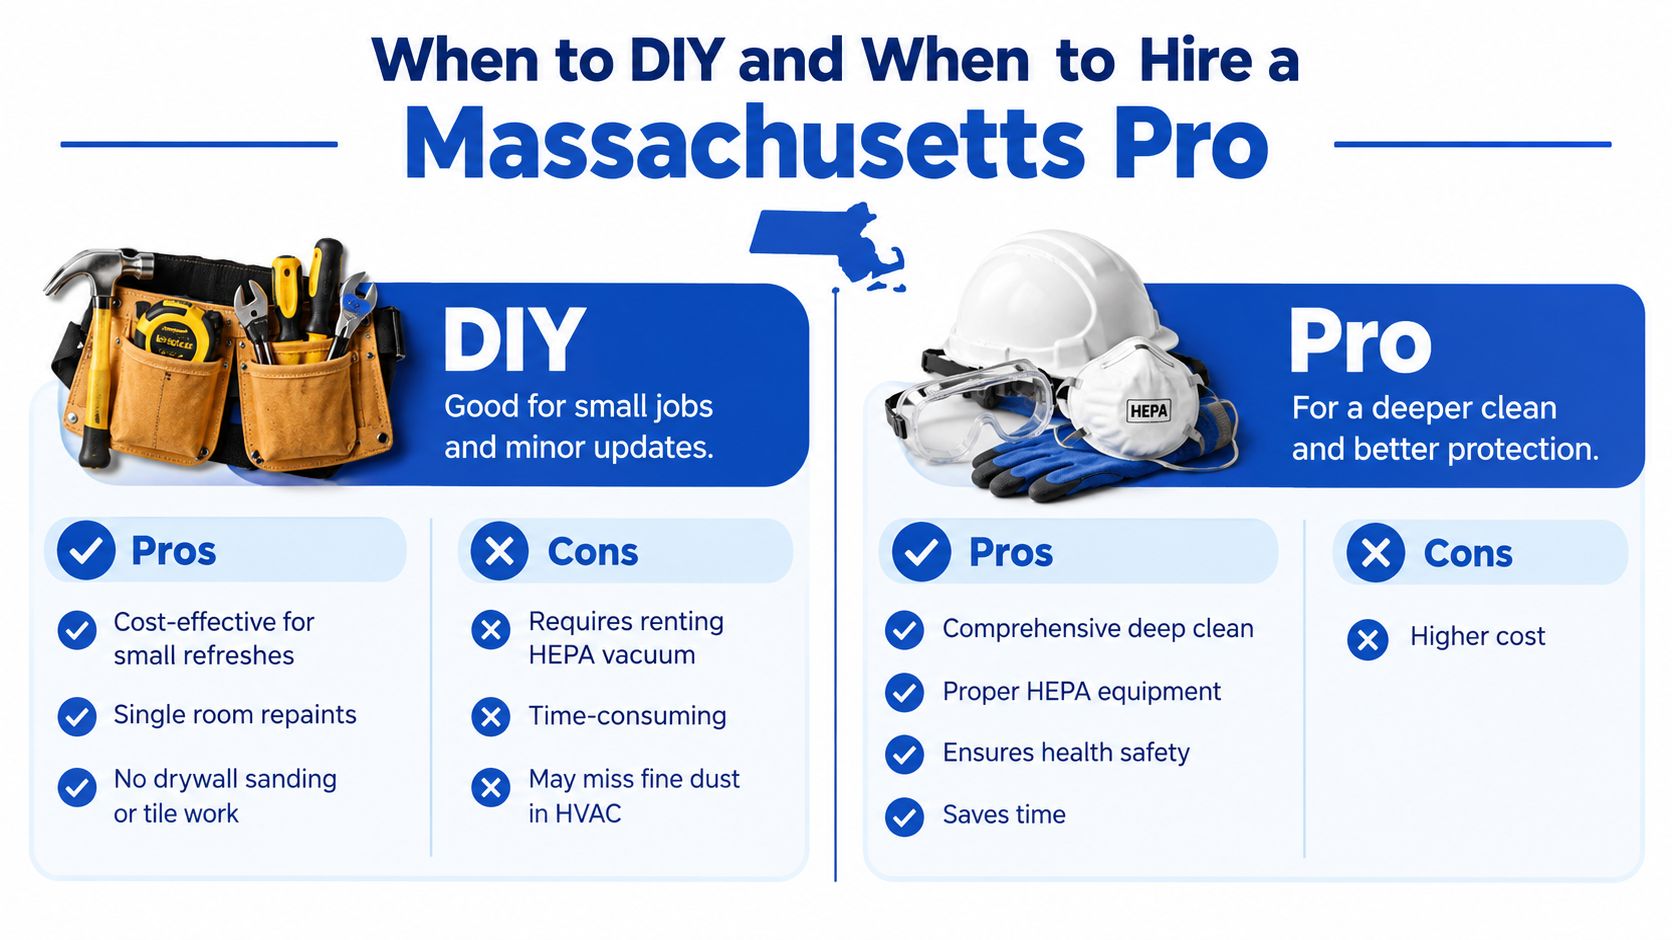
DIY works when the project is small enough to control. It breaks down when the house is still generating dust, the finish is delicate, or the deadline leaves no room for a second attempt.
Questions Homeowners Ask After the Crew Leaves
How much does post-construction cleaning cost in Massachusetts?
A trustworthy quote should be based on the home's size, room count, debris load, number of windows, surface types, residue, access, and whether the work is split into phases. Those variables can change the labor substantially, so a generic per-square-foot promise often hides important exclusions.
The table below is best used as a scope-planning guide. Exact dollar ranges aren't provided here because a responsible estimate requires a walkthrough rather than invented pricing.
| Project Type | Typical Size | Estimated Cost Range | Turnaround Time |
|---|---|---|---|
| Single-room refresh | One room | Quote after reviewing dust and residue | Depends on surface condition and access |
| Partial renovation | Kitchen, bathroom, or several connected rooms | Quote by scope and phase | Often scheduled around contractor completion |
| Full-home renovation | Whole residence | Quote after walkthrough | May include rough, final, and touch-up visits |
| Basement or drywall-heavy project | Finished or partially finished lower level | Quote based on dust load and exposed utilities | Allow time for settling and final verification |
What should you do before cleaners arrive?
Remove personal items, fragile décor, food, clothing, and anything that blocks cabinets, baseboards, window sills, or floor edges. Ask the contractor to finish sanding, cutting, painting, flooring, and punch-list work first. If trades must return, schedule the final inspection after their work, not before it.
What if dust comes back within 48 hours?
Some resettling is normal after heavy renovation activity. Keep people and pets out while the area is being controlled, avoid fans or compressed air that spread particles, and contact the cleaning company for the planned touch-up pass. Check ledges, tracks, vents, baseboards, and cabinet tops first, because those surfaces commonly reveal returning dust.
Should the crew return for missed spots?
Yes, if the agreed scope includes a satisfaction or touch-up guarantee. Walk the property in daylight and note specific locations, such as a dusty door-frame top, cloudy glass edge, adhesive mark, or gritty track. A clear checklist gives the crew something practical to correct instead of turning the walkthrough into a general disagreement.
How do you protect the result during punch-list work?
Keep finished rooms closed when possible, use floor and surface protection around remaining work, and don't move boxes through freshly cleaned areas until the contractor is finished. After the last trade leaves, inspect the home again under normal lighting before moving furniture in.
Sunny Day Pro Services handles staged post-construction cleaning for Massachusetts homeowners, including fine dust, construction debris, window film, adhesive residue, and move-in-ready detailing. Visit Sunny Day Pro Services to request a quote and schedule a walkthrough for your renovated home.

