
Tile Installation Grout Guide for Homeowners
Tile installation grout choices for joint width, color, mixing, sealing, and fixes, plus when Massachusetts homeowners should hire a pro.

“Use the narrowest grout joint you can, and seal it so the shower is waterproof” sounds like practical advice. It can lead to wandering grout lines, cracked joints, and moisture problems hidden behind tile. Joint width comes from the tile's actual size variation and the layout, while grout fills joints, not waterproofing or movement joints.
For a durable tile installation, choose grout to fit the joint and tile surface, prepare and pack the joints properly, and treat cracks as clues about the assembly rather than cosmetic defects. Those decisions matter in kitchens and bathrooms, where cleaning, water exposure, sunlight, and seasonal conditions all test the finished work.
Table of Contents
How Wide the Grout Joint Must Be
| Situation | Minimum average joint | What to add |
|---|---|---|
| Any installation, absolute floor | 1/16 in | Still widen to 3 times facial variation |
| Tiles varying by 1/16 in | 3/16 in | Use the worst tile from several cartons |
| Rectified tile, running bond, side over 15 in | 1/8 in | Add warpage of the longest edge |
| Calibrated non-rectified, running bond, side over 15 in | 3/16 in | Add warpage of the longest edge |
| Rectified tile with 1/32 in edge warpage in that layout | 5/32 in | 1/8 in base plus the measured warpage |
Those are starting widths, not a promise that every tile of that type will suit that joint. ANSI A108.02 guidance sets the joint at least three times the tile's total facial-dimension variation, with an absolute minimum of 1/16 inch. The Tile Council of North America's grout-joint guidance gives the example: if tiles vary by 1/16 inch, the joint must be at least 3/16 inch.
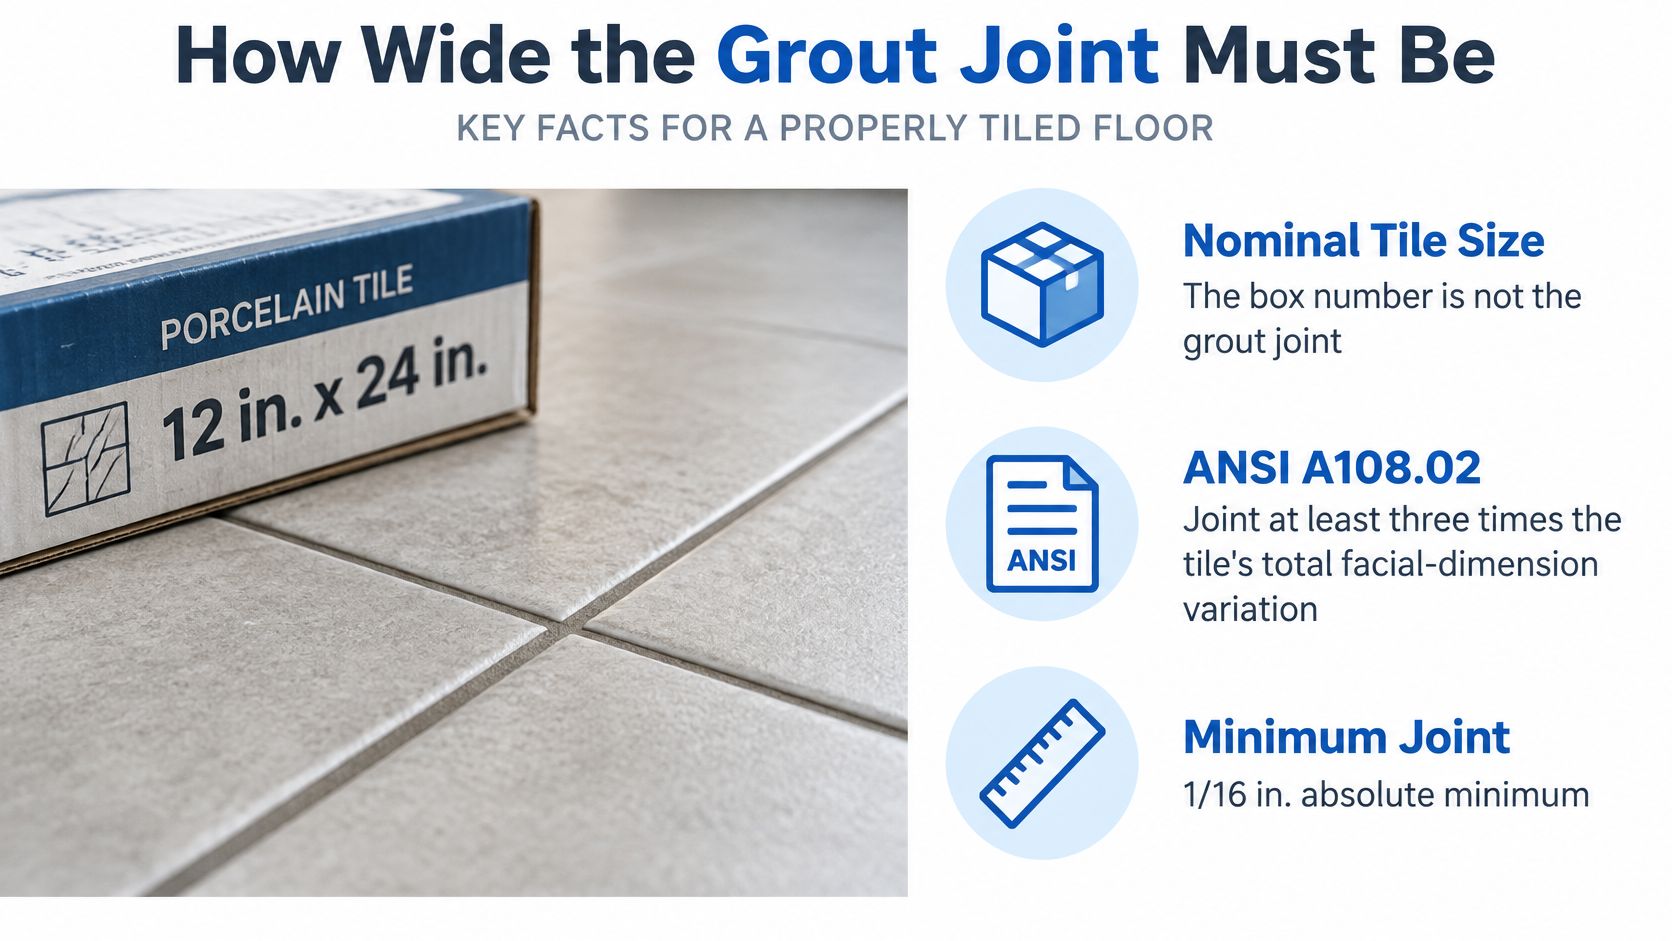
Work out the joint for a running bond
Say you're installing rectified rectangular tile in a brick pattern, and one side is longer than 15 inches. Start with an average joint of at least 1/8 inch, then measure the longest edge for warpage. If that edge has 1/32 inch of warpage, add it to the starting width: 1/8 inch + 1/32 inch = 5/32 inch. That's the minimum average joint for this example, not an optional aesthetic adjustment.
For calibrated, non-rectified tile in this kind of running-bond layout, the starting average joint is at least 3/16 inch, also increased by the longest-edge warpage. Staggered patterns make adjacent edge differences more obvious than a straight grid does. A grid may seem to hide uneven edges, while the same variation in a brick layout can show up as lippage, uneven joint lines, or both.
Measure the tile, not the packaging
Before setting tile, pull representative pieces from several cartons. Measure their facial dimensions and compare the worst variation, then check edge warpage where the layout calls for it. Follow the tile maker's layout requirements too, including any maximum offset for large rectangular tiles. A manufacturer may limit the offset to one-third of the tile length to help manage the effect of uneven edges.
A too-narrow joint doesn't fix irregular tile. The edges may not line up, there may not be enough room to pack grout properly, and lippage can remain visible no matter how carefully you select a grout color. And no grout-joint width replaces a movement joint. These joints serve different purposes: one accommodates the tile's dimensional variation, while movement joints are part of the installation design.
Which Grout Fits the Tile and the Joint
| Type | Typical joint | Best use | Main limit |
|---|---|---|---|
| Unsanded cementitious | 1/16 to 1/8 in | Polished stone, glass, narrow mosaics | Shrinks and cracks if used in wide joints |
| Sanded cementitious | 1/8 to 1/2 in | Ceramic and porcelain floors and walls | Sand can scratch polished stone and glass |
| Epoxy | Follow the product label | Showers, counters, stain-heavy floors | Stiff working time and higher cost |
| Premixed or urethane hybrid | Product-specific | Light-duty walls and backsplashes | Not a movement joint or a waterproof membrane |
Pick by joint width first, surface sensitivity second, exposure third, and color last. Grout is part of the tile assembly, not colored filler and not a waterproof skin.
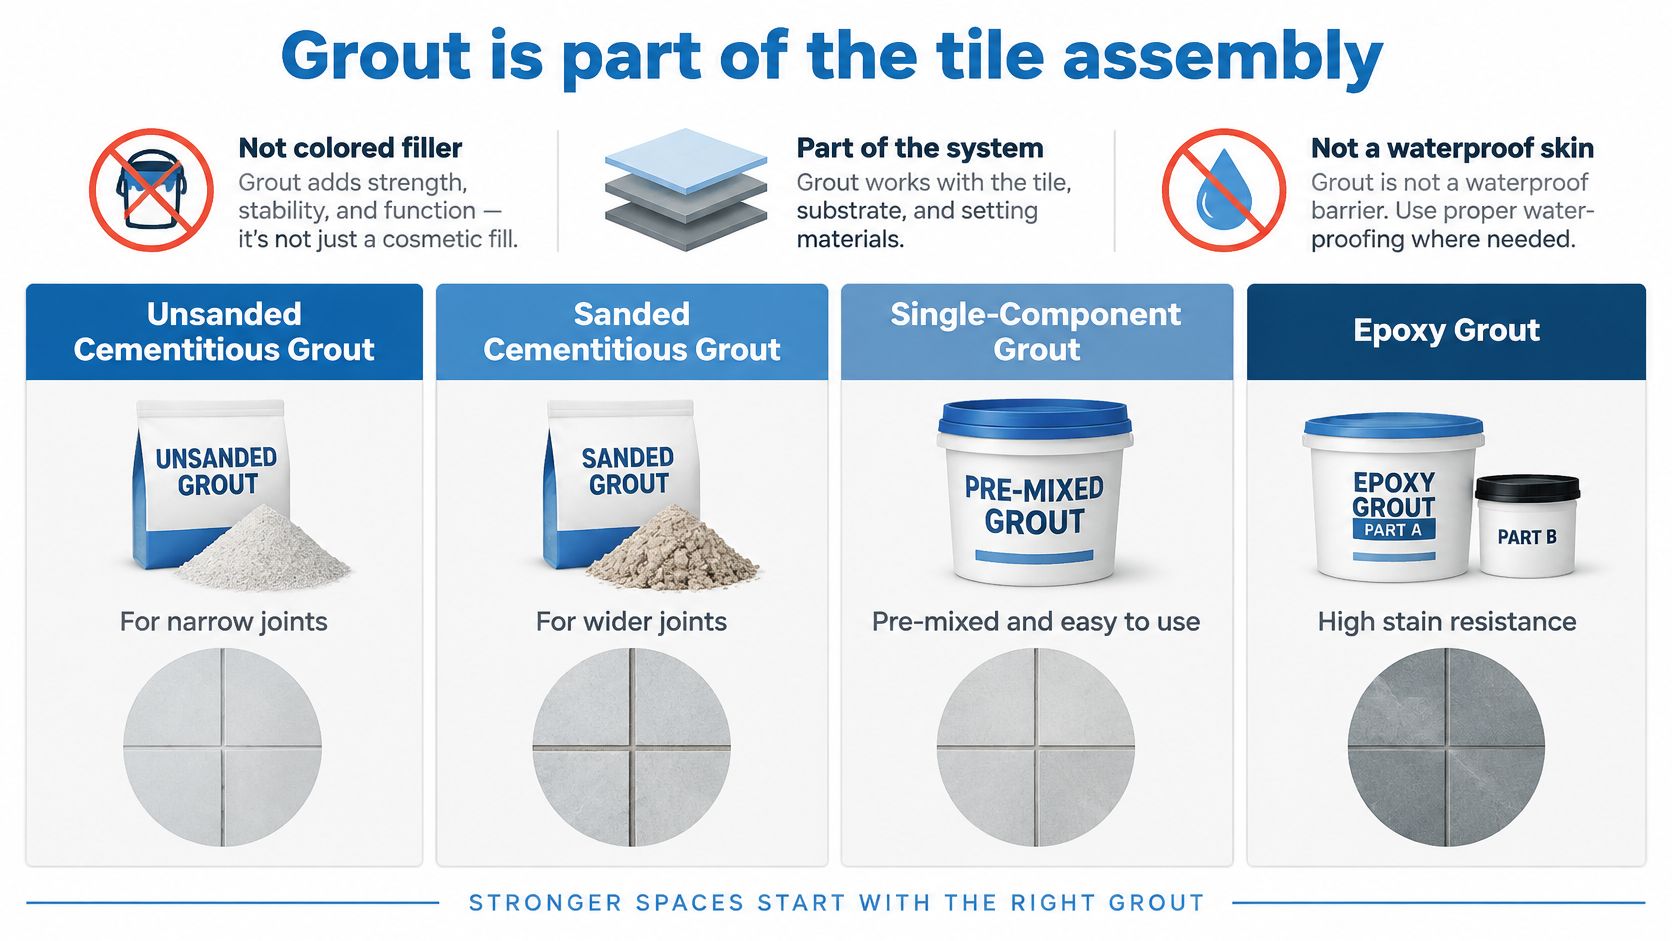
What the cement and sand do
Think of a cementitious joint as a small mud pie. In a wider joint, sand helps give the mix body and limit shrinkage as it cures. The trade-off is that its grit can scratch delicate polished stone or glass, or leave haze that's difficult to remove. Unsanded grout suits narrower joints and scratch-sensitive surfaces, but using it in a wide joint can raise shrinkage and cracking risk.
A representative unsanded grout designed for 1/16- to 1/8-inch joints lists compressive strength above 4,000 psi, flexural strength above 400 psi, tensile adhesion above 300 psi, and shrinkage below 0.3%. A sanded grout designed for 1/8- to 1/2-inch joints lists the same strength benchmarks and shrinkage below 0.2%. These are product-class benchmarks, not guarantees for every grout. Check the product label for its actual application range and suitability. The Sika unsanded-grout technical sheet also specifies maintaining tile and substrate between 50°F and 95°F during installation and for roughly 72 hours to support predictable curing.
Selection rule: Don't force unsanded grout into a wide joint or sanded grout into a hairline one. The first risks excess shrinkage; the second can be hard to pack and finish without leaving voids.
Match the grout to the surface and exposure
For polished marble, glass, or tight mosaics, unsanded cementitious grout may be appropriate if its label matches the joint. For ceramic or porcelain floors and walls with wider joints, sanded cementitious grout can provide the body needed to fill the space. In either case, test scratch-sensitive tile before grouting the full surface.
Epoxy is a strong candidate for showers, counters, and floors that see frequent staining, but it's stiffer to work and clean. Single-component products, including some premixed or urethane hybrids, can suit selected walls and backsplashes; “premixed” alone doesn't confirm that a product fits your joint or exposure. Read the label. Whatever type you choose, it won't substitute for an appropriate waterproofing system or flexible sealant where the tile assembly needs movement.
Choosing Grout Color That Stays Even After Cure
High-contrast grout makes a tile layout stand out, but it also highlights uneven joints, cleaning haze, and soil. A closer color match softens those differences. Choose for the tile surface, room lighting, and expected cleaning, not just the sample card. Joint width should follow the tile's actual variation and the layout, not the size printed on the box. Grout fills the joint; it is neither waterproofing nor a movement joint.
Color compatibility depends partly on how the tile surface handles grout pigment and residue. ASTM's C21 committee develops ceramic-tile standards, including proposed testing of whether tile surfaces retain grout pigment or release it cleanly. That question matters with textured or absorbent tile, where residue can be harder to remove. The ASTM discussion of gloss and grout standards covers this standards work.
Test before committing to a color
Make a sample board with the actual tile and grout. Mix and apply the grout using the same water ratio and method planned for installation, then let it cure fully before judging the color. Cementitious grout may dry lighter than it looks wet; epoxy can look darker than its bag or sample suggests.
Check how easily the tile releases pigment. Textured porcelain and honed stone can hold residue in surface texture or pores, while smooth glazed tile is more likely to release it cleanly. Test a discreet area and confirm compatibility before using a dark or bright shade on a difficult-to-clean surface.
Keep the color consistent across the room
For a consistent finish, buy enough grout from one batch for the room. Measure water rather than estimating, and avoid mixing leftovers from another day into a prominent wall or floor. Strong natural light, especially sunlight crossing the tile at an angle, can make small color differences easier to see. This can happen in any home with a bright window near a tiled surface.
On a high-traffic kitchen floor, light gray or a shade slightly darker than the tile can make soil less conspicuous. Bright white is better suited to areas that see less soil and are straightforward to clean. On textured or absorbent tile, choose a close color match or a grout the tile maker identifies as suitable for clean release. This guide to choosing grout color for tile can help you compare shades with the tile's tone and pattern.
How to Mix and Pack Grout
Good grout work starts before the mix reaches the floor. A clean, deep joint gives grout room to lock in; a shallow joint with thinset, dust, or water trapped inside can fail even if the surface looks neat at first.
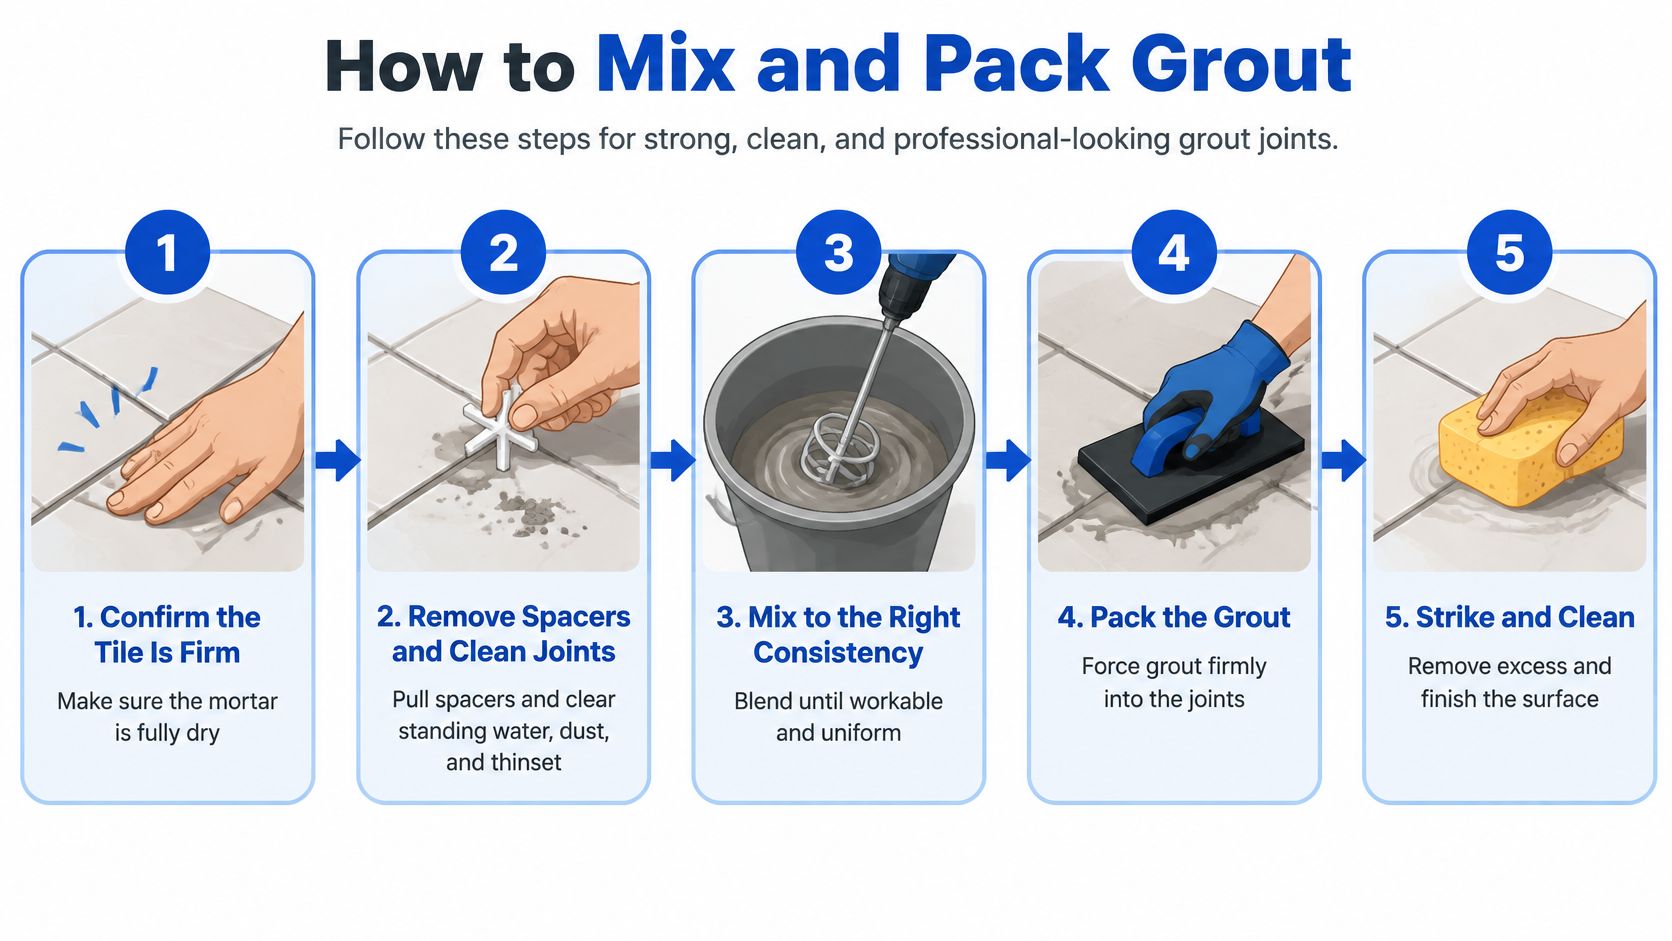
Confirm the tile is firm and the mortar is fully dry. Don't grout tile that shifts under pressure or sits over uncured mortar, because movement or trapped moisture can weaken the result. Before grouting, remove spacers and clear standing water, dust, dirt, and loose material. The Sika epoxy-grout installation sheet calls for removing excess mortar so approximately two-thirds of the tile depth remains open for grout.
Measure the water to match the product. Use a measuring container and follow the bag rather than pouring by eye. Too much water can contribute to soft or discolored joints, while inconsistent ratios across a room can leave the finished color uneven.
Mix to a smooth, workable consistency, then follow the slake direction on the label. If the product calls for slaking, let it rest for the stated time and remix without adding water. Don't “retemper” grout with extra water after it begins to set. The mix may spread more easily for a moment, but the extra water can undermine the cured joint.
Control the cure conditions. Check the product's temperature range and keep both the tile and substrate within it during installation and early curing. One representative cementitious-grout recommendation is 50°F to 95°F for roughly 72 hours; cold substrates, drafts, and unheated additions can make temperature control especially important in Massachusetts. Premature washing or a cold cure can leave grout weak or soft.
Pack the joints firmly with a rubber float. Spread grout diagonally across the tile, pushing it down and across the joint rather than merely smearing it over the face. Work small enough areas that you can pack and clean them while the grout remains workable. A joint that isn't filled fully can show dips or pinholes after it cures.
Clean when the surface starts to lose its wet sheen. Use clean water and a barely damp sponge, working diagonally and rinsing the sponge often. Don't scrub or press so hard that you pull grout out of the joint; overwashing can also disturb the grout's color and surface.
Keep traffic and washing off the work until the label allows it. Each grout has its own cure and cleaning instructions. For epoxy, work in smaller areas, shorten the time you leave residue on the tile, change wash water often, and expect a stiffer cleanup. Once epoxy residue cures on a textured surface, removal can become difficult.
Watch the mix: Extra water, retempering after the grout begins to set, and washing too soon are three avoidable routes to soft grout.
Don't rush joint preparation to save time. A shallow, contaminated joint may look acceptable on day one, then break down when the floor gets its first scrub.
Sealing Grout Without Pretending It Is Waterproof
Sealer does not waterproof a shower. Cementitious grout can help inhibit moisture and staining, but it isn't a complete waterproof barrier. The membrane behind the tile, proper substrate preparation, slope to the drain, adequate mortar coverage, and compatible sealant at changes of plane all play separate roles in managing water. Technical guidance on wet-area grout likewise cautions against treating grout as waterproofing and highlights how voids in mortar coverage can contribute to loose tile; this technical overview of grouting problems cites 95% minimum coverage for relevant wet or demanding installations.
For grout that does need sealing, wait until the grout has cured according to its label and the sealer maker's directions. Use a penetrating sealer where the product is compatible, such as on cementitious grout in floors, shower walls, or backsplashes near a sink. Some epoxy grouts and urethane products don't need sealer; applying one can leave a film, so check the grout instructions first.
Keep the maintenance routine simple
Use a pH-neutral tile cleaner and a soft brush for routine cleaning. Skip vinegar and bleach as everyday products, since harsh or acidic cleaners can affect grout, sealers, or nearby finishes. After a remodel, remove grout haze and construction dust before sealing, or you may trap residue beneath the sealer.
Water beading can help you judge whether a sealer is still doing its job, but follow the sealer label rather than assuming one schedule works for every room. If water no longer beads on sealed grout, check the instructions and consider reapplying where appropriate.
Discoloration that wipes away is usually a cleaning issue. Soft grout, recurring mildew, or loose tile calls for more investigation. Those signs can point to poor curing, gaps in coverage, or a concealed problem with the waterproofing system, not just an overdue coat of sealer.
Common Grout Problems and the Right Fix
Cracks at inside corners are among the easiest grout problems to misdiagnose. If cementitious grout fills a corner or another change of plane, scraping it out and replacing it with more rigid grout often repeats the same failure. Those locations need the appropriate flexible sealant, not another cosmetic patch.
| Symptom | Likely cause | Right next step |
|---|---|---|
| Crack only at inside corners or plane changes | Grout used where a movement joint belongs | Remove it and install flexible sealant |
| Cracks across the field | Movement, shrinkage, or joints too narrow | Diagnose substrate and joints before regrouting |
| Soft or powdery grout | Extra water, retempering, or cold cure | Cut out and regrout if tile is still bonded |
| Mildew returns after cleaning | Moisture behind the tile | Check waterproofing, slope, and coverage |
| Color haze stuck on textured tile | Pigment retained in the surface | Test-clean; do not grind the face |
| Loose tile with grout still in place | Mortar voids under the tile | Reset the tile; grout alone will not hold it |
Tile assemblies respond to movement in the substrate and changes in temperature, moisture, and exposure. Properly designed movement joints at corners, perimeters, structural joints, and other high-stress locations help accommodate that movement. There's no universal joint spacing that suits every room: radiant heat, sunlight, tile size, substrate, and moisture all affect the design. Guidance on movement joints in tile installations explains why replacing cracked grout alone may be temporary if the assembly lacks correctly placed joints.
Read the symptom before buying a repair kit
Cracks across the tile field can point to movement, shrinkage, or a joint that's too narrow for the tile. Before regrouting, check whether the tiles are solid and whether the installation has appropriate movement joints. Seasonal swings in Massachusetts homes, sunny rooms, and radiant-heated floors can make a cosmetic repair fail again if the underlying cause stays in place. Wider grout lines don't compensate for a missing movement joint.
Soft or powdery grout may follow excess mixing water, adding water after the grout starts setting, or curing in cold conditions. If the tile remains firmly bonded, remove the failed grout and correct the preparation or curing problem before replacing it. If the tile itself moves, a grout repair alone won't fix the bond.
Mildew that returns after a thorough cleaning, or tile that sounds hollow when tapped, deserves a closer look at the assembly. Mortar voids can contribute to loose tile even without an active leak, and recurring moisture may point to a waterproofing or slope problem. Don't cover those signs with fresh grout or more sealer.
Choose the next step, not the fastest patch
If the joint is hard and the stain sits on top, clean it and reseal if the product calls for sealer. If cracks run across the field but the tile is solid, diagnose the substrate and movement joints before regrouting. For cracks that follow a corner, tub edge, or other plane change, remove the rigid grout and use a compatible flexible sealant. If tile is loose or the substrate is wet, the assembly may need to be opened and repaired.
Textured tile needs care when pigment haze remains stuck to the surface. Test a small area with a compatible cleaner before attempting more aggressive removal; grinding the tile face can cause permanent damage. If you're weighing repair options, this guide to tile floor grout repair can help you assess whether the visible joint is the whole problem.
When to Hire a Tile Installer
A careful homeowner can grout a dry backsplash if the tile is firm, the joints are straight and clean, and the selected product fits the tile and joint. Hire a tile installer for showers and steam areas, radiant floors, large-format running bond, natural stone, field cracks, loose tile, or any repair where the waterproofing behind the tile is unknown. These jobs call for decisions about the full tile assembly, not just the material in the visible joints.
Before accepting an estimate, ask the installer to explain how they'll choose joint width from measured tile variation, where flexible sealant will replace grout, how they'll check mortar coverage in wet areas, and how they'll manage the curing temperature. Ask who handles haze removal before the room goes back into use. A clear quote should name the tile material, such as porcelain, ceramic, marble, or granite, and specify whether the work covers a backsplash, a kitchen, or a full bathroom.
For homeowners in Wayland, Newton, Needham, Wellesley, Weston, and nearby Massachusetts towns, Sunny Day Pro Services' tile installation services include porcelain, ceramic, marble, granite, and backsplash installations. Request a quote at sunnydaypro.com with the room, tile type, and whether you need new installation or a repair.
Tile grout FAQs
Can new grout go over old grout? Usually, not as a dependable repair: new grout needs a properly prepared joint, and a thin layer over old material may not bond or fill the joint well. Remove enough old grout to create a sound space for replacement, then address the cause of cracking before refilling.
When is epoxy grout worth its extra cost? Consider it when stain resistance matters in a shower, on a counter, or on a heavily used floor, provided the product suits the tile and joint. It takes more care to place and clean, so weigh that work against the room's exposure and maintenance needs.
Sunny Day Pro Services installs porcelain, ceramic, marble, and granite tile, including custom backsplashes and full-room remodels. If you're planning tile installation or trying to solve a grout problem in your Massachusetts home, visit Sunny Day Pro Services to request a quote and discuss the room, tile, and repair needs.

