
Tile Installation Services: A Homeowner's Complete Guide
Discover what professional tile installation services cover, from materials and prep to timelines, costs, and questions to ask Massachusetts contractors.

A remodel often feels manageable until demo day arrives. The old floor is up, dust has reached the hallway, and someone asks whether the subfloor is ready, where the tile should start, or which edge finish you want. Those decisions can affect the schedule and the finished work more than the tile's color does.
Good tile installation services aren't just about setting tile neatly. They include the preparation and checks that determine whether the assembly is suited to the room. If you're planning a kitchen, bathroom, backsplash, or new tile floor in Massachusetts, focus on what the installer will do before the work disappears under tile.
Table of Contents
What Happens the Week Your Remodel Starts
On demo day, the room may look worse before it looks better. A bathroom floor comes up, the installer checks what's underneath, and the crew discovers that the surface needs more preparation than the original estimate allowed. That isn't automatically a problem. The problem is when nobody explains the change, its cost, or how it affects the schedule before work continues.
A sound schedule starts with a walkthrough and a written scope. The installer should confirm what's being removed, what stays, where materials will be staged, and which other trades need to finish first. A tile crew can't sensibly set a kitchen floor while plumbing work is still underway or cabinets are arriving through the same work area.
The decisions that shape the schedule
Before installation, the crew should inspect the substrate, confirm tile and setting materials are on site, and plan the layout. The layout discussion should cover the starting point, cut locations, transitions, grout-joint width, and how the pattern meets walls, cabinets, drains, or doorways. These aren't fussy details. A centered pattern may require different cuts and planning than one that starts from a fixed wall.
Ask who handles demolition and disposal, and whether the estimate includes patching, flattening, waterproofing, and trim details. Also confirm who's responsible for moving appliances, protecting nearby rooms, and coordinating plumbing or electrical work. Those responsibilities often decide whether a project proceeds smoothly or stalls while everyone waits for someone else.
Practical rule: If a change affects the work, price, or schedule, get it in writing before the installer proceeds.
A clear plan won't prevent every surprise inside an old home, but it gives you a fair way to handle one. You should know what the crew is doing next, what needs your approval, and what must happen before tile covers the work.
What Professional Tile Installation Services Actually Cover
A tile quote should describe the whole assembly, not just the hours spent placing tile. The exact scope depends on the room and the existing conditions, but a professional proposal should make each major phase understandable.

Read the scope from the floor up
- Demolition and disposal: Confirm which finishes, fixtures, and materials will be removed, and who hauls debris away.
- Substrate preparation: The installer checks whether the backing is sound, clean, and suitable for the tile. Repairs or flattening should be identified rather than ignored.
- Waterproofing where required: Wet-area work needs a planned waterproofing assembly, including corners, penetrations, and drain details. Tile and grout alone aren't the waterproofing system.
- Mortar and layout: The proposal should identify the setting approach and include layout planning, cuts, transitions, and edge profiles where applicable.
- Setting and grouting: Ask how joints will be maintained, where flexible movement joints are planned, and whether grout or tile needs special care.
- Finishing and sealing: Sealing depends on the materials and products used. Don't assume every tile or grout needs the same treatment.
- Cleanup and handoff: Clarify site cleanup, protection of completed work, curing instructions, and the process for addressing a punch list.
A full-scope estimate should state what's included and excluded. Plumbing, electrical work, painting, glass shower doors, and moving appliances may belong to other trades. If demolition reveals damaged backing or an unsuitable surface, the contract should explain how the crew will document the condition and get approval for added work.
Compare estimates line by line. A low total can reflect a smaller scope, such as no disposal, no waterproofing, or no substrate correction. Ask the contractor to write down the products, preparation, finishing details, payment milestones, and cleanup responsibilities so you're comparing the same finished result.
Choosing Tile Materials That Match the Room
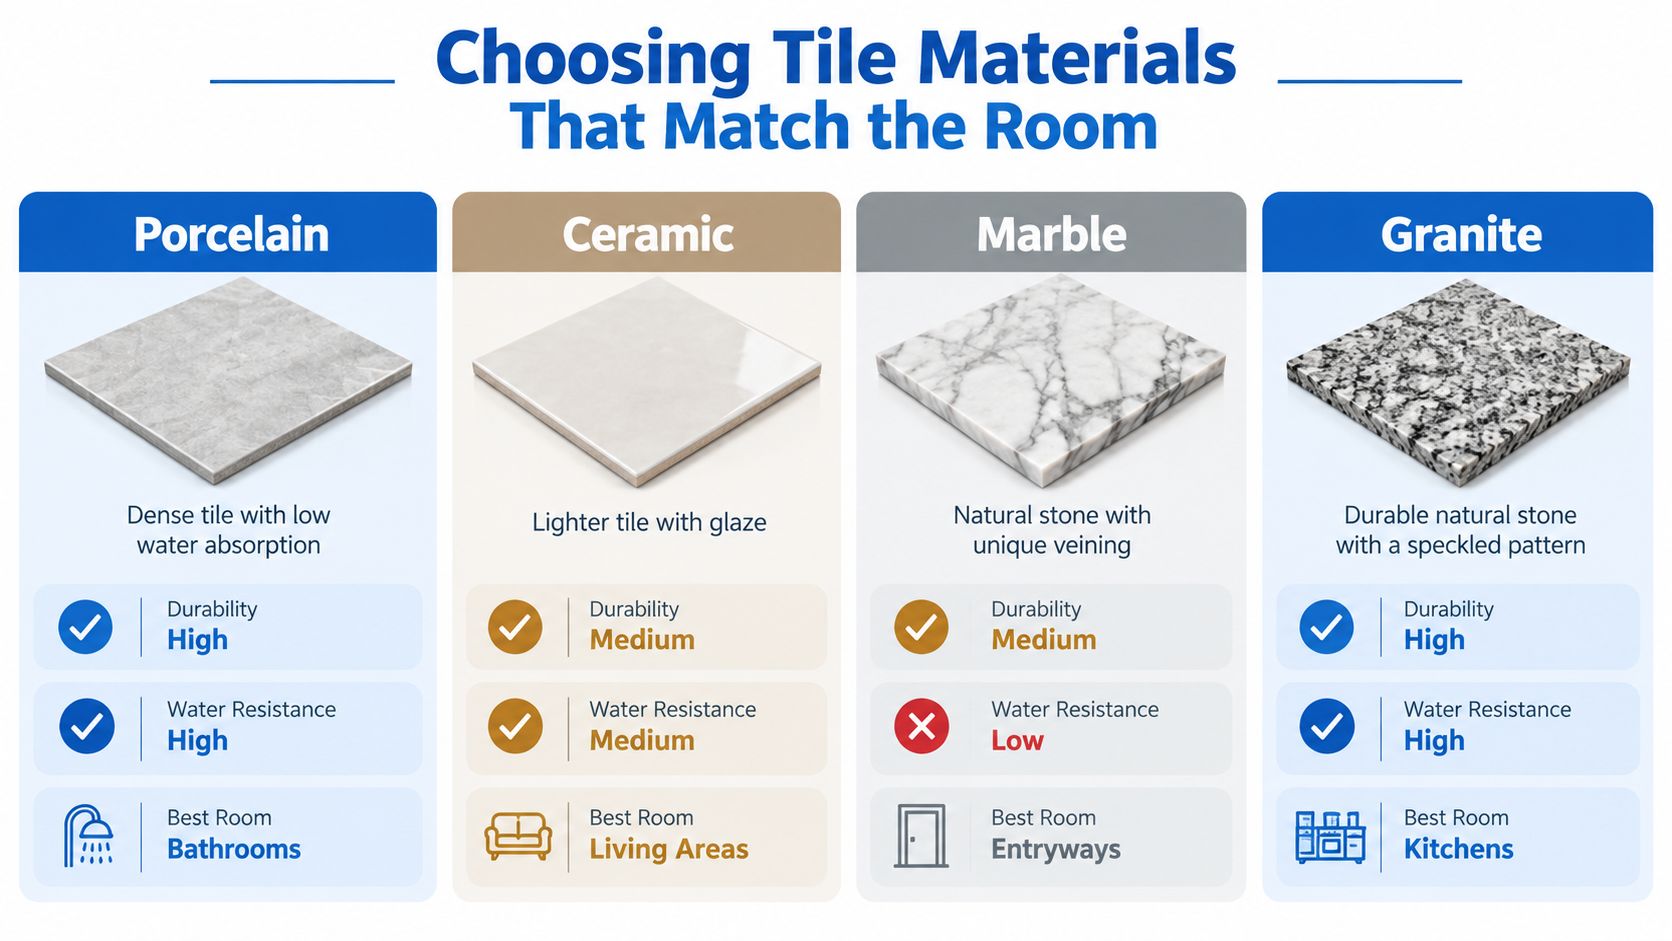
Choose tile for the room you live in, not only for the sample that caught your eye. Porcelain, ceramic, marble, and granite each bring different maintenance and installation considerations. The right choice depends on how the space is used, how much care you're willing to give it, and whether the installation details suit the material.
Match the material to daily use
Porcelain is a practical choice for busy bathrooms and kitchens because it's dense and comes in a wide range of finishes and formats. But a tile's low absorption doesn't make a shower waterproof. The membrane, drain connection, corners, and penetrations still need to be handled correctly.
Ceramic often offers a broad design range and can be easier to cut than denser materials. It can work well on walls and in suitable floor applications, but the specific tile's rating and manufacturer instructions matter. Don't assume every ceramic tile is appropriate for every wet or high-traffic location.
Marble gives a room natural variation that manufactured tile can't duplicate. It also asks more of the homeowner: use cleaners appropriate for the stone, follow the installer's sealing advice, and expect natural changes in appearance over time. Granite is another natural-stone option, but the particular product still determines its finish, care needs, and suitability for the intended surface.
Large-format tile and mosaics change the job in different ways. Larger pieces demand careful handling, layout, and substrate preparation; mosaics bring more grout lines and intricate detailing. Consider replacement availability, cleaning, and how the surface feels underfoot before committing. For a closer material comparison, see this guide to porcelain versus ceramic tile.
A showroom sample can't tell you everything about how a surface will look in your lighting or feel when wet. Take home samples, view them in the actual room, and ask the installer whether the selected tile suits the location and the planned installation method.
Substrate Prep and Movement Joints the Installer Should Not Skip
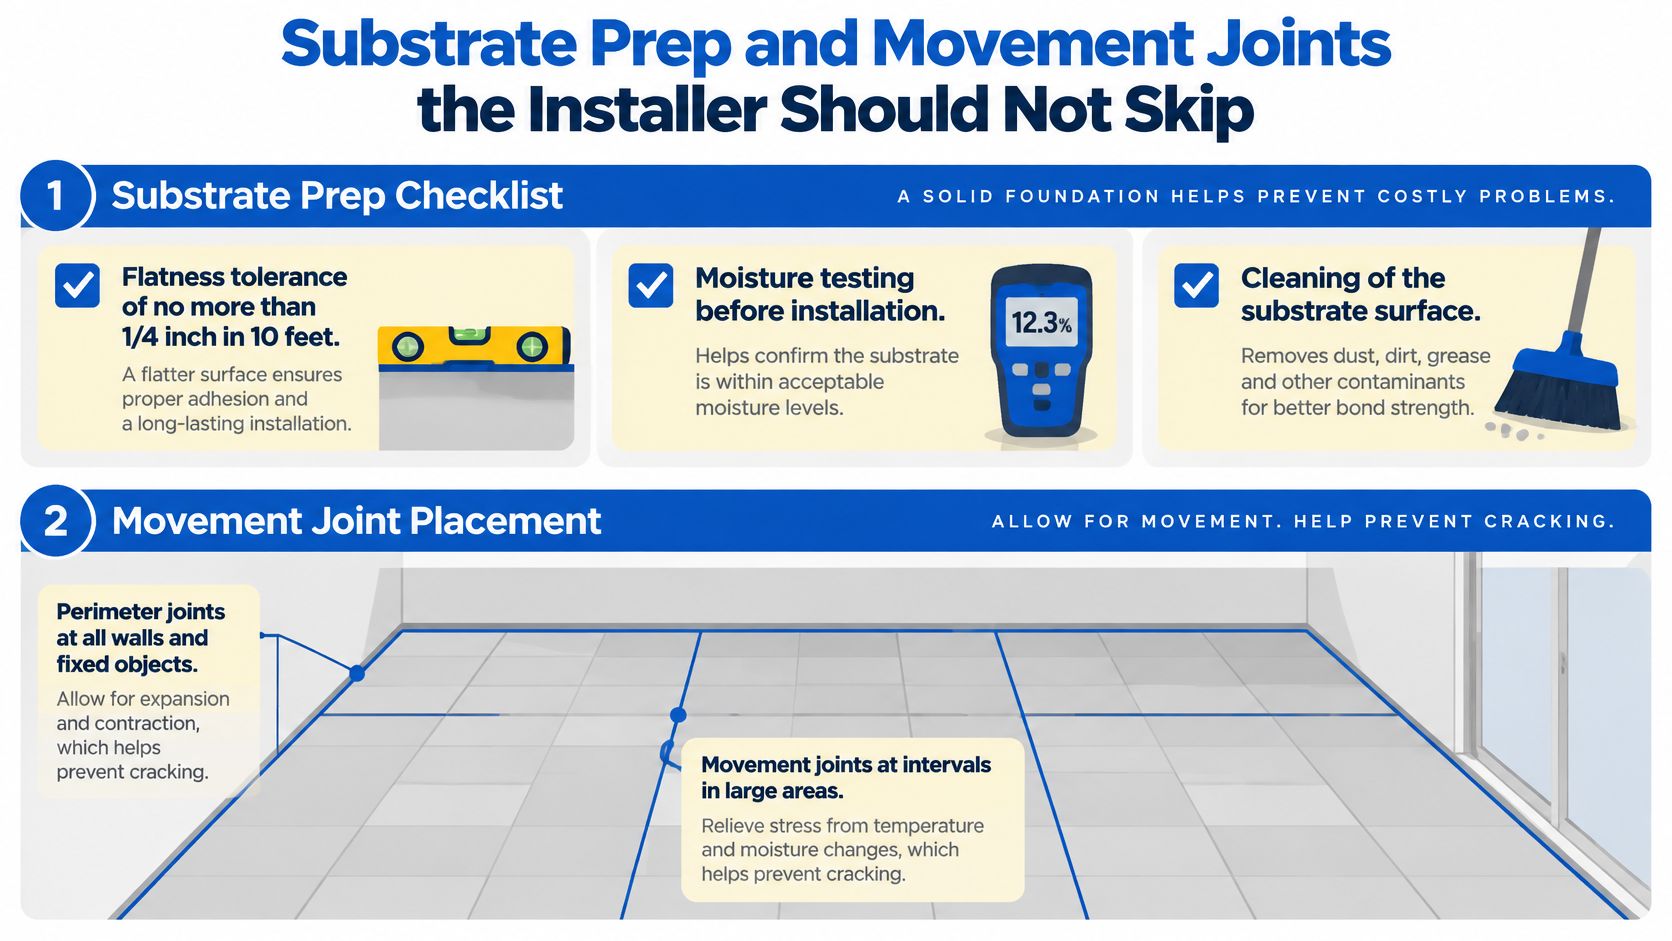
Tile won't correct a bad floor. An uneven or weak substrate can lead to lippage, rocking tiles, cracked grout, or bond failure, so ask how the installer will check the surface before setting begins. ANSI A108.02 guidance limits floor variation to no more than 1/4 inch in 10 feet and 1/16 inch in 1 foot; see the technical guidance on dimensional tolerances.
Check what will be concealed
For tile floors in wet areas, the referenced ANSI A108 guidance calls for at least 95% mortar coverage beneath tile. Dry interior installations commonly use an 80% minimum benchmark. The distinction matters because unsupported voids can leave tile more vulnerable to stress from impact, moisture, or movement. Ask the installer how coverage will be checked, including whether freshly set tiles will be lifted periodically. Back-buttering can help improve contact for large-format, textured-back, and natural-stone tile.
A substrate also needs to be structurally sound and clean. Mortar is made to bond tile, not to make up for major irregularities. Get a clear description of any patching, leveling, underlayment, or moisture-related checks the installer expects to perform.
Movement joints matter because tile and its substrate don't necessarily expand and contract at the same rate. The Tile Council of North America's guidance on movement joints recommends accommodating movement in every tile installation. Perimeter gaps may be hidden by baseboard or shoe molding, while larger or more exposed areas may need additional joints. Sunlight, moisture, room conditions, and heated floors can all affect the plan. Existing structural or control joints shouldn't be bridged with mortar or rigid grout.
Before tile covers the work, ask to review:
- Substrate: Is it clean, sound, and within the applicable flatness tolerance?
- Waterproofing: Are the membrane and other components compatible, with corners and penetrations treated?
- Drain and slope: Do the details suit the shower or wet-area design?
- Coverage: How will the installer verify mortar contact?
- Movement: Where are the perimeter and other required movement joints?
- Testing and records: Is a flood test appropriate for this assembly, and what evidence or installation records will be provided?
The most important work may be the work you won't see once the tile is finished. Make the pre-cover inspection part of the conversation before installation begins.
What Tile Installation Really Costs and How Long It Takes
There isn't a reliable cost range to quote without knowing the room, material, existing substrate, and project scope. Treat any price given before a proper walkthrough as a starting point, not a complete bid. A small, straightforward floor and a shower with complex waterproofing, detailed cuts, and extensive preparation aren't comparable jobs just because their areas sound similar.
The labor is specialized. The Bureau of Labor Statistics reported about 97,000 jobs in the broader flooring installers and tile and stone setters occupation in 2025. Tile and stone setters accounted for about 45,200 positions within that total. The BLS projects 4% employment growth from 2025 through 2035 across the combined occupation and estimates about 6,400 openings each year during that decade, with new-home construction and renovation identified as demand sources. Those figures describe the wider U.S. occupation, not Massachusetts pricing, but they underline why competent tile work depends on skilled labor. (BLS occupation outlook)
Compare project scope, not square footage alone
| Project type | Typical size range | Approx. cost range, labor and materials | Typical install timeline |
|---|---|---|---|
| Small bathroom floor | Depends on room and layout | Requires a site-specific estimate | Depends on demolition, preparation, setting, and curing |
| Large-format shower walls | Depends on shower design and tile format | Requires a site-specific estimate | Depends on waterproofing, layout, cuts, and curing |
| Kitchen backsplash | Depends on wall area, outlets, and pattern | Requires a site-specific estimate | Depends on preparation, detailed cuts, and grout or setting requirements |
| Kitchen floor and backsplash | Depends on the combined scope | Requires a site-specific estimate | Depends on sequencing, substrate work, and coordination |
A written estimate should separate tile, setting materials, demolition, disposal, preparation, waterproofing, finishing, and any work assigned to other trades. That makes it easier to understand why two bids differ and what you're buying.
The schedule also includes more than the hours spent setting tile. Delivery delays, substrate repairs, waterproofing, curing, inspections, and coordination with plumbing or cabinet work can all affect the completion date. Ask for the sequence and the point at which the room can be used again. “One-day tile job” is not a useful promise if the full assembly needs time to cure before it can be exposed to water or traffic.
Red Flags and Misconceptions That Get Homeowners in Trouble
A beautiful tile can still be part of a failing installation. The most expensive mistake is focusing on the visible finish while treating the hidden work as an afterthought.
Replace these assumptions with better questions
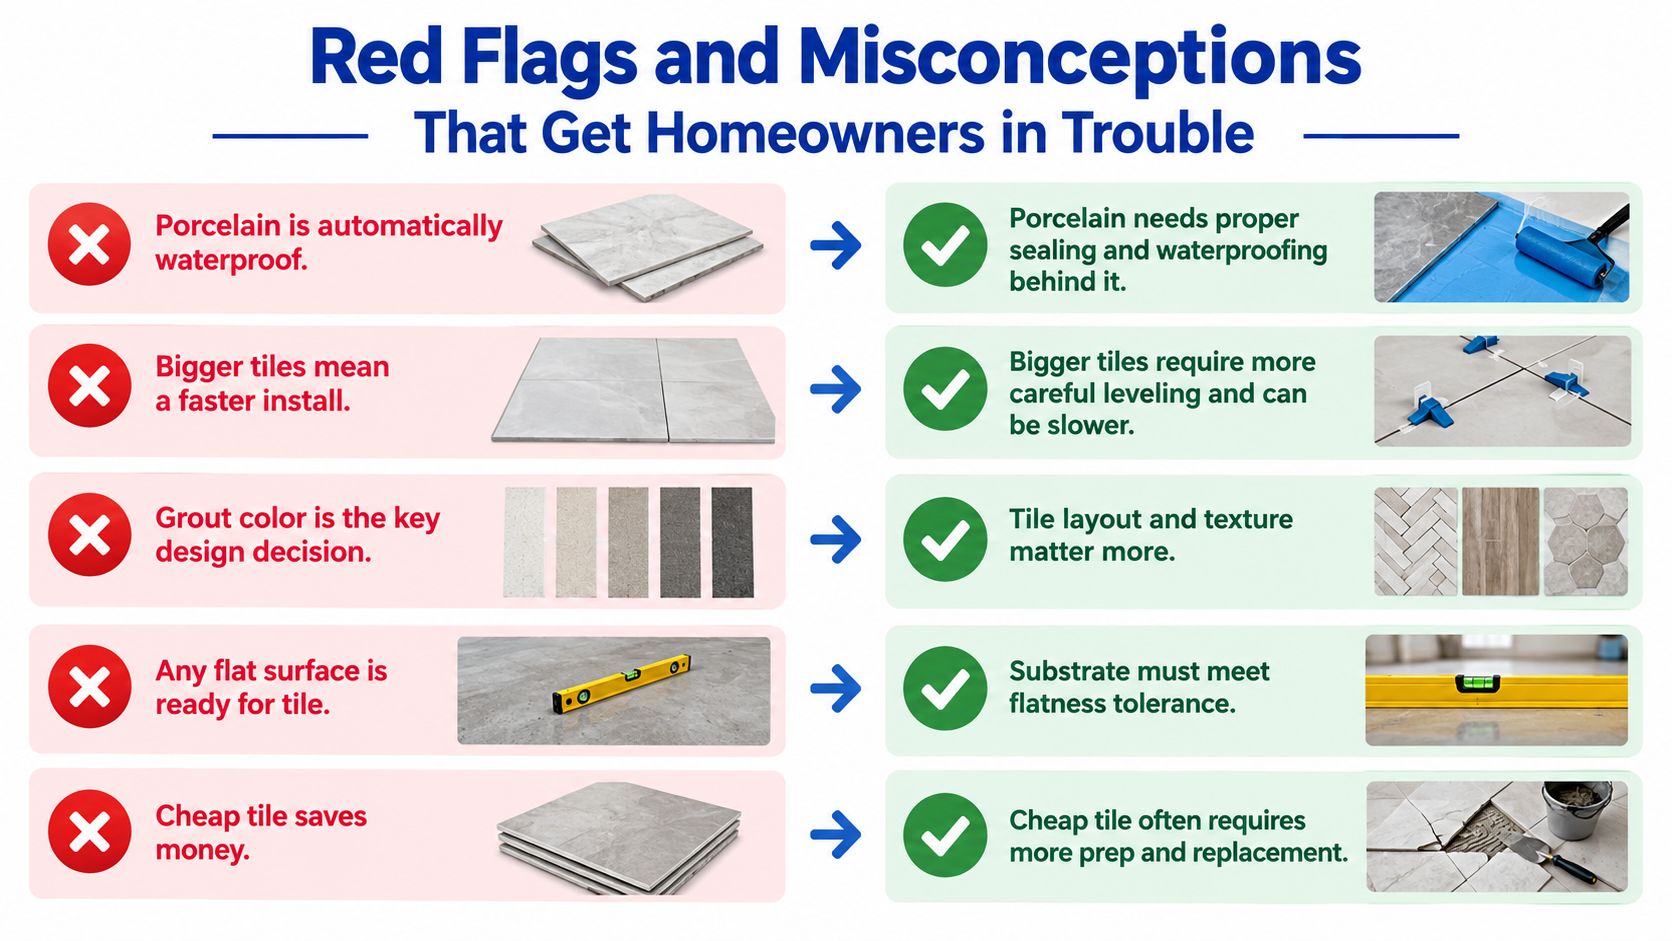
- “Porcelain makes the shower waterproof.” It doesn't. Ask what waterproofing assembly, drain connection, and penetration details the installer will use.
- “Bigger tiles mean a quicker job.” Large pieces can require more careful handling, layout, and preparation. Ask whether the existing substrate is suitable for the selected format.
- “Grout color is the main design decision.” Joint width and layout affect both appearance and performance. Tile and natural stone shouldn't be installed as a true butt joint; technical guidance on grout-joint design explains why joint width should account for tile variation and installation conditions.
- “Any flat-looking surface is ready.” The installer should check the substrate against the applicable tolerance and specify any correction needed.
- “The cheapest bid is the best deal.” A low number may leave out demolition, disposal, waterproofing, substrate work, or finish details. Compare written scopes instead of totals alone.
Watch how the contractor answers questions. A professional should be able to explain the work in ordinary language and identify what needs approval before it changes. Be wary if tile is set over a questionable surface, scope changes happen verbally, or no one can tell you how waterproofing and movement details will be addressed.
For wet-area work, ask whether a flood test is appropriate for the planned system and how the result will be recorded. Don't assume every assembly uses the same test procedure, but don't accept silence about how the contractor will confirm the work before tile conceals it. A calm, specific answer is more useful than a promise that the finished surface will be “sealed and fine.”
Vetting a Massachusetts Tile Contractor Before You Sign
For homeowners in Wayland, Newton, Needham, Wellesley, Weston, and nearby communities, contractor registration is a practical screening step for residential remodeling. Massachusetts generally requires contractors, subcontractors, partnerships, and corporations that solicit, bid on, or perform improvements on an existing owner-occupied residential property containing one to four units to register as a Home Improvement Contractor. Check the business's status through the Massachusetts HIC contractor resources.
Registration isn't proof of workmanship, insurance, or qualifications for other specialized trades. Verify those separately. Ask for proof of insurance and references for projects similar to yours, such as a shower, natural-stone floor, backsplash, or full-room remodel.
Put the important details in the agreement
A useful contract identifies the tile and setting materials, demolition and disposal responsibilities, substrate preparation, waterproofing approach, movement-joint plan, edge and transition details, cleanup, and punch-list process. It should also state what happens if demolition reveals damage or extra preparation is needed. Get any change to price, work, or schedule in writing.
Tie payments to clearly described project milestones rather than vague promises or elapsed time. Ask what workmanship guarantee applies and how the installer handles a problem after completion. Make sure the schedule accounts for other trades and material delivery rather than treating tile work as an isolated task.
Before signing, request:
- Registration information: Verify the contractor's Massachusetts HIC registration.
- Insurance documentation: Confirm the coverage is current and relevant to the work.
- Comparable references: Speak with homeowners who hired the contractor for similar tile work.
- Product and preparation details: Get the proposed materials and substrate work in writing.
- Payment and warranty terms: Confirm milestones, final payment conditions, and how concerns will be handled.
You can also review this guide to flooring installation agreements while checking that your own agreement spells out the specific tile scope. A signed, detailed contract makes it easier to resolve a disagreement before it becomes a job-site standoff.
Caring for Tile After Install and Your Pre-Project Checklist
Don't use a newly tiled shower or floor until the installer confirms it's ready. Setting materials and grout need the cure time specified for the products and conditions. Ask for written care instructions at handoff, including when the room can take water or foot traffic and whether the tile, grout, or stone needs sealing.
Use cleaners suited to the material. Natural stone may need different products from ceramic or porcelain, and harsh or acidic cleaners can damage some surfaces. Follow the installer's product-specific sealing advice rather than applying a sealer by habit. For routine maintenance, use this practical guide to tile cleaning and sealing.
Bring this checklist to the contractor meeting
- Scope and schedule: Confirm demolition, disposal, other trades, delivery, and cleanup responsibilities.
- Substrate: Ask how the surface will be checked and what preparation is included.
- Wet-area details: Document the waterproofing assembly, corners, penetrations, drain work, slope, and any appropriate testing.
- Installation quality: Agree how mortar coverage will be checked and where movement joints belong.
- Finish choices: Confirm layout, grout-joint width, edges, and transitions with actual samples.
- Contractor checks: Verify registration, insurance, references, written scope, warranty, and payment milestones.
- Aftercare: Get cure-time instructions, approved cleaners, and a contact for concerns.
After handoff, call the installer if you notice loose tile, cracked grout, persistent moisture, or a joint that's separating. Don't automatically fill a movement joint with rigid grout or assume a cosmetic patch will fix the cause. Keep the contract, product details, and care instructions together so you can refer to the actual installation rather than guess.
If you're planning tile work in a bathroom, kitchen, backsplash, or high-traffic area, Sunny Day Pro Services provides tile installation and remodeling for porcelain, ceramic, marble, and granite in the Greater Boston suburbs. Bring your project details and questions about preparation, waterproofing, schedule, and finish work to Sunny Day Pro Services to request a quote and discuss the scope before work begins.

