
Tile Installation on Concrete: A Complete Homeowner's Guide
Learn tile installation on concrete with this practical guide covering prep, materials, and pro tips for a flawless, long-lasting finish.

You've got a bare concrete slab in front of you, maybe in a basement, garage, or a main-floor remodel, and the question is simple: can tile really go on this thing and stay put? It can, but only if the slab is ready for it. The difference between a floor that holds up and one that starts sounding hollow, cracking grout, or lifting at the edges usually comes down to moisture, flatness, and coverage, not just the tile you chose.
Tile on concrete is one of those jobs that looks straightforward until the slab starts telling the truth. Concrete moves as it cures, it carries moisture, and it can hide old sealers or curing compounds that make thinset lose its grip. When the prep is right, concrete is a strong, durable base for tile. When it's rushed, the floor can fail long before the tile itself wears out.
Table of Contents
Why Tile on Concrete Is Worth Doing Right
A homeowner usually starts with the same scene, a tired basement slab, a garage floor that's seen years of abuse, or a dated slab-on-grade room that needs a cleaner, harder finish. Tile makes sense there because concrete is already a solid, mineral base, and it can handle a finished floor without the flex you'd fight in a framed wood subfloor. The catch is that concrete isn't passive. It cures, shrinks, and sometimes passes moisture upward, which means the slab itself becomes part of the tile system, not just the thing underneath it.
Practical rule: if the slab isn't ready, the tile job isn't ready, no matter how good the tile looks in the box.
Where the slab earns its keep
For basements and garages, concrete gives you a surface that can support tile without the bounce and deflection common in wood framing. That's a real advantage, especially for porcelain, which is a practical choice where you want durability and lower maintenance. But the same slab that makes tile possible can also create risk if it's still curing or holding moisture.
Industry guidance commonly says new concrete should cure for 28 days before tile is installed, because by that point it has reached about 90% cure and much of its shrinkage has finished, according to the cure-time guidance from CTASC. That timeline matters because tile doesn't forgive movement the way a painted floor might. Some polymer-modified adhesives can shorten the window to about 14 days, but the 28-day benchmark is still the reference point installers use to reduce movement and bond failure risk, as noted in the same CTASC guidance.
Why the subfloor logic changes
Concrete tile work is less about “stick it down” and more about managing the slab. The floor has to be evaluated for moisture, flatness, and surface contamination before setting begins. Established guidance for concrete floors centers on clean, dry, patch, and level, and that's not just a slogan. It's the sequence that prevents most callbacks, especially in spaces where moisture or temperature changes are part of everyday life, like basements, garages, and entry areas. A slab can look solid and still be wrong for tile if it has sealers, curing compounds, or active movement joints in the wrong places.
That's why this kind of project fits a careful DIYer better than a guess-and-go approach. If the slab is old, dry, clean, and flat, a competent homeowner can usually manage the work with patience and the right tools. If the slab is young, stained, damp, cracked in a way that keeps changing, or out of flat enough to fight the tile size you picked, that's specialty territory.
Assessing and Preparing the Concrete Slab
The first mistake on concrete tile jobs is almost always skipping evaluation and going straight to mortar. Professional guidance treats the slab in four passes, clean, dry, patch, and level, because each one supports the next. If the floor isn't clean, nothing bonds correctly. If it isn't dry, bond failure is only a matter of time. If cracks or holes stay open, the tile bridges defects that later show up at the surface. If the slab isn't flat, lippage and hollow spots show up fast.

The four checks that matter
Start with a moisture test. A simple plastic sheet test can tell you whether obvious vapor is still moving through the slab, and a calcium chloride kit is the next level when you need a more serious read on the floor's condition. You're looking for a slab that behaves like a finished substrate, not one that keeps feeding moisture into the tile assembly.
Flatness comes next. Tile-setting standards call for checking slab flatness at 1/4 inch in 10 feet for standard tile and 1/8 inch in 10 feet for large-format tile with an edge length of 15 inches or more, according to the National Tile Authority guidance. That tighter requirement is where many DIY jobs get into trouble, because big tiles don't hide waves. If the slab needs correction, installers usually reach for a self-leveling compound, grinding, or both, depending on the high and low spots.
A short practical checklist looks like this:
- Clean first: remove dust, paint, adhesive residue, and any loose debris that keeps mortar from keying into the slab.
- Dry next: confirm the floor isn't actively pushing moisture upward before you cover it.
- Patch the defects: fill voids, cracks, and divots with the right repair material.
- Level the field: grind highs and float lows until the tile size you chose can sit without rocking.
What disqualifies a slab
Some slabs need more than patching. Tile installation methods over concrete emphasize that the surface must be free of curing compounds, sealers, and other surface treatments that interfere with adhesion, according to LATICRETE's technical guidance. That matters on older garages and basements where someone may have sealed the floor years ago for dust control. If that layer is present, thinset can't bond the way it should.
Cracks also need a sober look. Hairline shrinkage cracks can sometimes be managed with the right prep, but active movement cracks are different. Those need to be treated as movement issues, not cosmetic flaws. A tile floor over a moving slab is a floor that's already negotiating failure.
For homeowners who want a deeper look at why rigid tile layers need a compatible base, the differences between tile backer systems and direct slab work are worth reading in this guide to tile backer board installation. On concrete, though, the slab itself is the substrate, and it has to earn that role before the first trowel of mortar goes down.
Choosing the Right Materials for the Job
Material choice on concrete is less about brand loyalty and more about matching the floor's conditions. A dry interior slab in a finished room doesn't call for the same setup as an exterior patio or a damp basement. Thinset, membrane, and tile format all need to work together, or one weak link starts telegraphing through the whole floor.
Matching products to conditions
For many interior concrete floors, a quality modified thinset is the practical default because it gives good grab and helps bridge the normal realities of tile work. Wet areas and exterior work raise the bar. Industry guidance for exterior or wet-area installations calls for at least 95% mortar coverage between the tile and the substrate, with coverage distributed evenly to support edges and corners, and one installation guide notes that 100% bonding coverage is desirable while 95% is the minimum for exterior work, according to Custom Building Products' exterior installation guidance. That coverage target changes how you choose mortar and how hard you work the tile into it.
A crack-isolation membrane becomes more valuable when the slab has existing crack history or you're working with a tile size that won't forgive minor movement. It doesn't make a bad slab good, but it can help decouple the tile layer from small stresses that would otherwise print through. The membrane decision is about risk management, not wishful thinking.
Here's a simple way to think about the stack:
| Location / Condition | Thinset Type | Membrane Needed | Coverage Target |
|---|---|---|---|
| Dry interior slab, minor traffic | Modified thinset suited to the tile | Optional if the slab is sound | Full, even contact |
| Basement with old cracks or moisture concerns | Modified thinset matched to the membrane system | Often helpful for crack control | Full, even contact |
| Exterior patio or wet area | Mortar chosen for exterior use | Frequently part of the assembly | **95% minimum**, ideally more, per [Custom Building Products](https://www.custombuildingproducts.com/media/61571167/WP145_Exterior_Installations_10-20.pdf) |
Tile format changes the plan
Tile size matters as much as location. Large-format tile needs a flatter slab and more careful mortar contact than smaller tile, because a bigger body bridges flaws instead of hiding them. Large-format work commonly needs back-buttering, and one technical manual states that for large-format panels or tiles, adhesive should be applied on both the slab and the back surface of the tile to achieve sufficient coverage, according to the BCA manual.
That extra mortar contact is also where the tile type itself matters. Ceramic can be forgiving in some spaces, while porcelain is the workhorse for busier areas. Natural stone can look exceptional, but it asks more from the installer and from maintenance. If the room gets heavy use, the right choice is usually the tile that can be supported properly, cleaned easily, and kept within the slab's limits.
For more detail on matching finish, traffic, and upkeep, this article on high-traffic tile flooring lines up well with the decisions that matter on concrete.
Tools and Safety You'll Need on Site
A concrete tile job goes smoother when the right tools are already on hand. A wet saw with a diamond blade is the center of the cutting setup, because porcelain and dense tile chip fast on cheap blades. Add a margin trowel, the correct notched trowel for the tile size, a 4-foot level or straightedge, a mixing drill with paddle, spacers, a rubber grout float, buckets, a sponge, and a solid knee pad set. That's the working kit, not the wish list.

What earns a place in the kit
The wet saw is worth renting if you're only doing one room. The same goes for a grinder if the slab needs local flattening or old material removal. Buy the small tools that save time on repeat tasks, like spacers, floats, and good buckets. The trowel size has to match the tile and the mortar bed you're trying to build, because poor notch selection leads to weak coverage and uneven set.
A practical tool list looks like this:
- Cutting gear: wet saw with diamond blade, plus a grinder only if the slab needs corrective work.
- Setting gear: notched trowel, margin trowel, mixing drill, paddle, and spacers.
- Checking gear: straightedge, level, tape measure, and chalk line.
- Finishing gear: grout float, sponge, clean buckets, and microfiber towels.
Safety isn't optional on concrete
Concrete work creates silica dust when you cut or grind it dry, and that dust is a serious hazard. Use eye protection, hearing protection, and respiratory protection when the job calls for grinding or heavy cutting. Tile edges can also be sharp enough to nick hands fast, especially on porcelain cuts. Knee protection matters too, because tile work keeps you low for longer than most homeowners expect.
Practical rule: if you're dry-cutting concrete or grinding a slab, treat the dust like a job hazard, not a cleanup issue.
The safest way to work is to control the mess before it starts, keep your cuts wet where possible, and never assume a quick trim is harmless. The floor doesn't care if you're rushing. Your knees, lungs, and eyes will.
Laying Out, Setting, and Grouting the Tile
A clean tile floor starts with dry layout, not mortar. Snap the centerlines, test the room, and shift the grid if needed so you don't end up with a sliver cut at the most visible wall. On a concrete slab, that planning step matters even more because your setting margin is smaller when the surface has to stay flat and the tile size is less forgiving.
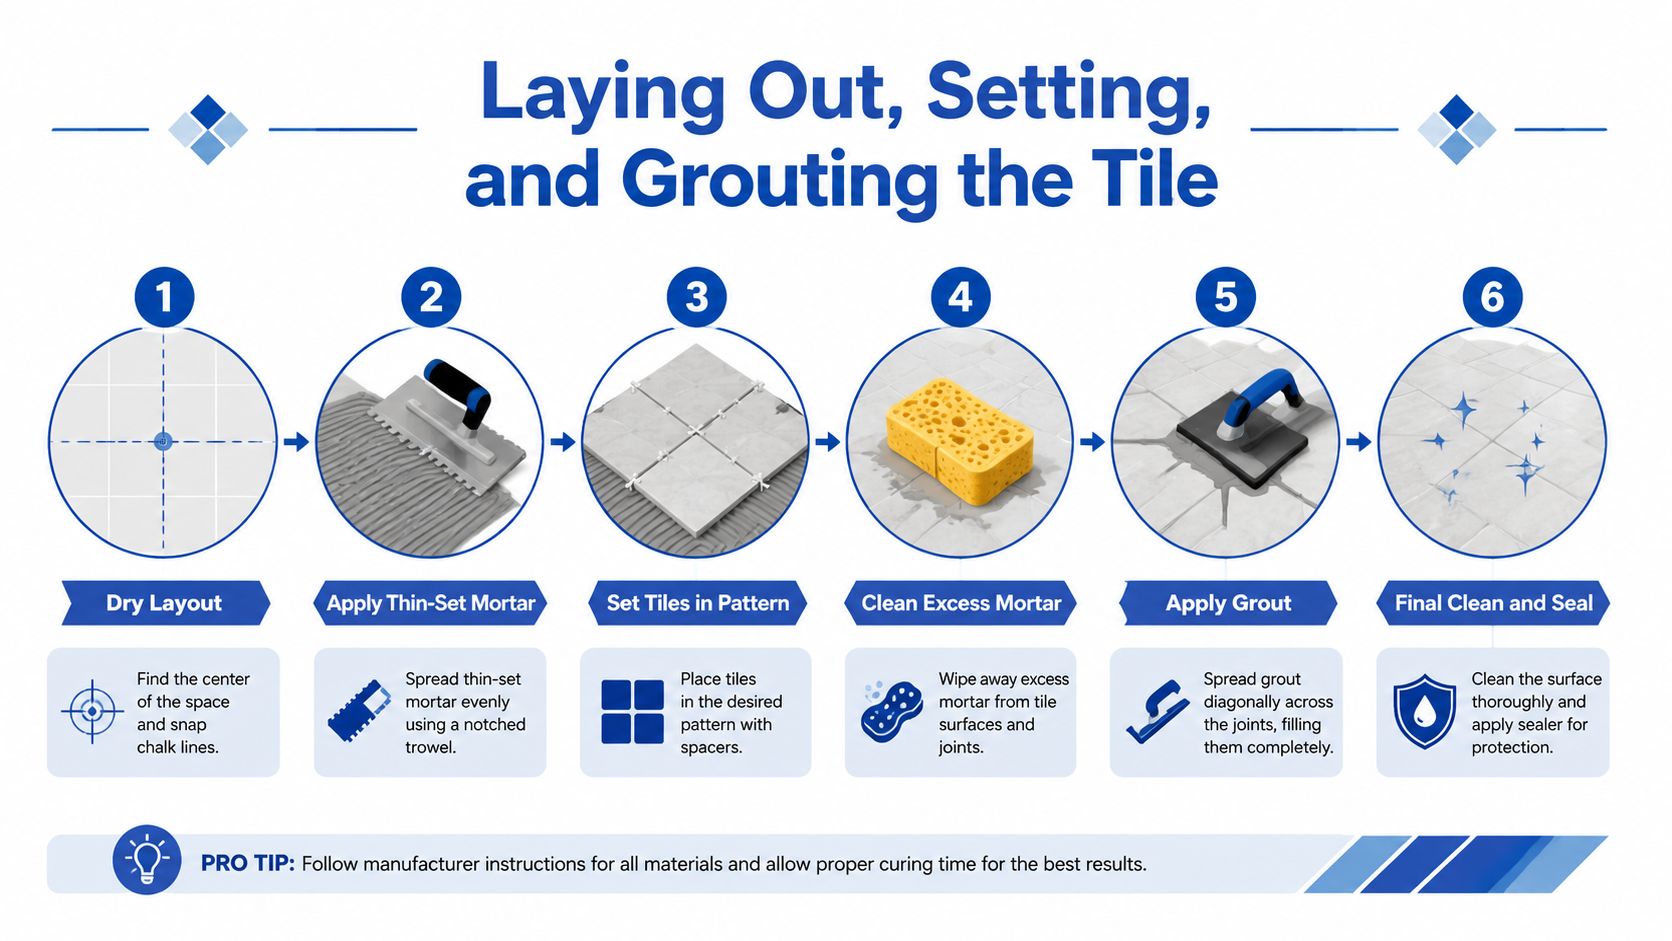
Layout before mortar
A dry layout shows you where the cuts land, how the pattern reads through doorways, and whether the grout lines look balanced against the room. That's especially important in long rooms and basement spaces where a crooked start shows up right away. If you're working with large-format tile, the layout also tells you where the slab needs the most attention before a single piece is set.
When you mix mortar, aim for a workable, creamy consistency that spreads without slumping. Then comb it in one direction with the right notch, because random swirl patterns trap air and weaken coverage. For large-format tile, back-buttering is not a luxury. It's how you build the contact needed to keep edges supported and reduce hollow spots.
Setting, grouting, and movement joints
Press each tile in firmly, then twist slightly to collapse the ridges and check for even contact. A straightedge helps you catch lippage before the mortar skins over. If a tile wants to sit high, fix it then, not after the row is complete.
The practical timing for grout is straightforward. After setting, thinset is typically left to cure about 24 hours before grouting, according to DG Floors' tile-over-concrete guidance. That waiting period gives the mortar time to stabilize before grout joints are packed and cleaned.
Concrete floors need movement space. Skip the perimeter gap, and the tile can tent, crack, or push against the walls as the slab changes with temperature and moisture.
Movement joints and perimeter expansion gaps are the part many homeowners don't see, but they matter a lot. Concrete expands and contracts, and tile needs room to live on top of that movement. Grout isn't a substitute for movement accommodation. If the floor is locked tight against every wall and cabinet base, stress has to go somewhere, and it usually goes into the tile.
Troubleshooting the Problems Tile on Concrete Is Known For
Most concrete tile failures are not mysterious. They usually trace back to one of four things, moisture, movement, poor flatness, or inadequate coverage. That's why the symptoms are so useful. They tell you which part of the installation got ignored.
Reading the failure pattern
If tiles release from the slab, the first suspect is almost never “bad tile.” It's usually prep or moisture. A slab that wasn't dry, wasn't cleaned properly, or still had a bond-breaking surface treatment under the mortar will eventually let go. That failure often starts small and spreads when foot traffic and temperature changes keep working the weak bond.
Grout cracking at transitions usually points to missing movement accommodation. The floor may have looked fine at first, but if the perimeter and transitions were locked too rigidly, the slab's normal movement had nowhere to go. Efflorescence haze on grout joints often means moisture is migrating up through the slab and carrying salts with it. You can clean the symptom, but if the moisture source stays active, the haze returns.
Lippage on large-format tile is usually a coverage or flatness problem. The slab wasn't flat enough, or the mortar contact wasn't consistent enough to hold adjacent tiles at the same plane. That's where the earlier flatness numbers and back-buttering advice earn their keep. Big tile doesn't hide a sloppy substrate. It exposes it.
A short field check helps when a floor starts talking back:
- Hollow sound underfoot: often points to coverage gaps or weak bonding.
- Cracked grout at edges or doorways: often means a movement joint was left out.
- White residue on joints: moisture may be migrating through the slab.
- Raised corners or tented tile: expansion room was too tight or the slab was locked in.
The fix depends on what failed, but the prevention is usually the same. Respect moisture, flatten the slab, hit the right mortar coverage, and leave the movement space the floor needs.
Care, Maintenance, and When to Call a Pro
A tile floor on concrete lasts longer when the cleaning routine matches the material. Neutral-pH cleaners are the safe default because acidic products can etch grout and wear down sensitive finishes. Grout and natural stone may also need periodic sealing, while porcelain generally asks for less maintenance. Heavy furniture should sit on felt pads, because one dragging leg can chip a grout line or tile edge faster than most homeowners expect.
For a deeper maintenance routine, this guide on tile cleaning and sealing fits the same practical mindset. The goal is simple, protect the surface without creating new problems through harsh cleaners or neglect.
When the job deserves a pro
Some slabs are better left to an installer who handles these problems every day. Widespread cracking is a warning sign, especially if the cracks appear active or keep reappearing after patching. Active moisture wicking is another. If the slab keeps pulling moisture from below, the floor needs a system that addresses that condition instead of covering it up.
Large-format tile is also where mistakes get expensive quickly. A small coverage miss on a tiny tile might never be seen, but the same miss on a big tile can turn into a hollow sound, lippage, or failure. Significant slope is another pro-level issue, because you can't just “make up” a bad slab with mortar and hope the floor stays flat.
FAQ
How long should concrete cure before tile goes down?
The standard reference is 28 days, according to CTASC. Some polymer-modified adhesives can shorten that in certain cases, but the 28-day mark is still the safest benchmark.
Can you tile a basement slab?
Yes, if the slab is dry, clean, flat, and free of surface treatments that block adhesion. Moisture testing matters more in basements than in many other rooms.
How soon can you grout after setting tile?
Thinset is typically left about 24 hours before grouting, based on DG Floors' guidance.
What's the biggest mistake on concrete tile work?
Rushing prep. If the slab is wet, uneven, or contaminated, the tile rarely makes up for it.
Sunny Day Pro Services installs tile for homeowners who want the slab prepped correctly and the finished floor built to last, not just look good on day one. If you're planning tile installation on concrete in Wayland, Newton, Needham, Wellesley, Weston, or a nearby Massachusetts town, visit Sunny Day Pro Services to request a quote and get expert help with the kind of floor that holds up.

