
A Pro's Guide to Tile Installation Steps in 2026
Master the tile installation steps with our expert guide. From surface prep to final grout, learn how to get a professional finish that lasts.
A great tile job is built on a solid foundation. While everyone gets excited about laying the tile and seeing the pattern come together, the real make-or-break work happens long before you even open a box of thin-set. It all boils down to preparing your surface, mapping everything out, setting the tile, and finishing with grout and sealer. If you get these tile installation steps right, your floor will look fantastic and last a lifetime.
Table of Contents
- Applying and Cleaning Grout Correctly
- Curing and Sealing for Long-Term Protection
- Knowing When to Call a Professional Tile Installer
- How Long Does a Full Tile Installation Take?
- Can I Just Tile Over My Existing Tile Floor?
- What Are the Most Common DIY Tile Installation Mistakes to Avoid?
Step 1: Building the Foundation for Flawless Tile
I can't stress this enough: the most critical part of any tile project is the surface you're tiling over. Any shortcuts you take here will come back to haunt you, showing up as cracked tiles or uneven grout lines down the road. A poor foundation will always telegraph its flaws right through to the finished floor.
Think of it this way—the time you spend getting the subfloor perfectly prepped is an investment in preventing future headaches and costly repairs.
Remove Obstructions and Clean the Subfloor
First things first, clear the room completely. Then, get your pry bar and carefully work your way around the room, removing all the baseboards and any door trim. This gives you clean, open access to the entire perimeter.
With the trim out of the way, it's time to get obsessive about cleaning. Grab a shop vac and go over the subfloor until every last bit of dust, dirt, and construction debris is gone. Anything left behind can compromise how well your mortar bonds.
Next, get down on your hands and knees and really inspect the surface. Run your hand over it and use a long, straight level to find any high spots or low spots. Even a small dip can cause a tile to rock, which eventually leads to cracks or frustrating lippage (when one tile sits higher than its neighbor). Finding and fixing these issues now is the difference between an amateur job and a professional one. For a closer look at what goes into a proper substrate, our guide on tile backer board installation is a great resource.
Level the Surface and Create an Expansion Gap
From my experience, rushing the prep work is the number one reason DIY tile jobs fail. A seasoned pro will spend a good 20 to 40 minutes per 100 square feet just on patching and leveling the floor. It’s no surprise that jobs with proper prep see a 95% satisfaction rate for durability, compared to a measly 60% for rushed projects. You can see these standards reflected in professional guidelines, like those found by reading about installation best practices on Daltile.com.
Pro Tip: One small detail that makes a huge difference is the expansion gap. You absolutely must leave a 1/4-inch gap between your tile and the walls. This space allows for the natural movement of the house through the seasons, preventing pressure from building up and cracking your beautiful new tiles.
Step 2: Mapping Your Layout and Mixing Mortar Like a Pro
The difference between a floor that looks professionally done and one that screams "DIY job" often comes down to the layout. It's a classic rookie mistake to start tiling right up against a wall. It seems logical, but walls are rarely perfectly straight. If you do this, you’ll end up with a weird, tapered sliver of a tile on the opposite side of the room, which immediately draws the eye for all the wrong reasons.
Here's how the pros avoid that amateur look: we find the room's true center. Forget the walls for a moment. Just measure the length and width of your space, find the halfway point for each, and snap chalk lines across the floor. Where they intersect is your starting point. This grid ensures that any tiles you have to cut along the edges will be roughly the same size, giving the entire room a balanced, symmetrical feel.
Mixing Your Mortar to Perfection
With your grid lines snapped and ready, it's time to mix the thin-set mortar. Getting the right consistency here is absolutely critical. You're aiming for a thick, creamy texture—think smooth peanut butter. When you pull your trowel out of the bucket, the mortar should be firm enough to hold a peak without slumping over.
Pro Tip: One of the most important—and most often skipped—steps is letting the mortar slake. After you've done the initial mixing, just let the bucket sit for about 5 to 10 minutes. This rest period allows the chemicals in the mix to fully activate and the water to absorb completely, which makes for a much stronger and more reliable bond.
After it has slaked, give it one final, quick stir, and you’re ready to get to work. If you're looking for more details on choosing the right materials for your project, our porcelain tile installation guide has you covered.
The Correct Troweling Technique
How you spread the mortar is just as crucial as how you mix it. Grab your notched trowel and hold it at a firm 45-degree angle to the floor. Comb the mortar in one direction to create clean, standing ridges. This isn't just for looks; this technique is essential for achieving the 85% to 90% adhesive coverage needed for a lasting installation. Without it, you'll create hollow spots under the tiles that can lead to cracks down the road. For some more great tips, you can review the DIY guidance from the experts at Best Tile.
This infographic lays out the crucial prep work that has to happen before you even open a bag of mortar.
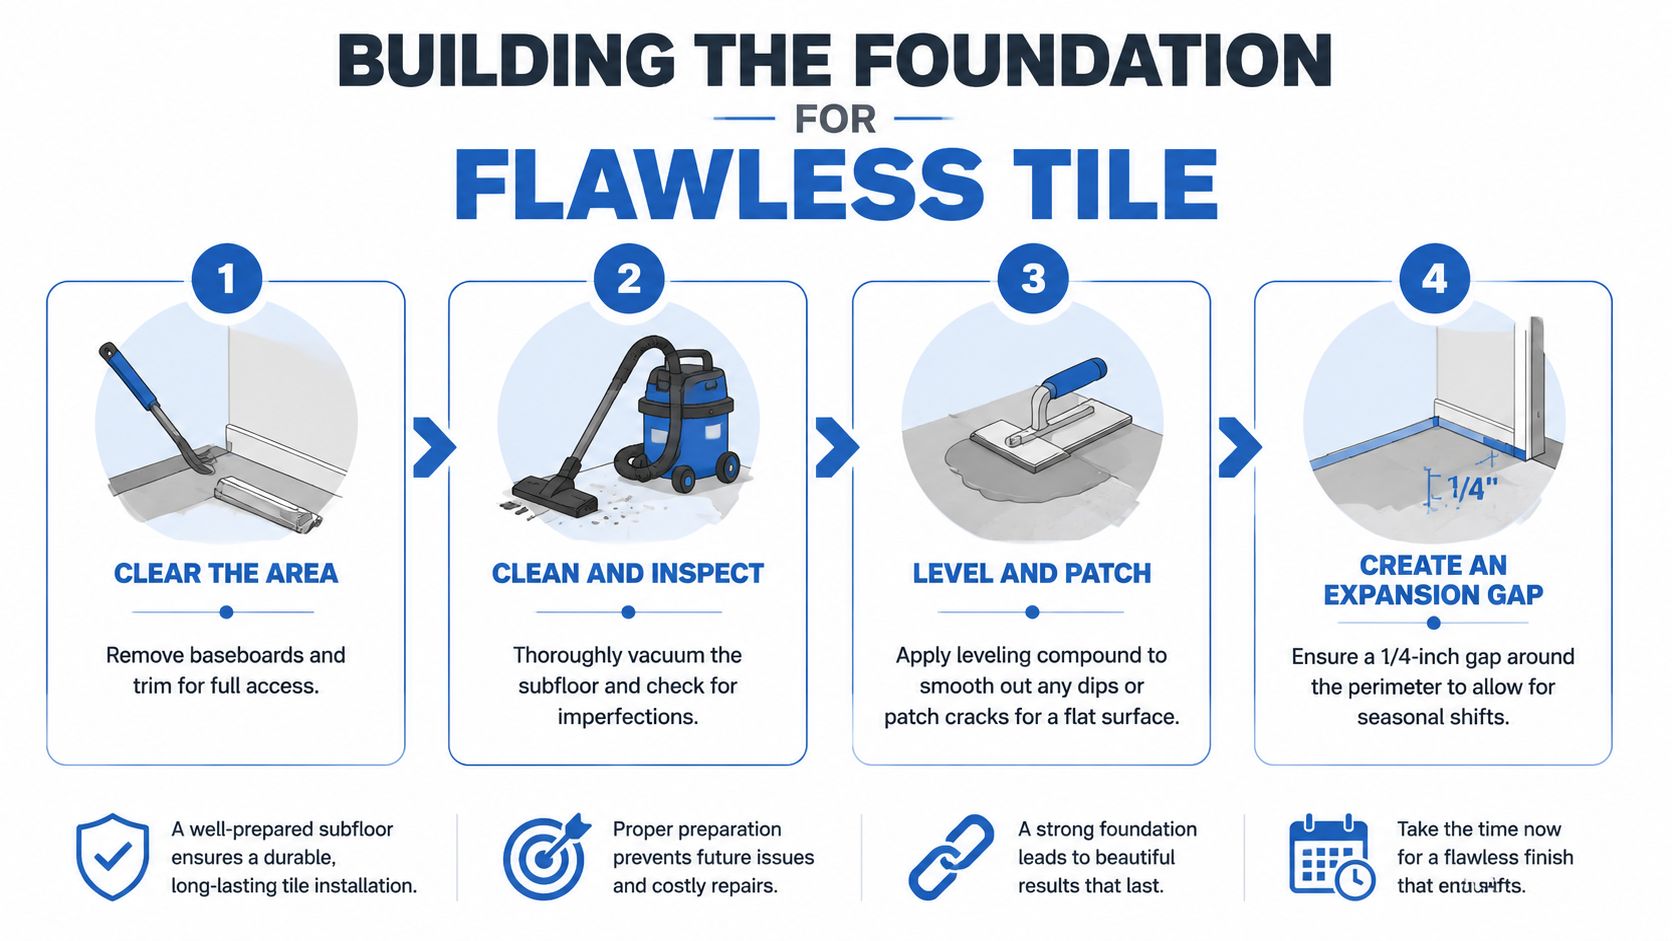
As you can see, a perfect finish starts long before the first tile is set. Clearing the space, cleaning the subfloor, ensuring it's level, and creating an expansion gap are the non-negotiable steps that pave the way for a perfect layout.
Finally, always follow the "15-minute rule." Only spread as much mortar as you can comfortably set tiles on in about 15 minutes. If you work in small, manageable sections like this, you'll prevent the mortar from skinning over and losing its bonding power before you can get the tile down.
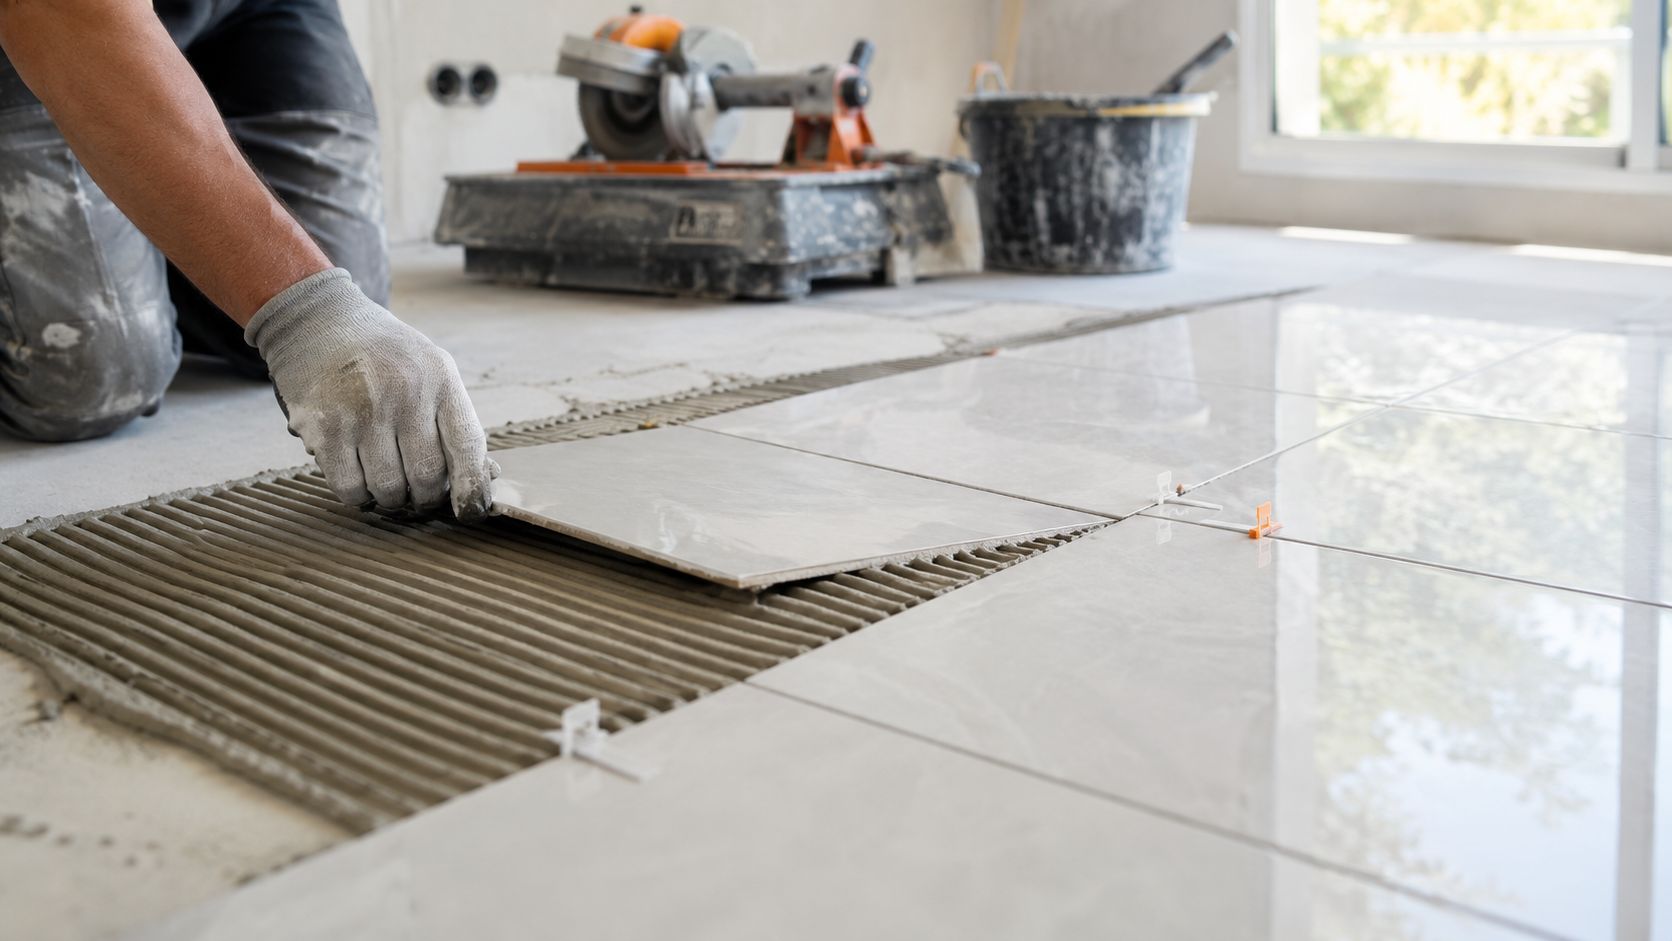
Step 3: How to Set, Cut, and Space Your Tiles
With your layout lines snapped and a fresh batch of mortar mixed, it's time to start laying tile. This is the moment all that prep work really pays off, turning your plan into a beautiful, durable surface.
Grab your first tile and press it firmly into the mortar bed. Give it a slight wiggle back and forth as you push down. You'll feel the ridges of mortar underneath collapse—that’s exactly what you want. This motion ensures the tile is fully supported, which is key to preventing hollow spots that can lead to cracks down the road.
For any tiles larger than 12x12 inches, I can't stress this enough: you have to back butter. This just means spreading a thin, even coat of mortar on the back of the tile itself before setting it in place. It guarantees complete adhesion, which is especially critical for large format tiles.
Making Precise Cuts
It’s a rare day when a room is a perfect fit for your tiles. Inevitably, you'll need to make cuts to fit along walls and around obstacles. Your choice of tool will come down to the tile you're using and the cut you need to make.
| Tool | Best For | Pro Tip |
|---|---|---|
| Score-and-Snap Cutter | Straight cuts on standard ceramic and some softer porcelain tiles. | Fast, produces almost no dust, and is surprisingly easy to use once you get the hang of it. My go-to for most jobs. |
| Wet Tile Saw | Tough materials like dense porcelain, glass, or any natural stone. | Essential for tricky L-shaped or U-shaped cuts you'll need for corners, pipes, or outlets. |
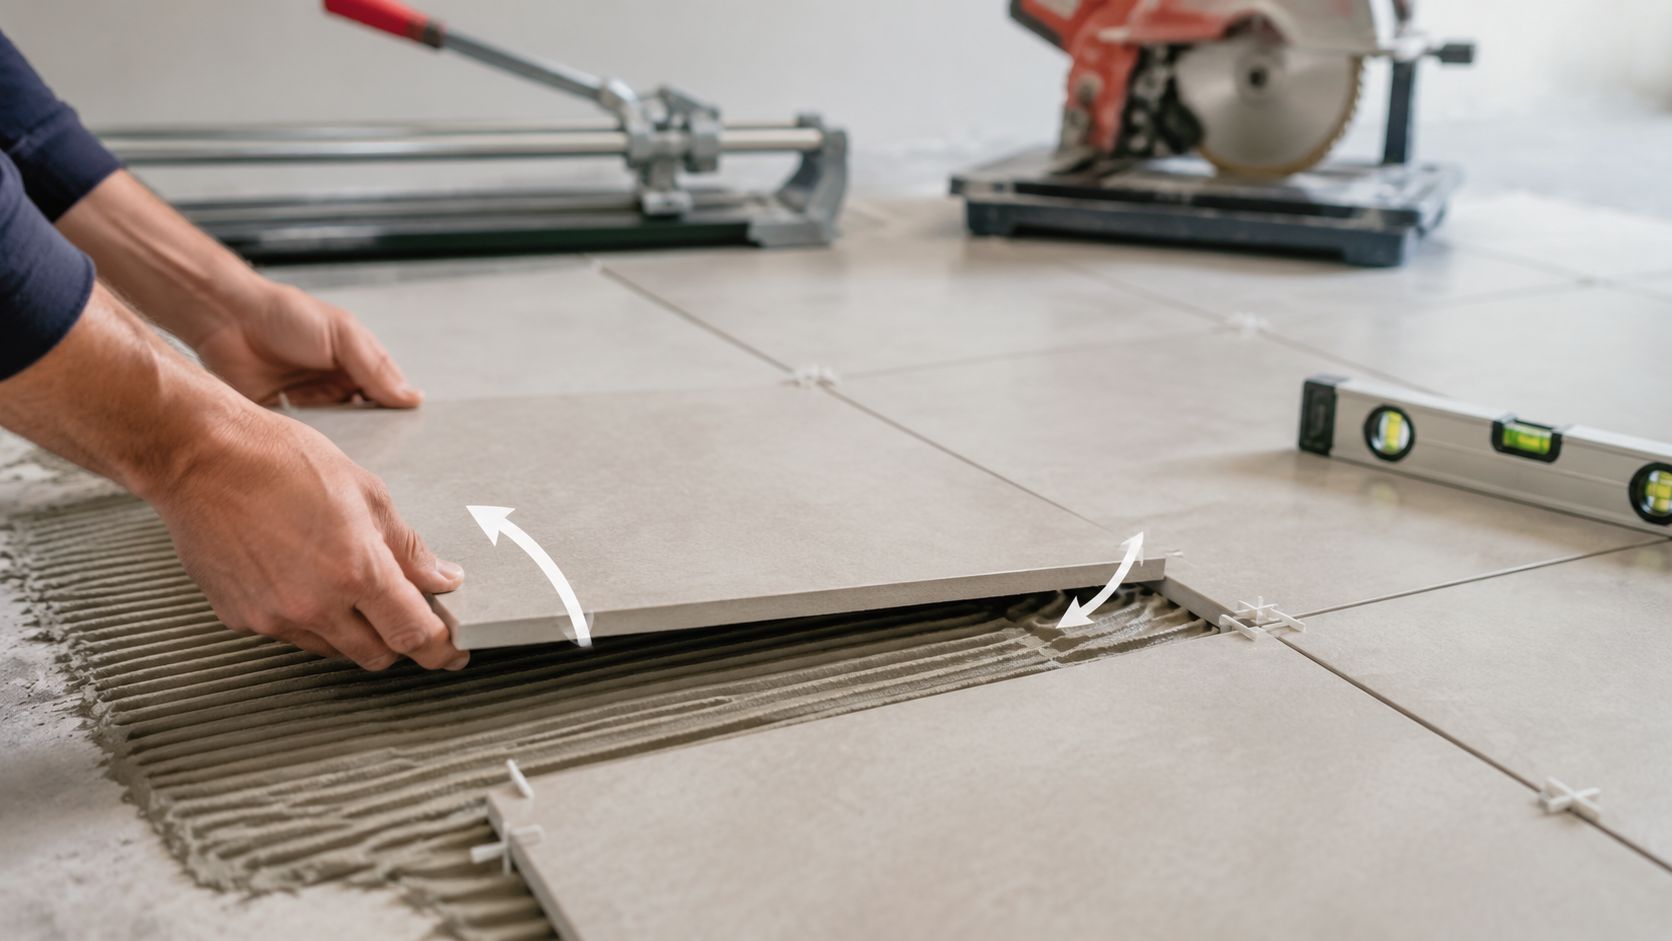
The Importance of Spacers and Leveling
As you place each tile, don't forget to insert your tile spacers at the corners right away. These little plastic crosses might seem tedious, but they are the secret to perfectly straight, uniform grout lines—the true mark of a professional-looking job.
Pro Tip: Keep a level nearby and check your work constantly. Don't just check one tile; lay the level across several tiles at once to feel for "lippage," which is any difference in height between them. If a tile sits too low, just pull it up and add a bit more mortar. If it's too high, a few gentle taps with a rubber mallet will settle it down.
Trust me, making these small adjustments while the mortar is still wet is infinitely easier than trying to fix an uneven tile later. This same attention to detail applies to vertical projects, too, which we dive into in our guide on how to install a kitchen backsplash.
Step 4: Finishing Your Project with Grout and Sealant
You’ve laid the last tile, and your floor is finally starting to look like the real deal. It's tempting to jump right into the final steps, but trust me on this: grouting and sealing are what separate a decent DIY job from a truly professional one. This isn't just about filling the gaps; it's about locking everything in place and protecting your hard work for years to come.
First things first: step away from the tile. The mortar underneath needs at least a full 24 hours to cure before you should even think about mixing your grout. I've seen too many projects compromised because someone got impatient. Grouting too early can shift the tiles, mess up your perfect lines, and weaken the entire installation.
Applying and Cleaning Grout Correctly
Once your mortar is fully cured, it's time to grout. Mix the grout to the consistency of smooth peanut butter, following the bag's directions precisely.
Grab your rubber grout float and scoop up a generous amount. The trick is to hold the float at a 45-degree angle and sweep it diagonally across the tiles. Pushing diagonally ensures you pack the grout firmly into the joints without pulling it back out as you move. Scrape the excess off the tile faces as you work.
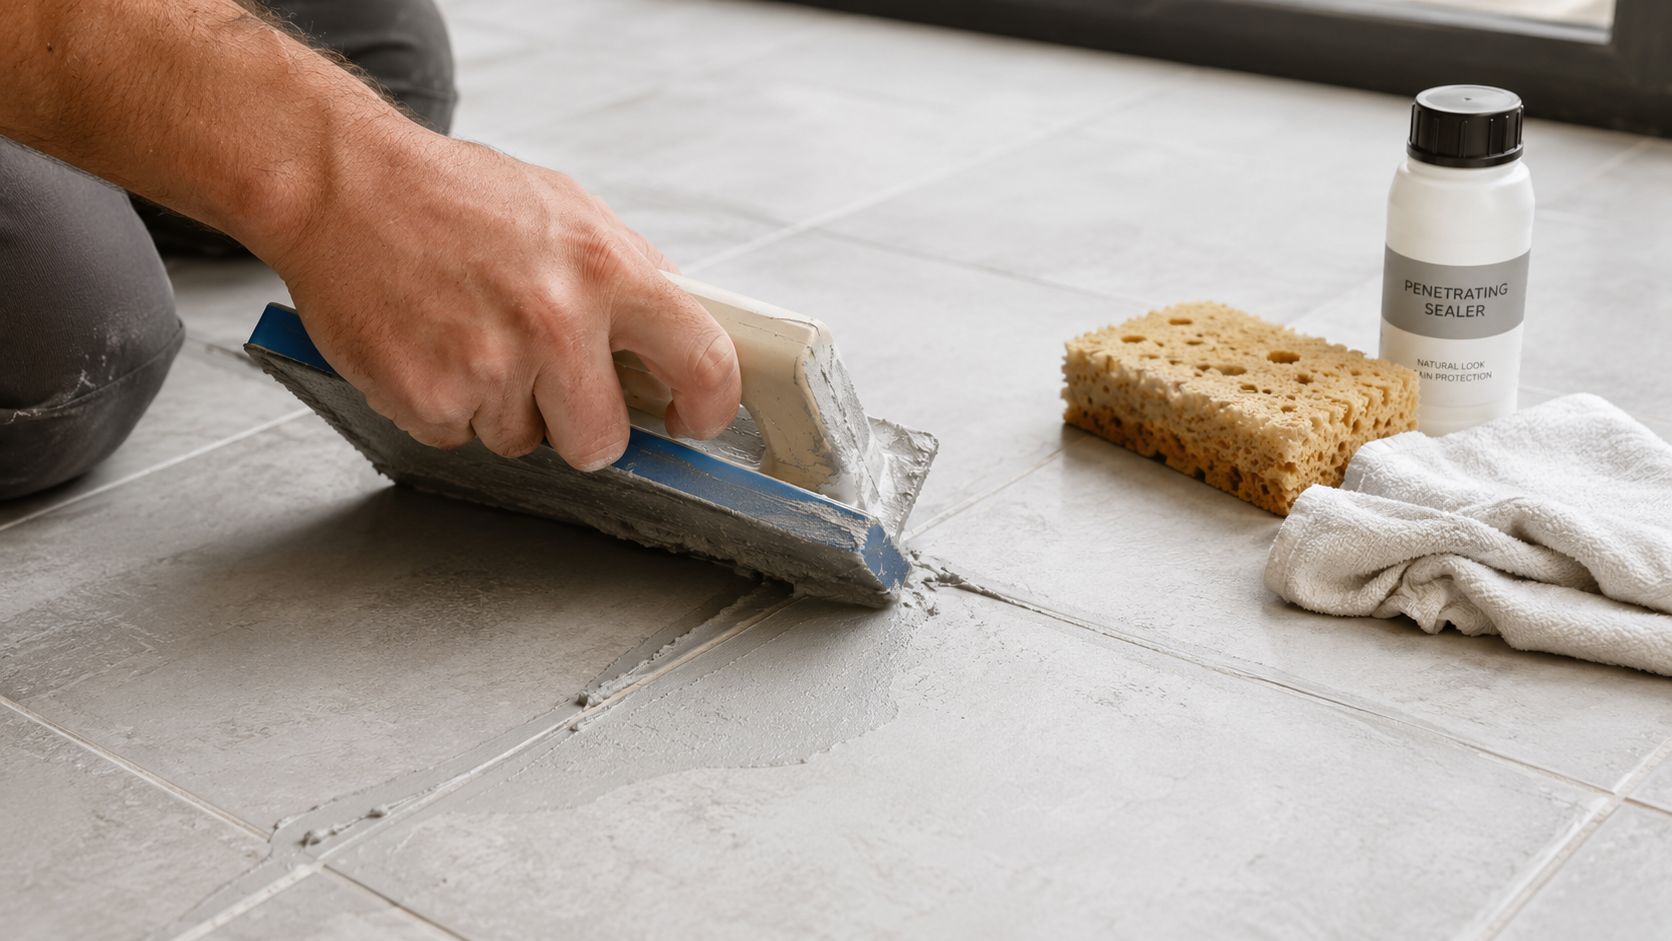
Now comes the part that requires a bit of feel. Let the grout set for about 15 to 30 minutes. It should be firm to the touch, not gooey. Then, take a damp (not soaking wet!) grout sponge and gently wipe the excess off the tiles. Use light pressure and rinse your sponge often in a separate bucket of clean water. If you press too hard, you’ll pull the grout right out of the joints you just filled.
Curing and Sealing for Long-Term Protection
Your floor needs to cure again after grouting, so keep everyone off it for at least 48 to 72 hours. Walking on it too soon is a major cause of uneven grout lines—I’ve seen studies suggesting it can lead to a 40% higher incidence of issues. For a deeper dive into the final stages, you can find more details about tile installation steps on Lowes.com to see how it all comes together.
Pro Tip: You’ll probably notice a light white film on your tiles after the grout has dried. Don't worry, that's just "grout haze," and it's completely normal. Once the grout is fully cured, you can easily buff it off with a dry microfiber cloth or a dedicated haze remover.
The last real step is sealing the grout. Wait until it has completely cured—the manufacturer’s instructions will give you a precise timeline, but it's often at least 72 hours. Use a small applicator brush to apply a quality penetrating sealer directly onto the grout lines. This tiny step is a game-changer, protecting the porous grout from stains and moisture. A good sealing job can add up to 10 years to the life of your new floor.
Knowing When to Call a Professional Tile Installer
There’s a special kind of pride that comes with stepping back and admiring a project you’ve completed yourself. But with tiling, it's crucial to be honest about where that DIY spirit ends and a potential headache begins. Knowing your limits isn't just smart—it can save you a lot of time, money, and frustration.
So, when should you call a professional? Start by looking at the complexity of your design. If you’re dreaming of an intricate herringbone or chevron pattern, remember that these designs live and die by dozens of perfect, angled cuts. One bad measurement can throw off the entire look. The same goes for large-format tiles, which are anything over 15 inches. They are incredibly heavy, a real challenge to set perfectly level, and unforgiving if you don't get complete mortar coverage on the back.
For homeowners in the Wayland, Newton, or Needham areas, tackling a complex project like this is the perfect time to call in an expert. Trusting a local professional like Sunny Day Pro Services ensures you get that flawless finish without the DIY guesswork.
Here are a few other red flags that signal it's time to hire a pro:
- Your Materials: If you've invested in expensive natural stone like marble or slate, don't risk it. These materials are often delicate, easy to stain, and require specialized tools and sealants. A single mistake can be costly.
- Heated Floors: Installing in-floor heating systems is a technical job. The wiring and installation have to be perfect before any tile goes down, because fixing a mistake after the fact is a nightmare.
- A Troublesome Subfloor: Are you dealing with a floor that's seriously sloped or uneven? While minor issues can be patched, significant leveling jobs require skills and equipment that most homeowners simply don't have.
Ultimately, hiring a professional isn't admitting defeat. It's a strategic move to protect your home and your investment, guaranteeing a beautiful result that will last for years.
FAQ: Common Questions About Tile Installation Steps
If you're thinking about installing new tile, you probably have a few questions. That's a good thing! Thinking ahead is the key to a great result. Here are answers to some of the most common things homeowners ask us about the tile installation steps.
How Long Does a Full Tile Installation Take?
This is the big one, isn't it? For a professional crew working in a standard 100 sq. ft. space, like a bathroom or laundry room, the entire job usually takes 2-3 days. That timeline covers everything—prepping the surface, setting the tile, and grouting.
If you're tackling this as a DIY project, it's smart to set aside more time. Expect it to take 4-5 days, maybe even longer, depending on your experience and the complexity of the cuts. And remember, no matter who does the work, the floor needs to cure. You must wait a final 48-72 hours before walking on it or moving furniture back in.
Can I Just Tile Over My Existing Tile Floor?
We hear this question a lot, and while it's technically possible, it's something we almost never recommend. Laying new tile over old creates a thicker floor, which can cause real headaches with door clearances, transitions to other rooms, and even the height of your appliances.
More importantly, any issues with the old floor—like a hidden crack or a slightly loose tile—will eventually transfer to your brand-new installation, causing it to fail.
Pro Tip: It's always worth the effort to remove the old flooring. Starting with a clean, solid subfloor is the only way to guarantee a beautiful, long-lasting finish that won't give you problems down the road.
What Are the Most Common DIY Tile Installation Mistakes to Avoid?
Honestly, the most costly mistakes happen before the first tile is even set. Inadequate prep work is the number one culprit. This includes not getting the subfloor perfectly clean and level, mixing your mortar to the wrong consistency, or forgetting to leave an expansion gap around the perimeter of the room.
Another huge one is not getting enough thin-set on the back of the tile. This creates hollow spots underneath, and it's only a matter of time before those tiles crack under pressure.
Navigating all the steps of a tile installation can be tricky, but you don’t have to go it alone. For homeowners in Wellesley, Weston, and the surrounding towns who want a perfect, stress-free result, the team at Sunny Day Pro Services is here to help. Contact us today for a fast, professional estimate.

